Appointments: How to Schedule, Track, and Complete an Appointment
What it is
Section titled “What it is”The Schedule is where you book appointments for clients, track who has arrived, who didn’t show up, and who has been served. It’s also where you get started on opening a tab or starting the day’s visit. Everything that happens with a scheduled sleeve tattoo goes through here, from the booked appointment until the client leaves.
When to use it
Section titled “When to use it”- A client calls or messages to book a helix piercing for next week: open the Schedule and choose the tattoo artist, time, and service.
- The client arrives for their appointment: confirm their arrival, then generate a tab or start the visit from the appointment when they sit down.
- The tattoo artist has no openings for a walk-in, but you want to see what’s booked for today or this week: the Day/Week/Month view shows everything at a glance.
Before you start
Section titled “Before you start”This article covers the Scheduling screen. If you can’t find this menu, ask the studio owner to enable the Scheduling module for your type of business.
If you can’t create, edit, or cancel an appointment, ask the studio owner to give you access under Access → Profiles. There isn’t currently a “my appointments only” view—anyone with access to the Schedule can see all tattoo artists’ appointments, not just their own.
Step by step
Section titled “Step by step”Step 1 — View the schedule by day, week, or month
Section titled “Step 1 — View the schedule by day, week, or month”Use the Day / Week / Month buttons to switch views (on mobile, only Day and Month are available), and the arrows next to Today to move between time periods. Each appointment shows the client’s name, time, and service. The Search customer search field below shows only one client’s appointments, while the buttons with each tattoo artist’s name show or hide their column in the grid.
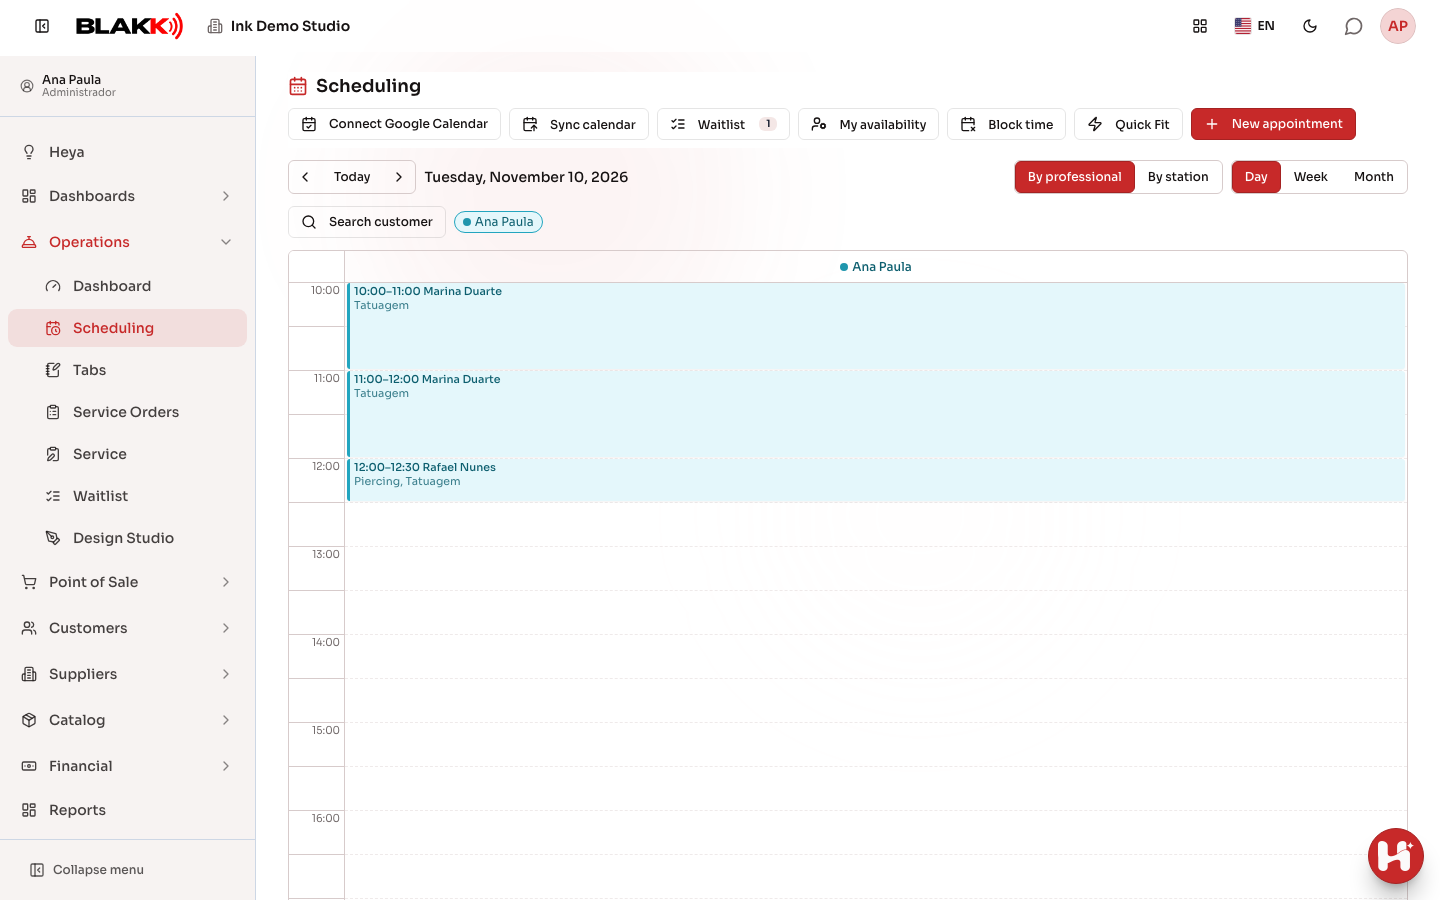
If your studio uses stations (chairs), the By station button changes how the grid is grouped. Instead of one column per tattoo artist, you’ll see one column per station.
Step 2 — Create a new appointment
Section titled “Step 2 — Create a new appointment”Click New appointment (on mobile, tap the + button next to the title). Choose the tattoo artist, the client (or quickly add them right there), the date, the Start, and how many Slots the appointment will take up—the system automatically displays the calculated end time. At least one service is required (Step 3), while Notes is optional. Click Save to book the appointment.
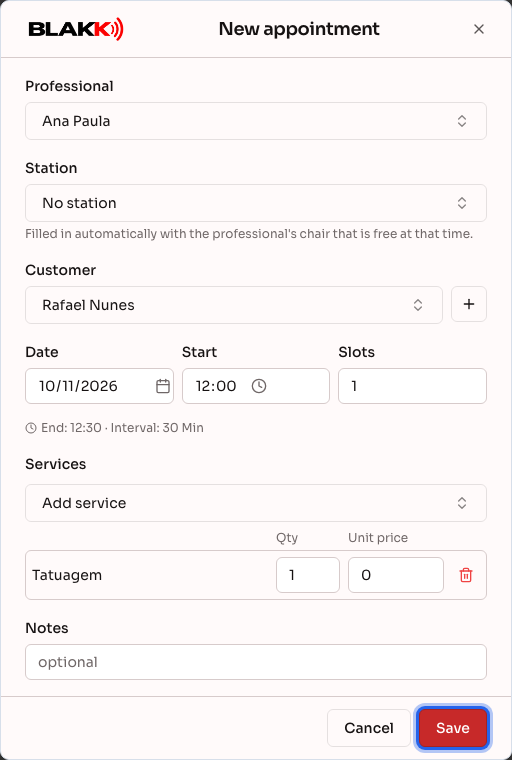
If there’s an available station for that tattoo artist at the chosen time, it’s selected automatically—you only need to change it if you want to.
The system won’t let you book over another appointment for the same tattoo artist, outside their availability, during a block on their schedule (Step 9), or on a company holiday. See also My availability in the related articles.
Step 3 — Add more than one service to the same appointment
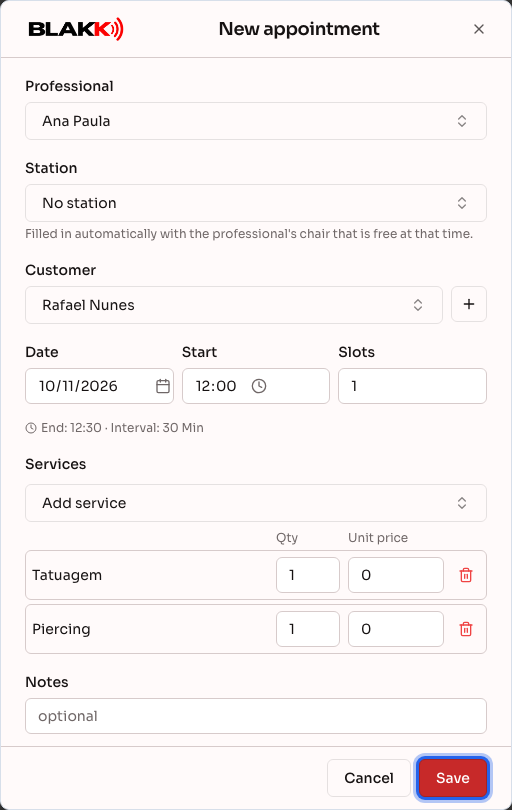
Section titled “Step 3 — Add more than one service to the same appointment”In the Services section, click Add service to add as many services as the client will receive during the same visit—for example, a sleeve tattoo and a helix piercing. The list only shows services on file; products only appear there if the business doesn’t have any services yet. Each row has Qty (quantity) and Unit price (unit price) columns, which you can adjust for that specific appointment. The price is shown in the business’s currency, with the symbol before the amount and two decimal places.
Step 4 — Confirm the client’s arrival
Section titled “Step 4 — Confirm the client’s arrival”When the client confirms they’ll be coming, open the appointment and click Confirm. The status changes from “Scheduled” to “Confirmed”—this is just a visual indicator and doesn’t lock anything. The button only appears while the appointment is “Scheduled.”
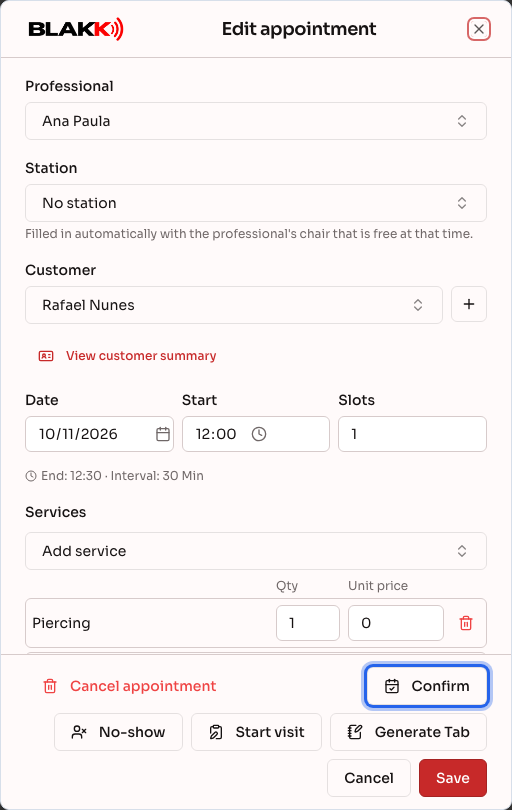
In a saved appointment, View customer summary (right below the client’s name) opens their summary: upcoming appointments, no-shows, what they’ve already had done, and what’s still open. This shortcut only appears when there are no unsaved changes to the appointment, so nothing gets lost if you leave it to view the summary.
Step 5 — Mark a no-show (and undo it if it was a mistake)
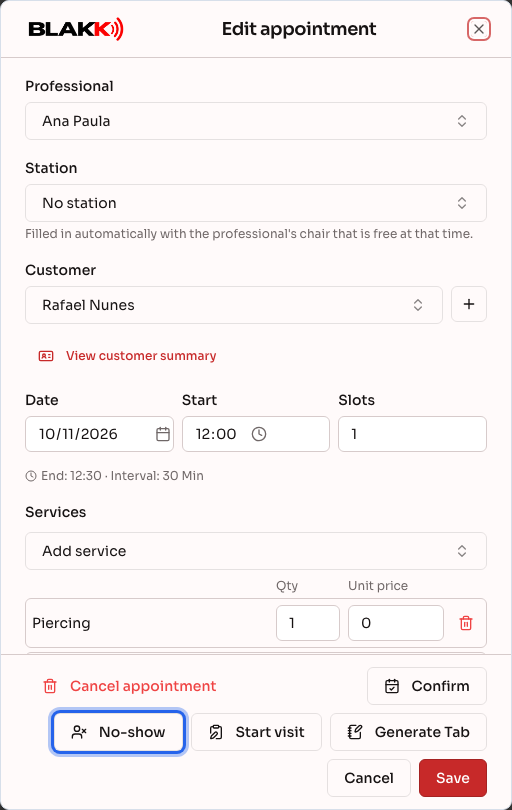
Section titled “Step 5 — Mark a no-show (and undo it if it was a mistake)”If the client doesn’t show up, open the appointment and click No-show. If they arrive late or you marked them as a no-show by mistake, the same appointment will show the Client arrived button, which returns the visit to its normal status.
Step 6 — Generate a tab from the appointment
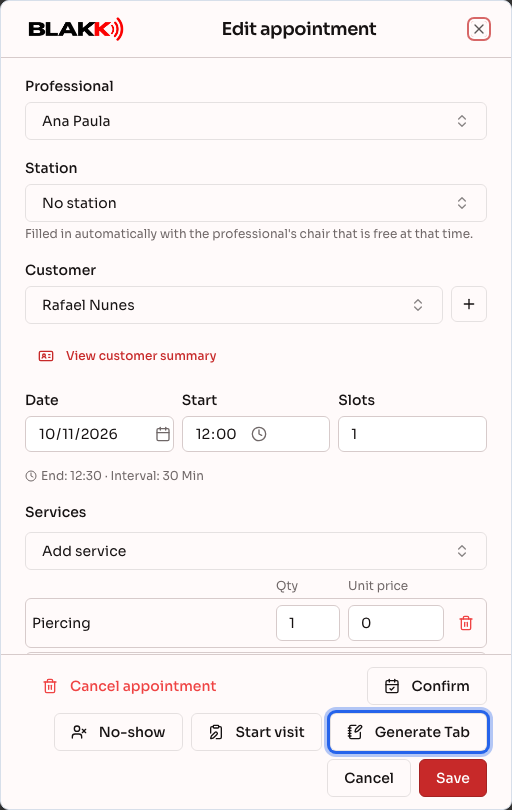
Section titled “Step 6 — Generate a tab from the appointment”When the client is in the chair, click Generate Tab. Any services already added to the appointment are automatically added to the tab at the agreed-upon price, and the appointment changes to “In progress” automatically—there’s no need to confirm the client’s arrival separately. The tab opens right away over the Schedule so you can add items or take payment. After that, the appointment shows the tab number (Tab #N); click it to reopen the tab.
Step 7 — Start the visit from the appointment
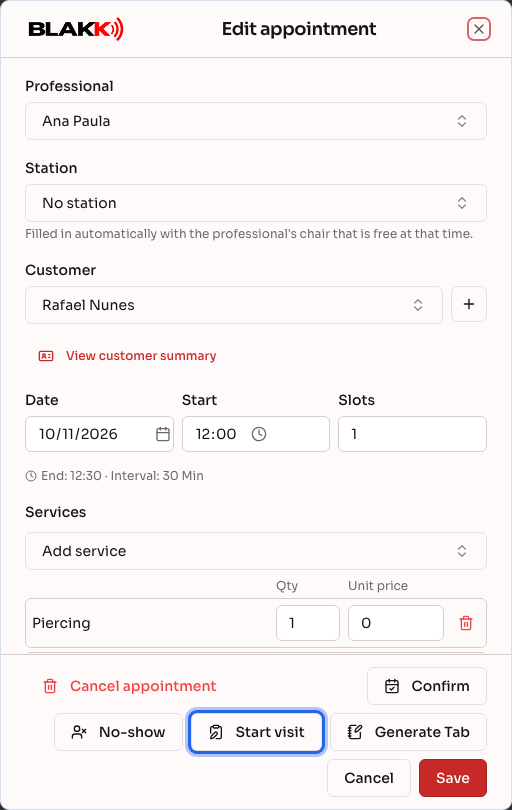
Section titled “Step 7 — Start the visit from the appointment”Start visit is different from “Generate Tab”: it adds the tab (if the module is enabled) and opens the Visit screen, where photos, notes, and the history of that visit are recorded. Use this button when you want to track more than just the payment.
Step 8 — Cancel an appointment
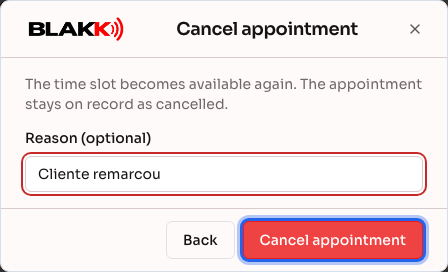
Section titled “Step 8 — Cancel an appointment”Open the appointment and click Cancel appointment. The system asks you to confirm and lets you enter a reason (optional). The time becomes available on the schedule again, but the cancellation remains in the history.
Step 9 — Block days or times on the schedule
Section titled “Step 9 — Block days or times on the schedule”To block off the schedule for a personal commitment—for example, from 12 PM to 2 PM today or all day next Thursday—click Block time at the top of the Schedule:
- Under Professional, choose whose schedule to block. If you don’t have permission to edit the Schedule, only your own schedule appears.
- Under Dates, tap one or more days on the calendar. The days don’t have to be consecutive; for example, you can select two Thursdays.
- Choose All day or Time range. If you select a time range, choose the start and end times. The same time range applies to every selected day.
- Enter the Reason (required) and click Lock.
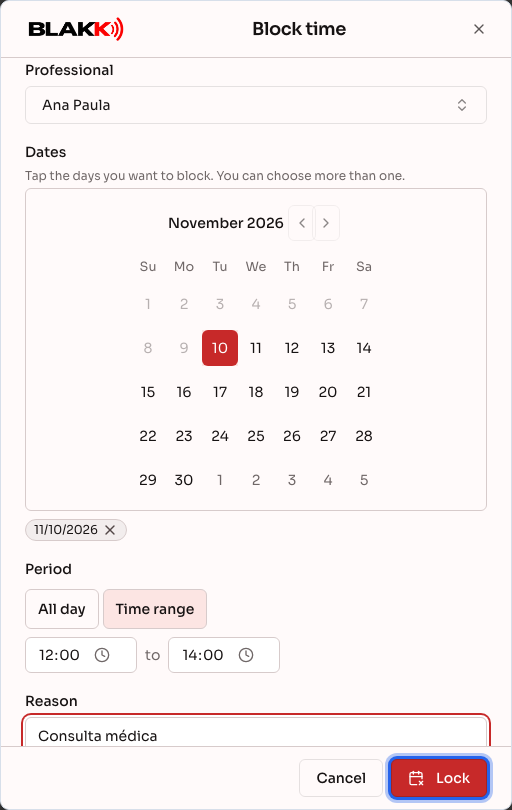
If any of the selected days already has an appointment during that time—or a time reserved for someone on the Waitlist—nothing will be blocked. The dialog lists those appointments under Appointments in this period so you can reschedule or cancel them first.
On the grid, the block appears as a striped bar labeled Blocked with the reason. Click it to view the details or, if you need to reopen the time, click Delete block.
If you can’t block another tattoo artist’s schedule, ask the studio owner to give you access under Access → Profiles.
Other screen features
Section titled “Other screen features”- Quick Fit — instead of looking for an open time on the grid, choose the client and service, and the system will show available times. See the related article.
- Waitlist — a list of clients waiting for an opening. When a matching time becomes available, the system automatically sends a confirmation link by WhatsApp or email. See the related article.
- My availability — each tattoo artist sets their own hours, services, occasional blocks, and holidays. Blocks created there appear on the grid just like those in Step 9. See the related article.
- Google Calendar — each tattoo artist can connect their own Google account to view and sync appointments from there, too. See the related article.
- Drag an appointment — on the grid, click and drag an open appointment to another time or tattoo artist to reschedule it without opening the edit dialog. No-shows, canceled appointments, and completed appointments can’t be dragged.
What happens next
Section titled “What happens next”- Tab/Visit: generating a tab or starting a visit automatically marks the appointment as “In progress.” This—not the Confirm button—is what indicates that the client has actually arrived.
- Completion: an appointment only changes to “Completed” when the tab is paid—there’s no separate “Complete” button.
- Google Calendar: if the tattoo artist has connected their account, creating, editing, moving, or canceling an appointment automatically updates their Google Calendar.
- Time made available again: only canceling an appointment makes the time available on the schedule again. A no-show continues to occupy the time so the history of who missed their appointment isn’t lost.
Common mistakes and questions
Section titled “Common mistakes and questions”Q: How do I schedule the next session for a tattoo that takes multiple sessions? A: In the appointment form, choose the project under Project continuation (this field appears when the client has a project in progress). This also works for appointments the client booked through the website: open the appointment and choose the project. The tab for that day will automatically be set as the next session.
Q: Why doesn’t a product appear under Add service? A: When the business has services on file, the list only shows services. Products only appear there if the business doesn’t have any services yet. Products sold during the visit are added later, on the tab.
Q: Why can’t I edit or move an appointment? A: Canceled or completed appointments are locked—they can’t be edited or moved. If you need to correct something, book a new appointment.
Q: Why won’t the system let me book the time I chose? A: The time may be outside the tattoo artist’s availability for that day, during a block on their schedule (the striped “Blocked” bar on the grid), on a company holiday (when they haven’t marked themselves as present), during another appointment for that tattoo artist, or reserved for someone on the waitlist. The message on the screen tells you which one applies.
Q: Why can’t I cancel an appointment? A: Because it already has an open tab or a visit in progress. Resolve that first (cancel the tab or complete/delete the visit)—the message on the screen tells you exactly what’s needed. Once a tab has been generated, the Cancel appointment button no longer appears on the appointment.
Q: Can everyone who has access to the Schedule see all professionals’ appointments? A: Yes, that’s how it works right now—anyone with access to the Scheduling screen can see all tattoo artists’ appointments, not just their own. The screen filters (by professional or station) only change what’s shown on the screen; they don’t hide anyone’s information.
Q: Why can’t I block a time on the schedule? A: The most common reason is that an appointment is already scheduled during that time. The dialog shows which appointments under Appointments in this period, and the block can only be created after you reschedule or cancel them. You also can’t block a day that has already passed, and a reason is required.
Q: Who can see the reason for a block? A: Everyone with access to the Schedule. The block bar shows the reason next to “Blocked” so the front desk knows why the time is unavailable.
Q: Can I add more than one service to the same appointment? A: Yes—see Step 3. All services are added to the same tab when it’s generated.
Q: What’s the difference between “Generate Tab” and “Start visit”? A: “Generate Tab” creates the tab and opens it over the Schedule. “Start visit” creates the tab (if the module is enabled) and takes you to the Visit screen, where you can record photos and notes from the visit. See Steps 6 and 7.
Q: Will an appointment booked by a client on their own (through the public page) appear here the same way? A: Yes, just like an appointment booked by the front desk. The only difference is that it doesn’t have a tattoo artist/user listed as the person who created it.
Related
Section titled “Related”- Tab: How to open a tab, add items, and accept payment
- Quick Fit: Find an available time based on the client, not the schedule grid
- Waitlist: Automatically notify clients when an opening becomes available
- My availability: Set up your hours, services, and blocks
- Google Calendar: Sync your appointments with your Google account
- Appointment link: Get the link to share with clients
- Dashboard: Your studio’s daily summary, all in one place