Financial Hub: Track and Record Payments and Receipts
What it is
Section titled “What it is”The Financial Hub is your studio’s accounts center: everything due to be paid or received, as well as everything already paid or received, all in one period and one list. It brings together vendor expenses, customer payments, and manual accounting adjustments, with an account balance summary at the top of the screen. Use it to record when an account has been paid or received, individually or in a batch, without opening each original expense or sale.
When to use it
Section titled “When to use it”- At the end of the day, to see what’s overdue and still unpaid or unreceived.
- When the vendor for Healing Ointment confirms that a bill was paid and you need to record it in the system.
- When several accounts of the same type are due at once (for example, multiple customers with outstanding balances) and you want to mark them all as paid or received at once instead of one by one.
- To add a new expense (rent, supplies, recurring bills) without leaving the screen and going to the Expenses menu.
Before you start
Section titled “Before you start”The Financial Hub is part of the Finance module. If you don’t see this option in the menu or can’t record a payment or receipt, ask the studio owner to grant you access in Access → Profiles.
Step by step
Section titled “Step by step”Step 1 — View the summary and account list
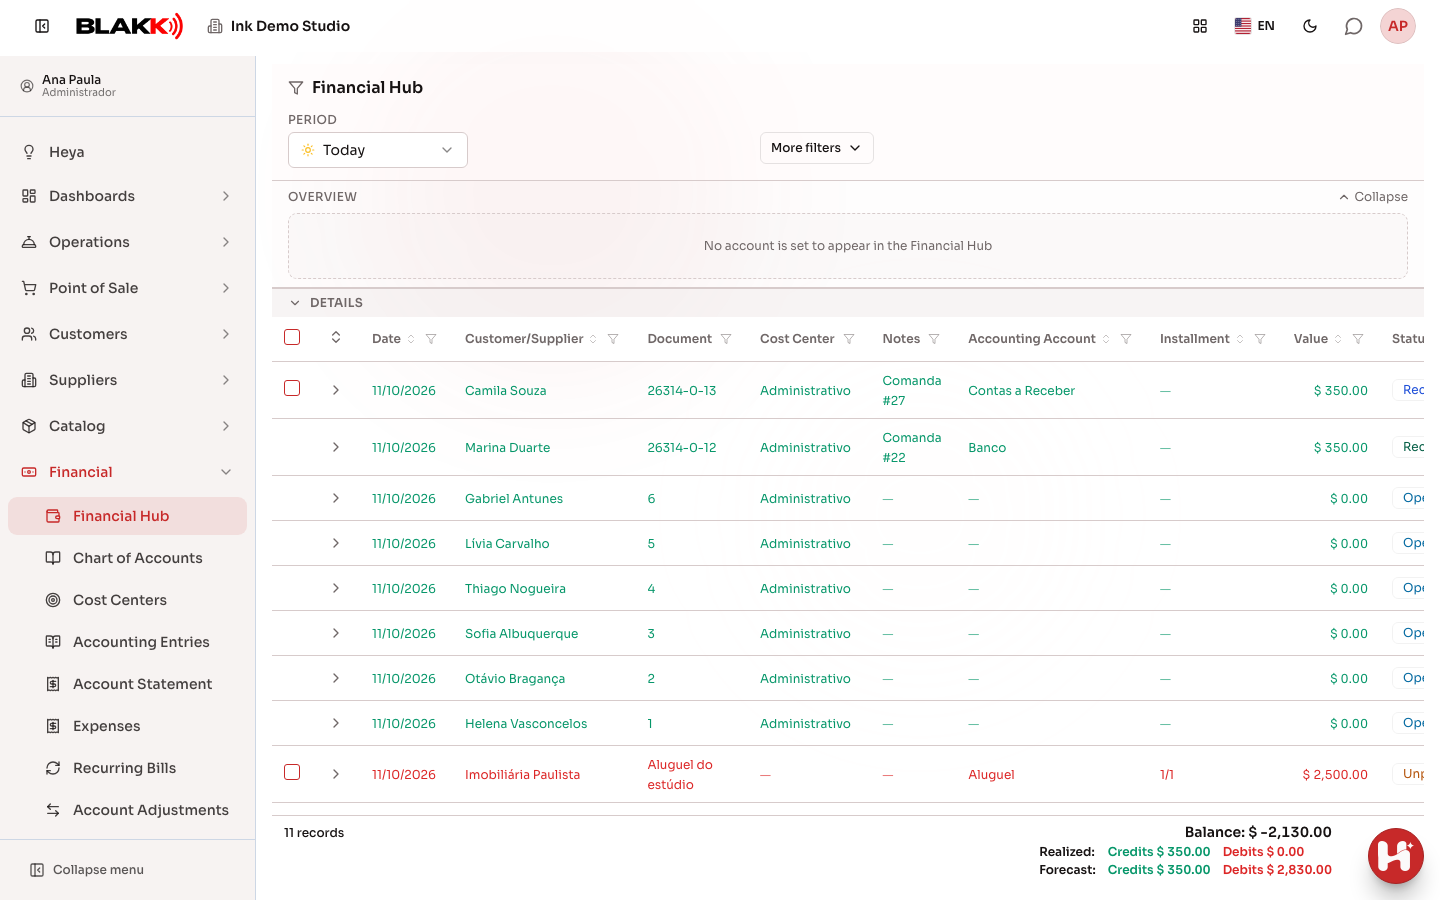
Section titled “Step 1 — View the summary and account list”When you open the Financial Hub, the period defaults to “Today.” The Overview panel at the top shows the account balances (Cash, Bank, etc.) for the selected period, both Consolidated and by account. Use Collapse/Expand to hide or show it. Only accounts marked Show in Financial Hub in the Chart of Accounts are included. If none are marked, the panel displays the message “No account is set to appear in the Financial Hub”. The list below shows each item: unpaid, paid, receivable, received, partial receipts, and manual entries. The row appears in red when money goes out and in green when money comes in. The footer totals what’s in the list: what has already been completed (credits and debits), what’s still forecast, and the balance.
When you open the Hub, only the period is shown. The customer/vendor, status, document, cost center, and notes filters, along with the Apply Filters, New Expense, New Adjustment, and Export CSV buttons, are under More filters. The number next to the button shows how many of these filters are active. Filters you enter only take effect after you click Apply Filters.
Step 2 — Add an expense directly from the Hub
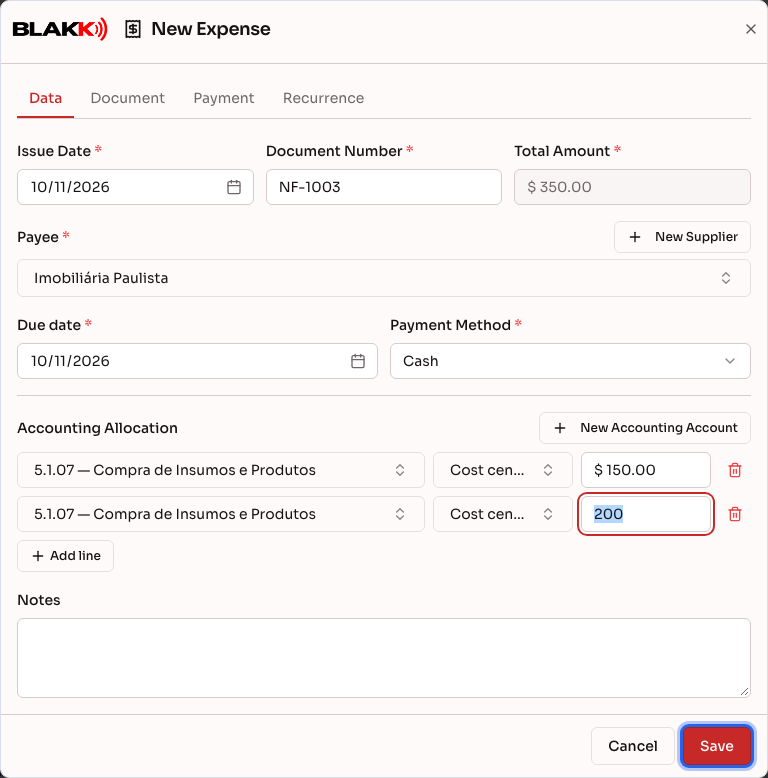
Section titled “Step 2 — Add an expense directly from the Hub”Open More filters and click New Expense to add an account payable without leaving the screen. Select the Payee (customer, vendor, or employee), fill in the Due date, Payment Method, and Document Number, then add at least one line under Accounting Allocation with an amount. The expense’s Total Amount is calculated from this allocation; it isn’t entered in a separate field. If the payee already has a previous expense, the accounting allocation from their latest expense is prefilled (only in blank lines: anything you’ve already entered won’t be erased or duplicated). Just adjust the amount. This is the same form used on the Expenses screen.
Step 3 — Record a payment
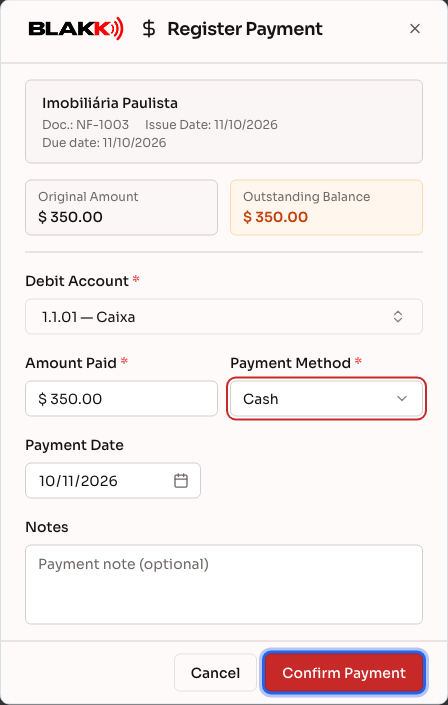
Section titled “Step 3 — Record a payment”On a Unpaid row, click the Register Payment icon. Choose the Debit Account (where the money comes from) and the Payment Method. The Amount Paid field is prefilled with the outstanding balance, but you can adjust it to record a partial payment. You can also enter the Payment Date and Notes. Click Confirm Payment.
Step 4 — Record a receipt
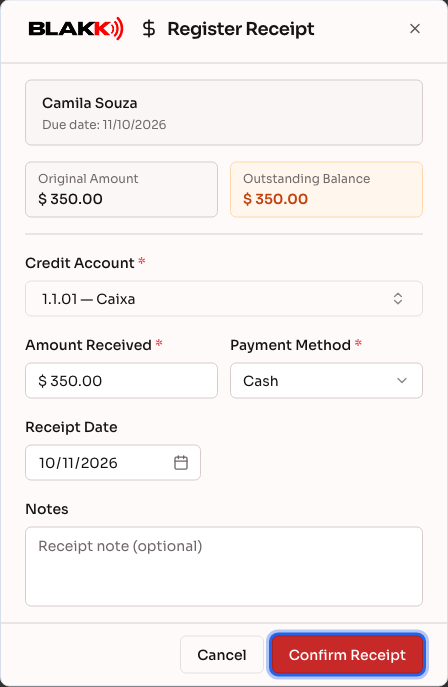
Section titled “Step 4 — Record a receipt”The same applies to incoming money: on an Receivables row, click Register Receipt. Choose the Payment Method and the Credit Account (where the money goes). The account is suggested based on the selected payment method, but you can change it.
Step 5 — Record a batch payment or receipt
Section titled “Step 5 — Record a batch payment or receipt”Select the checkboxes for multiple rows of the same type (all Unpaid or all Receivables) and click the button that appears in the selection bar: Batch Payment or Batch Receipt, depending on what you selected. Each account keeps its own fields, so you can use a different account and payment method for each one in the same batch. Only Unpaid and Receivables rows can be selected.
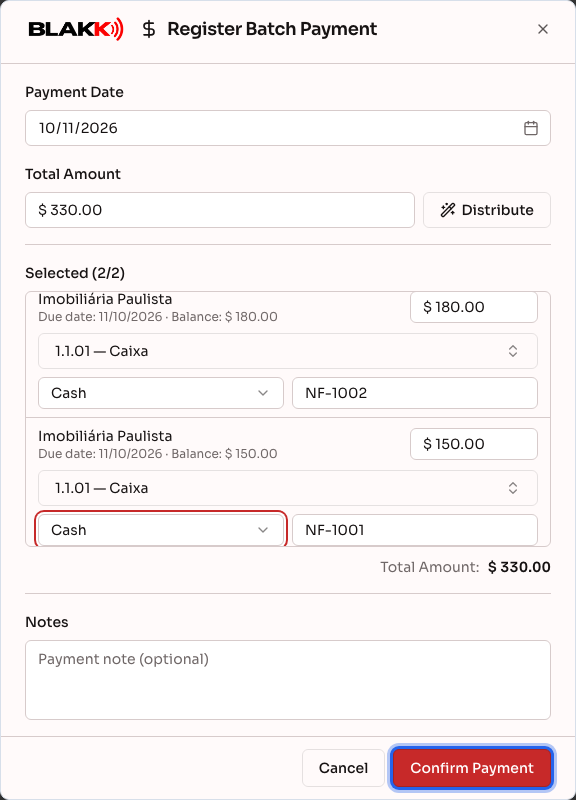
Step 6 — View a row’s history and reverse a payment
Section titled “Step 6 — View a row’s history and reverse a payment”Click the arrow icon next to any row to expand it and view the details: issue date, due date, payment method, Installment Total, Paid so far (or Received so far), and Pending Balance, as well as who recorded each payment and when. For an expense, each payment in the list has its own Reverse Payment icon, which you can use to undo a payment recorded by mistake.
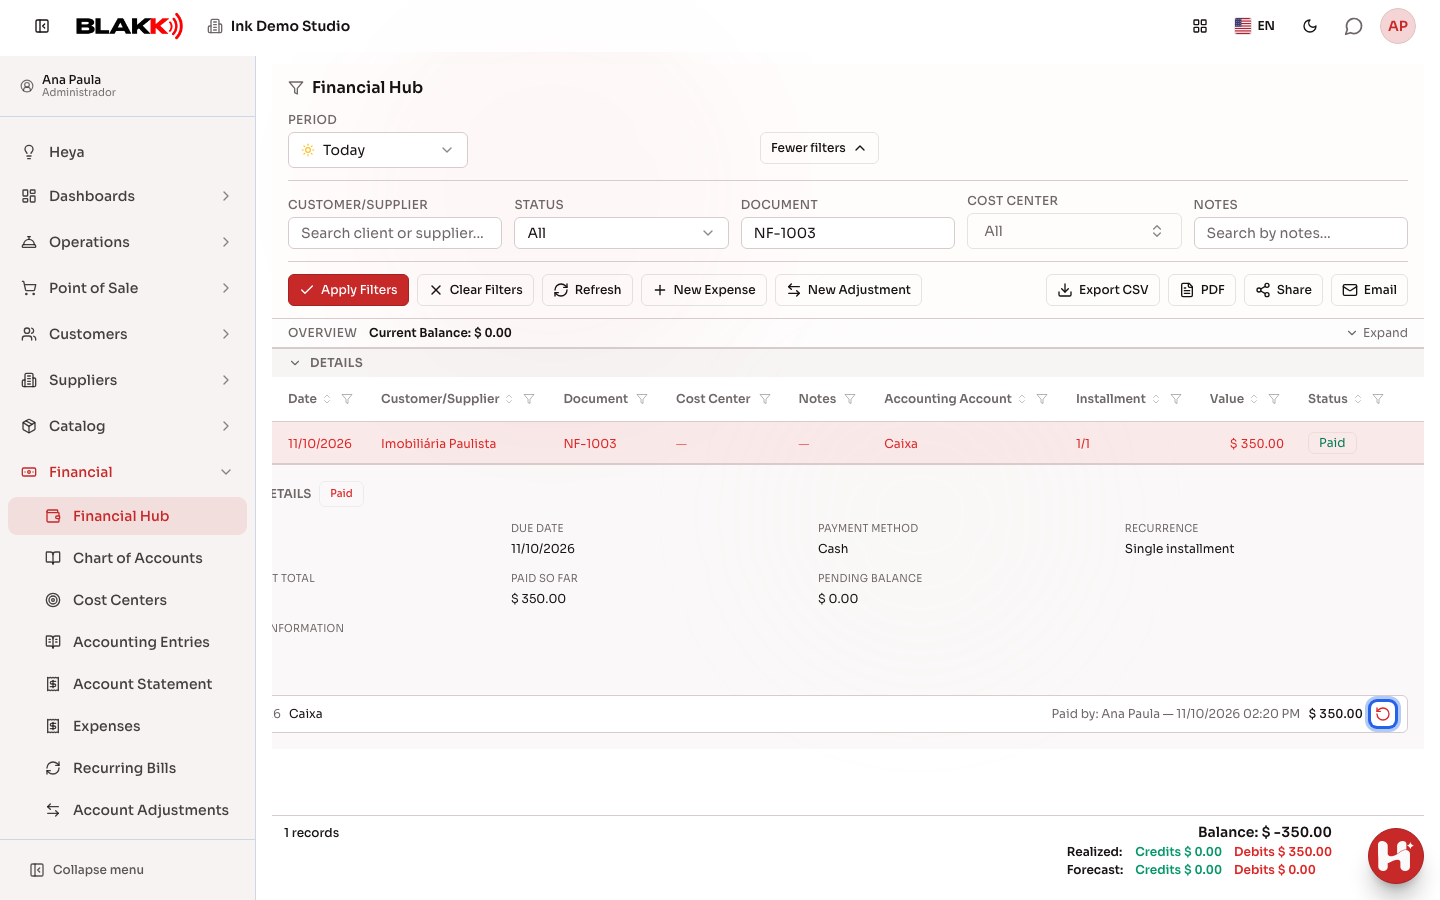
What happens next
Section titled “What happens next”- Paying or receiving an account immediately updates the balance of the selected account (Cash, Bank, etc.), which is reflected in the summary at the top of the screen.
- A paid or received row leaves the list of outstanding items and appears as Paid or Received, with its payment history saved, including when it’s paid in multiple installments.
- Reversing a payment restores the account balance and the item’s outstanding balance. The reversed payment remains in the history, crossed out, so you can see who reversed it and when.
- An Unpaid row with the Forecast label is a future occurrence of a recurring account that hasn’t been generated yet. It appears so you can plan your cash flow, but you can’t pay it or select it for a batch from here.
- A closed sale with a payment method set to “receive later” (check, bill) automatically appears here as an Receivables row, without any manual entry. The Hub only reflects activity already recorded on other screens in the system. An open sale doesn’t appear, even if a partial payment has been recorded. It only becomes a sale, and appears in the Hub, once it’s actually closed.
Common mistakes and questions
Section titled “Common mistakes and questions”Q: Do I need to select an account every time I record a payment?
A: Yes. The Debit Account (when paying) or Credit Account (when receiving) is required because it determines where the money comes from or where it goes.
Q: Can I pay an account payable and receive an account receivable in the same batch?
A: No. If your selection includes both types, the system will alert you and ask you to select only one type at a time before continuing.
Q: Does the payment amount have to equal the full amount due?
A: No. The field is prefilled with the outstanding balance, but you can enter a smaller amount to record a partial payment. The rest remains outstanding.
Q: Who can reverse a payment?
A: Only users with editing access to Expenses, and only for Unpaid/Paid accounts. The reverse icon appears in an expense’s payment history, not in a receipt’s history. If you don’t see it, ask the studio owner to grant you access in Access → Profiles.
Q: Why don’t I see the “New Expense” and “New Adjustment” buttons?
A: They’re under More filters and only appear for users with editing access to Expenses (for New Expense) and Account Adjustments (for New Adjustment). If you don’t see them, ask the studio owner to grant you access in Access → Profiles.
Q: I entered the vendor’s name in the filter, but the list didn’t change. What did I miss?
A: Click Apply Filters. The fields under More filters only take effect after you click it; only the period is applied immediately.
Related
Section titled “Related”-
Expenses: add, split into installments, attach a document, and pay
-
Account Adjustments: create and edit manual accounting entries — the Hub’s “New Adjustment” shortcut opens the same form as this screen.
-
Accounts Receivable Report: follow up on outstanding payments
-
Paid Accounts Report: payment history and how to reverse a payment
-
Financial Dashboard: understand your studio’s financial health over time