Website: add your product catalog and other system data
What it is
Section titled “What it is”Your studio’s website isn’t a static page: it pulls information directly from your system. A product list on your website shows products from your catalog, along with their photos and prices; the gallery shows photos from your library; and the footer displays your registered address and business hours. When you change a price or add a product, the website updates automatically—you don’t need to edit or publish it again.
When to use it
Section titled “When to use it”- You want a product showcase featuring your products (jewelry, healing ointment) that stays up to date.
- You want to show only one group, such as “Titanium jewelry,” on a specific page of your website.
- You want customers to be able to book, buy, contact you through WhatsApp, or get directions to your studio directly from your website.
Before you start
Section titled “Before you start”- You need to have a website set up already (see the article about creating your own website).
- Your catalog needs to be organized: your website displays groups and products the same way as the QR Code menu. A group with Visible on the public menu (QR Code) turned off won’t appear on your website, and neither will its subgroups or products. Services follow the online booking rules: they only disappear from your website if they’re inactive or belong to an inactive group, and only services with a registered duration will appear.
- Selling through your website (cart and payment) requires the online store to be included in your plan. To accept Pix payments, your Digital Account must be active (approved).
- If you can’t edit the website, ask the studio owner to grant you access under Access → Profiles.
Step by step
Section titled “Step by step”Step 1 — See what’s already set up
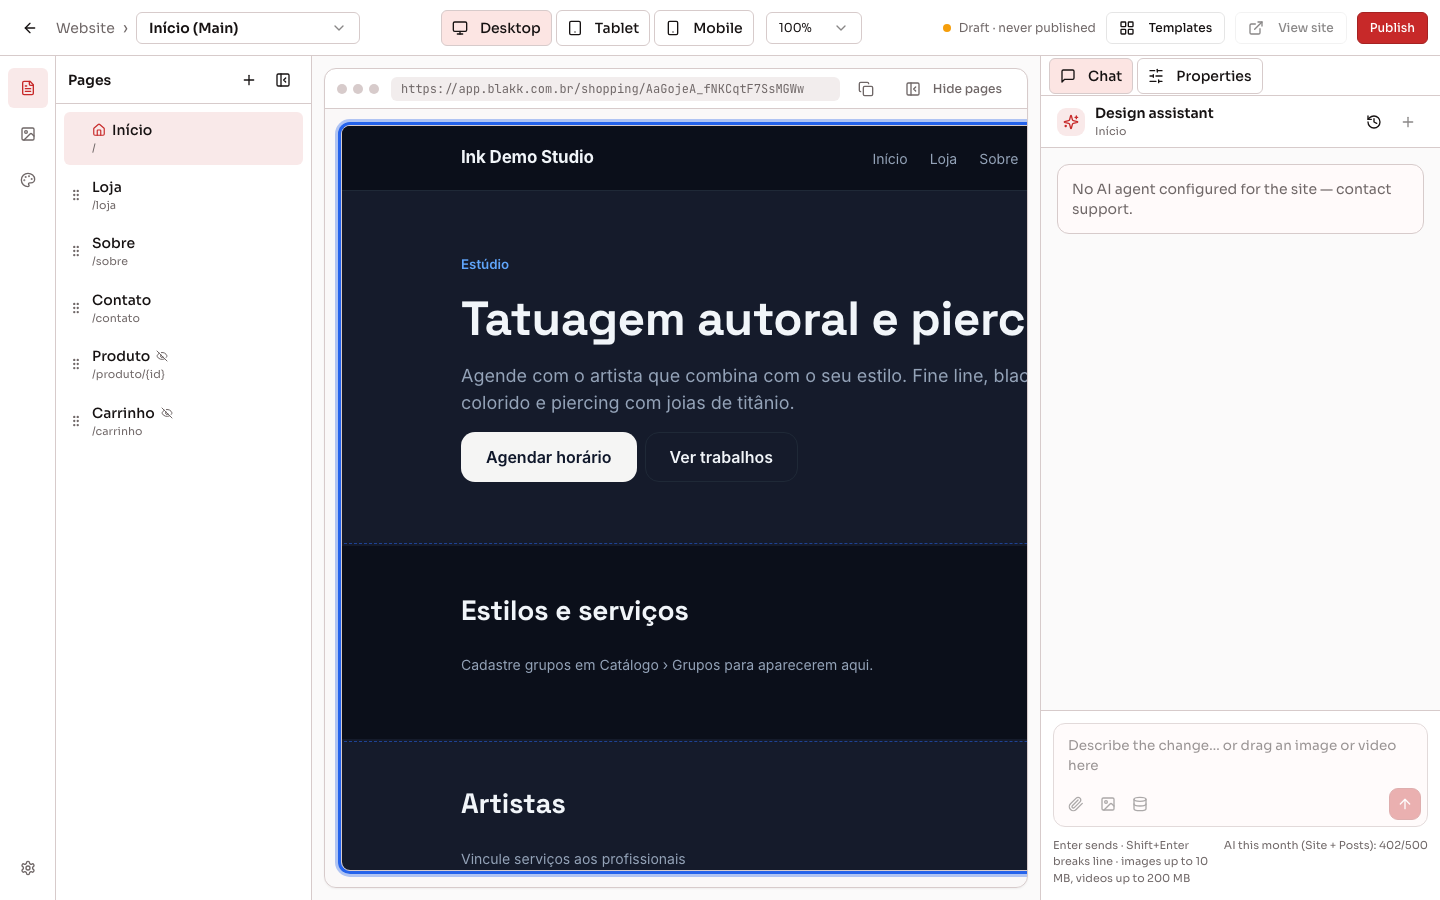
Section titled “Step 1 — See what’s already set up”Every template is already connected to your data: product pages, the service list, tattoo artists, the gallery, the booking button, and the contact details in the footer all pull information from your system. If you started with a template, much of the work is already done—check the preview to make sure the groups and products look the way you want.
Step 2 — Ask the assistant to add a product list
Section titled “Step 2 — Ask the assistant to add a product list”To add the catalog to a page, make a request in the editor’s Chat using everyday language. For example:
- “Add a grid with products from the Jewelry group to this page.”
- “Add a carousel with featured products.”
- “Create a section with our services and the price of each one.”
The System data icon (the cylinder below the message box) opens Insert data reference. Choose the data you want (products, groups, services, tattoo artists, gallery, and more), and it will be added to your message so the assistant knows exactly what to use.
There isn’t a list of blocks you can drag and drop: new blocks that use system data are added through chat (or are already included in the template).
Step 3 — Choose which products to show
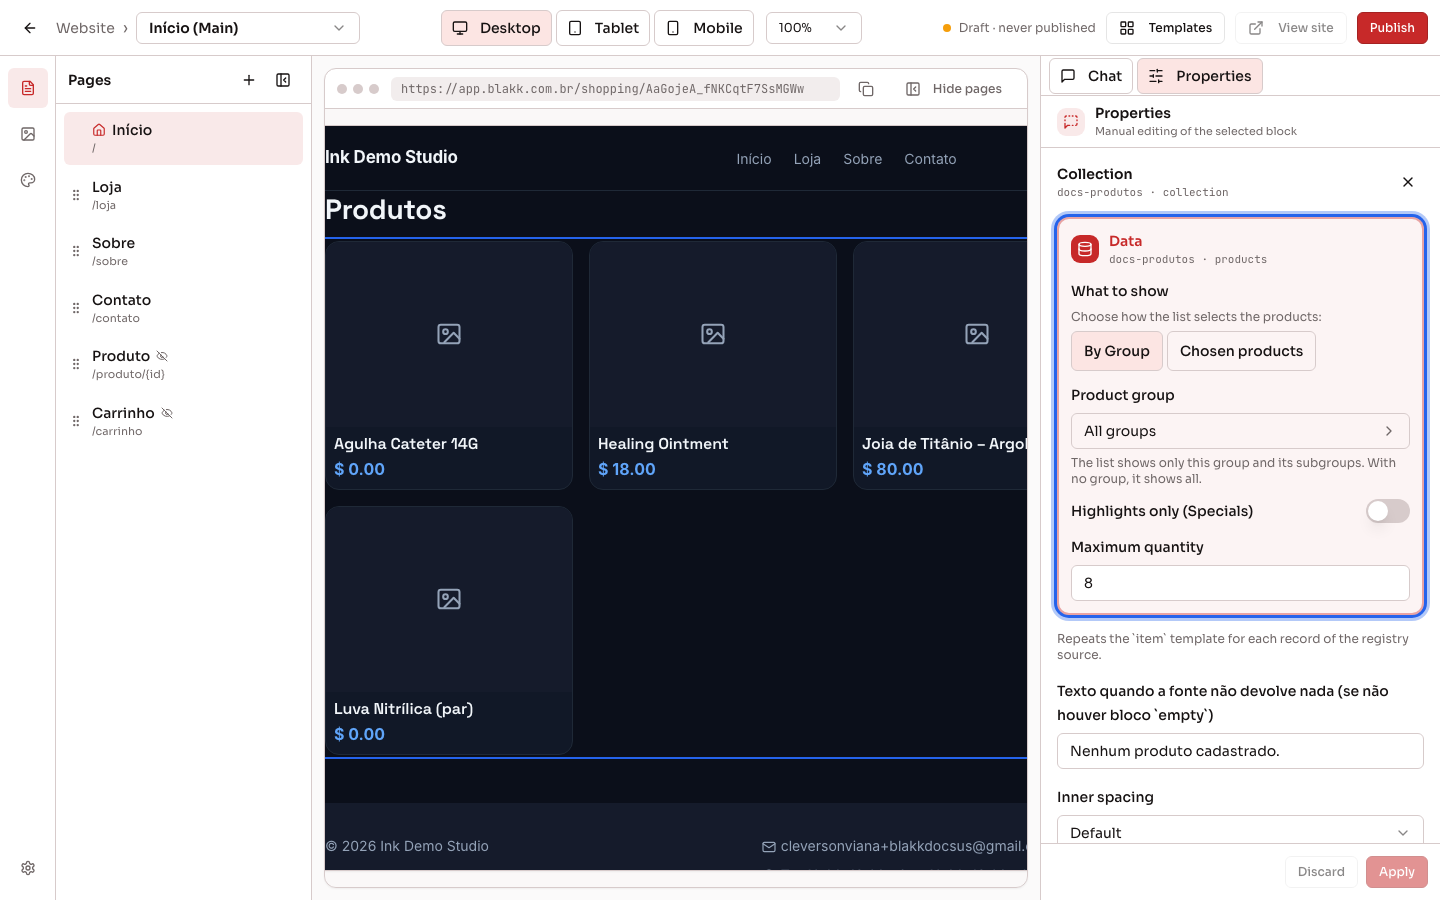
Section titled “Step 3 — Choose which products to show”Click the product list in the preview and open Properties. In the Data panel:
- What to show: By Group (the default, with the options below) or Chosen products, to select products from the list one at a time (see the next step).
- Product group: choose a group to show only that group and its subgroups. If you don’t choose a group, all groups are shown.
- Highlights only (Specials): show only products marked as Special in the product record.
- Maximum quantity: set how many items the list displays.
For a group list (such as the style showcase in the template), the panel only has Product group and Maximum quantity. When you choose a group, the list shows its direct subgroups.
Click Apply, then Publish to publish the changes.
If the list is Linked to page navigation: the group changes as the visitor clicks., the group shown changes based on the group the visitor clicks, so you don’t choose it here. In this case, the What to show option isn’t shown.
Step 4 — Show specific products
Section titled “Step 4 — Show specific products”To feature a product in a section of your website (or a few products in the order you choose), use a product list and select the items:
- Click the product list in the preview and open Properties.
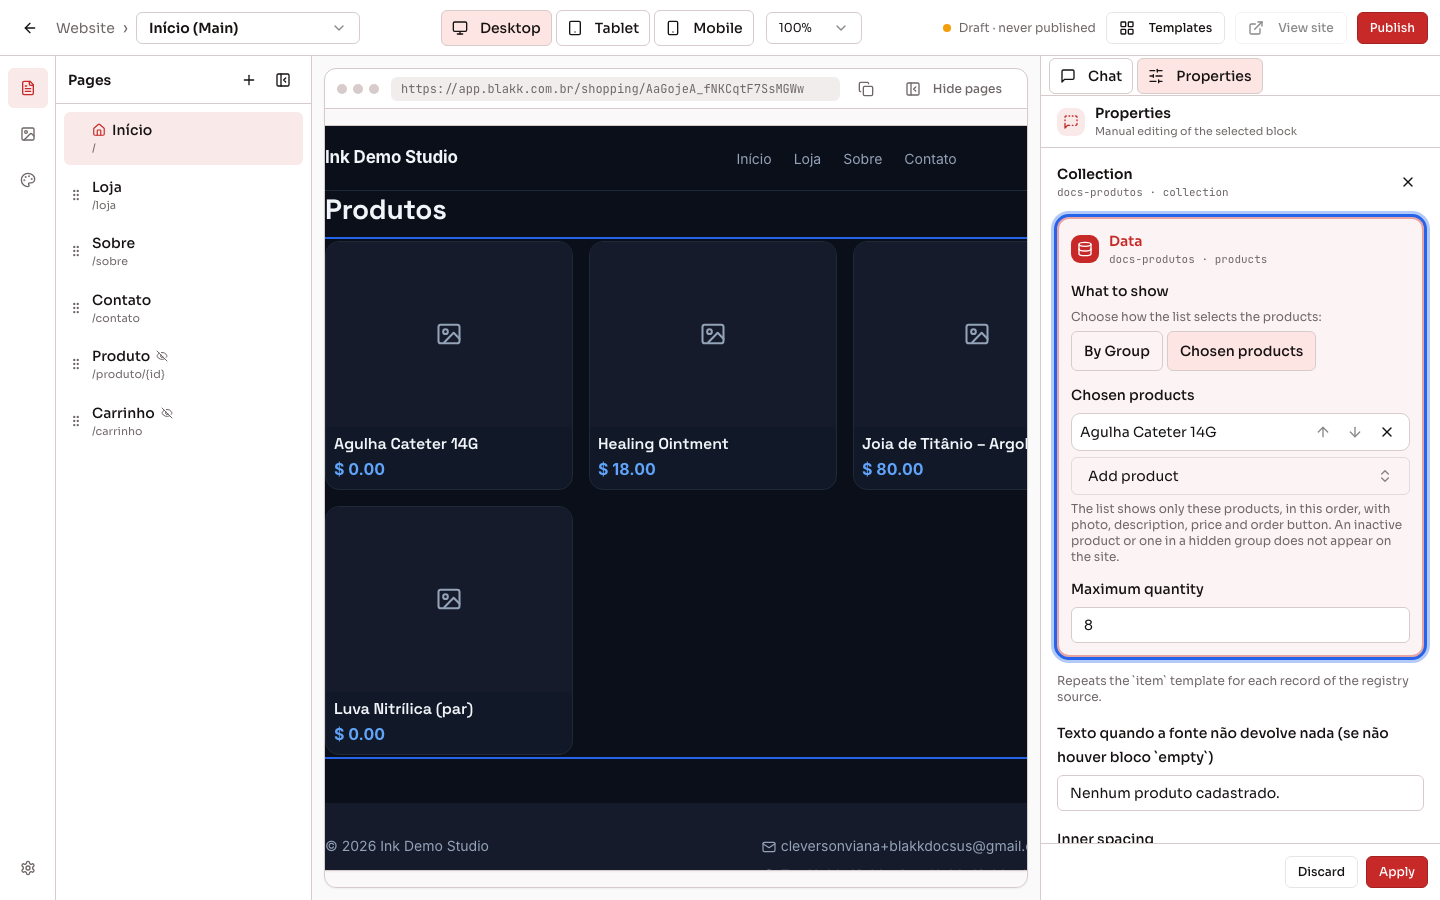
- Under What to show, choose Chosen products.
- Click Add product, search by name, and select the product. Repeat to add more products.
- Use the Move up and Move down arrows to change the order, or click X to remove a product from the list.
- Click Apply, then Publish.
The product appears in the same card as the rest of the list, with a photo, description, price, and order button. When you choose Chosen products, the group and Highlights only (Specials) no longer filter the list, but your settings are saved. If you switch back to By Group, the list uses them again. Maximum quantity still applies.
To add a new section featuring just one product, ask the assistant in chat to add a product list (for example, “add a section with one featured product”), then choose the product here.
Step 5 — Use other system data
Section titled “Step 5 — Use other system data”Your website can also display the following. Just ask the assistant in chat:
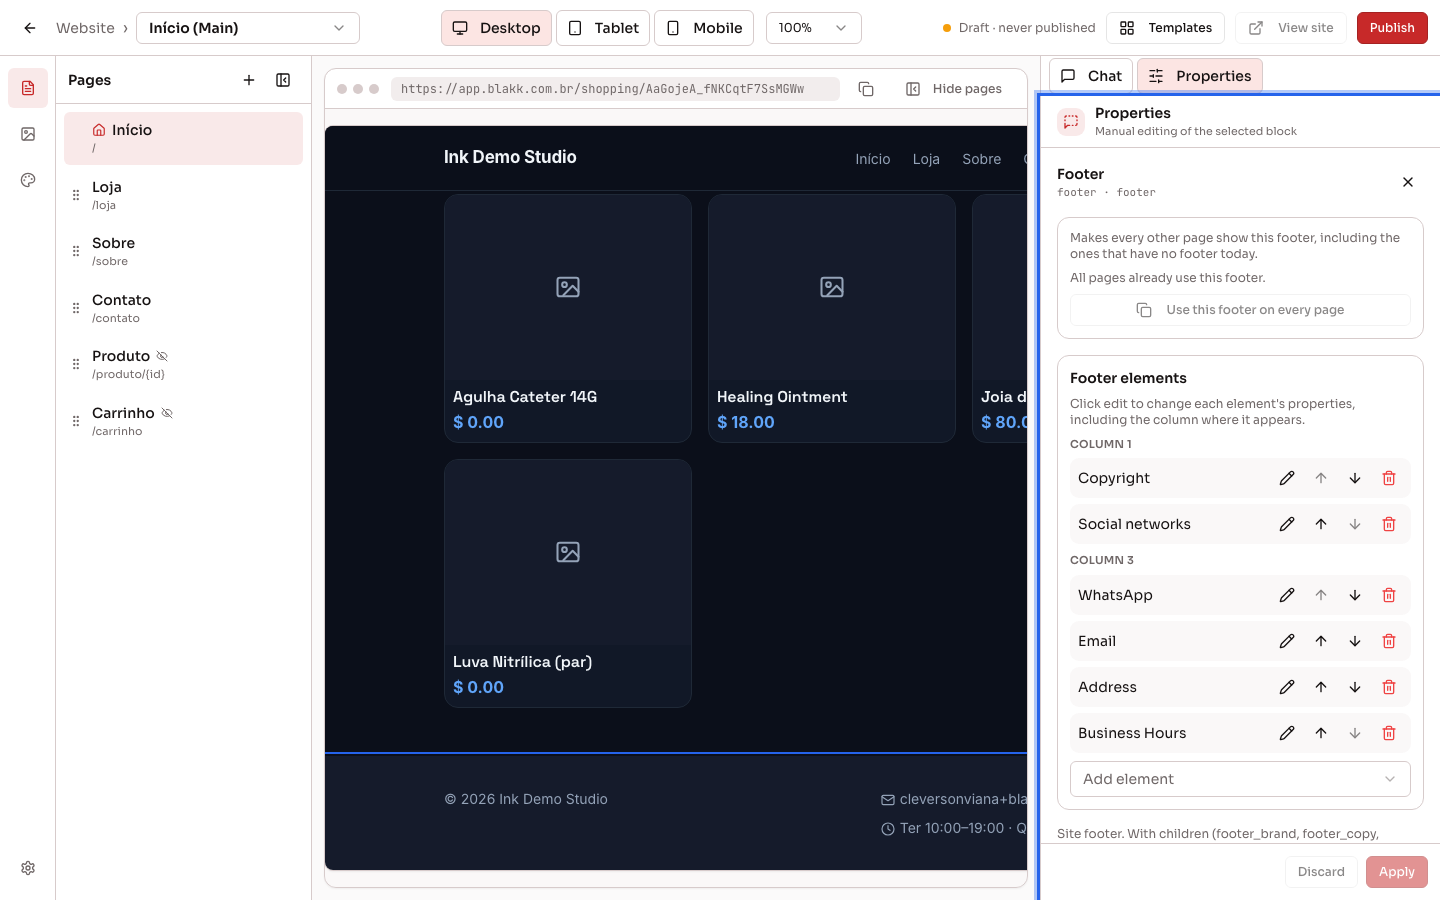
- Business information: name, logo, WhatsApp, email, address, city, business hours, and phone number—the same information in your business profile.
- Services (with duration and price) and tattoo artists (their email and phone number are never shown).
- Gallery: photos from the Media Library. If you mark photos as favorites, the gallery only shows those photos.
- Buttons that link to system pages: booking (opens the public booking page), customer account, directions (opens Google Maps with your address), call, and online orders.
- Contact form: anyone who submits the form is added as a customer under Customers, and their message is emailed to your studio.
Step 6 — Sell through your website (online store)
Section titled “Step 6 — Sell through your website (online store)”Once the online store is available in your plan, ask the assistant to create the product page and shopping cart (for example, “create the product page and cart page, and add the cart to the menu”). Then, under Settings → Online store, choose Payment for website orders:
- Online payment only: the order is only submitted after payment.
- Online, or at pickup when there is no online payment: if online payment is set up, the customer pays right away; otherwise, they pay at pickup or delivery.
- Customer chooses: the customer chooses whether to pay now or at pickup.
What happens next
Section titled “What happens next”- Everything updates automatically: prices, photos, names, new products, inactive products, business hours, and addresses appear on your website the next time someone visits—no editing or publishing needed. Only layout and text changes made in the editor require Publish.
- Prices shown on your website are the sale prices in your business’s currency. The system checks the price again in the cart, so no one can buy a product at a price that’s been changed.
- Website orders appear in the POS under Pickup/Delivery. Orders to be paid for at pickup are marked as unpaid and charged at checkout.
- Website orders update product inventory, just like any other sale.
- Anyone who submits the contact form is added to Customers (or their existing record is updated if the same phone number or email is already on file). The full message (name, email, phone number, page, and message text) is emailed to the address in the Email field on the Settings → Business screen. There’s no separate screen for website contacts: reply to the customer by email or phone.
Common mistakes and questions
Section titled “Common mistakes and questions”Q: A product isn’t showing on my website.
A: Check that the product is active; that Visible on the public menu (QR Code) is turned on for its group and the parent group; and, if the list uses Highlights only (Specials), that the product is marked as Special. If the list uses Chosen products, the product must be in the list. Inactive products and products in hidden groups won’t appear, even if selected, and the panel will show Inactive: not shown on the site. Services aren’t included in product lists: make sure each service is active and has a duration set.
Q: I changed a price in the system. Do I need to publish the website again?
A: No. Prices, photos, and names come from your product records and are updated the next time someone visits your website.
Q: I want to show only one group on a page.
A: Select the list in the preview, open Properties, and choose the group under Product group. Click Apply, then publish.
Q: I want to show a specific product, not an entire group.
A: Select the list in the preview, open Properties, choose Chosen products under What to show, then add the product with Add product. Click Apply, then publish.
Q: I chose Chosen products but didn’t add any. What will show?
A: While the chosen products list is empty, the website shows products by group, as before.
Q: Can I drag a product block onto the page?
A: There isn’t a block palette. Ask the assistant in chat (“add a grid with products from group X”), then adjust the list in the Properties tab.
Q: Pix isn’t showing as a payment method on my website.
A: The online store uses your Digital Account to accept Pix, and it must be active (approved). If no online payment method is set up, choose Online, or at pickup when there is no online payment or Customer chooses so the customer can pay at pickup.
Q: Where can I see who submitted my website’s contact form?
A: Check your email. Each message arrives with the subject “New message from your website” and the customer’s message in the address listed in the Email field under Settings → Business. The customer is also added to Customers. If you don’t receive the email, check that field and your spam folder.
Q: Does the website show customer reviews or a map?
A: It doesn’t show reviews. For directions, the website uses a “Get directions” button that opens Google Maps with your studio’s address.