Catalog: Add Your Services, Products, and Groups
What it is
Section titled “What it is”This is where you add everything your studio sells: services (such as a full sleeve tattoo and a helix piercing) and products (such as healing ointment), organized into groups. This catalog powers the Tab, Calendar, Quick Booking, and public booking page. Setting it up correctly helps prevent problems in the screens you use every day.
When to use it
Section titled “When to use it”- You’re about to start offering helix piercings and need to add the price, duration, and technical sheet before you can schedule the service or add it to a tab.
- You want to organize your services into groups (Tattoo, Piercing, Micropigmentation) so they’re easier to find on the Tab and public menu.
- You need to track a product, such as healing ointment, in your inventory.
- Each helix piercing uses a needle and gloves, and you want those supplies deducted from inventory automatically with every sale—or you want customers to choose their jewelry when they buy.
Before you start
Section titled “Before you start”If you can’t add, edit, or delete a service or product, ask the studio owner to give you access under Access → Profiles. Products and Services have separate permissions, even though they’re managed on the same screen. The same rule applies to the Options and Add-ons and Materials and Supplies tabs: setting them up for a service requires the Services permission, and setting them up for a product requires the Products permission.
Step by step
Section titled “Step by step”Step 1 — Add a service
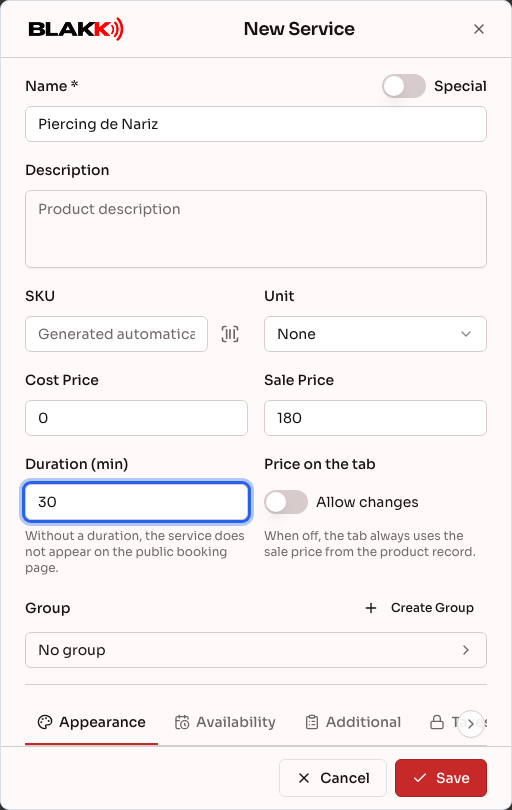
Section titled “Step 1 — Add a service”Go to Catalog → Services and click New Service. Enter the name, Sale Price, and Duration (min). The duration determines whether the service is available for booking in the Calendar, Quick Booking, and on the public booking page. Without a duration, the service won’t appear on those three screens, but you can still add it directly to a Tab.
Below the main fields, you’ll see a row of tabs (Appearance, Availability, Additional, and others), each with a different part of the setup. Swipe sideways to see tabs that don’t fit on the screen.
Step 2 — Link a technical sheet and anamnesis form
Section titled “Step 2 — Link a technical sheet and anamnesis form”In the row of tabs below the main fields, open Additional and select a Anamnesis Template if the service requires a health assessment before the appointment. You can also select a Technical Sheet—the artist’s technical form—if your studio has one set up. Both fields are optional and only appear for services, not products.
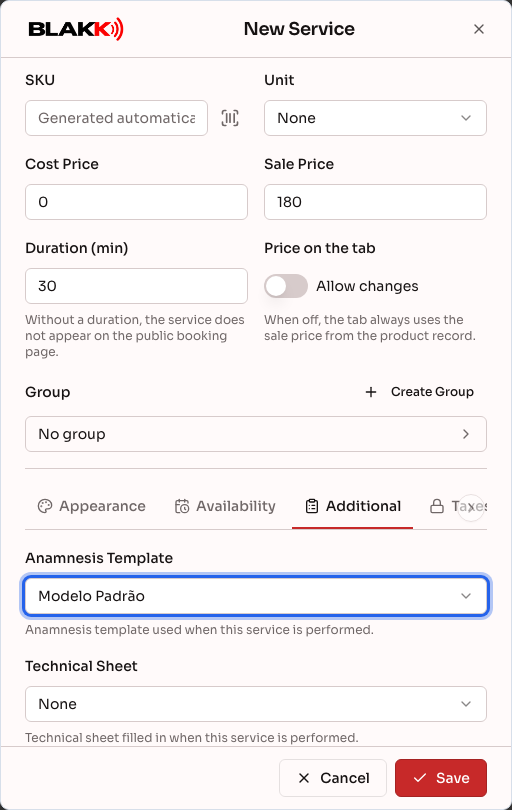
These links make the “Technical sheet” and “Anamnesis” labels appear when someone adds the service to a Tab or Appointment.
Step 3 — Organize services into groups
Section titled “Step 3 — Organize services into groups”Next to the Group field, click Create Group to create a new group without leaving the screen, or select an existing one. Groups help organize the Tab, public menu, and booking page. Customers browsing the menu will see services grouped together.
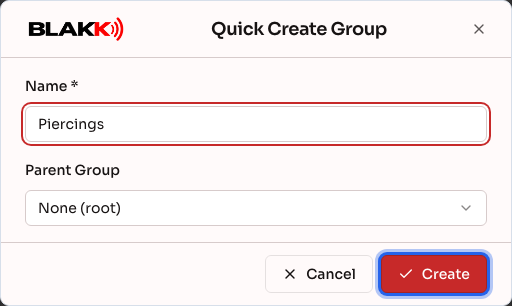
A group can have subgroups, be hidden from the public menu, have its own availability hours, and—if you use stations—be linked to a production printer. Configure these options on the Catalog → Groups screen by editing the group after you create it.
Step 4 — Add a product
Section titled “Step 4 — Add a product”Go to Catalog → Products and click New Product. Enter the name, Cost Price, and Sale Price, then click Save. The form is the same as the service form, with two differences: products don’t have Duration (min) or the Additional tab (technical sheets and anamnesis forms are only for services), and they have an Inventory tab that services don’t have.
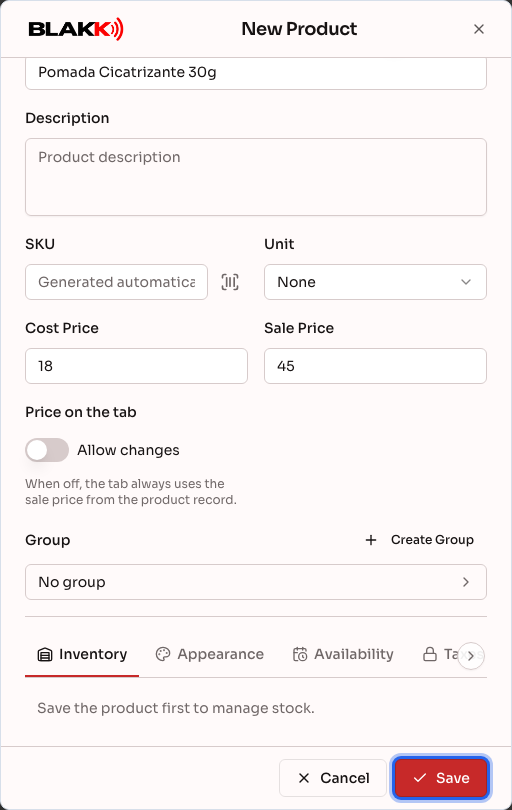
For a new product, the Inventory tab only shows Save the product first to manage stock.. You don’t enter the quantity while setting up the product. After saving, reopen the product using the Edit button in its row. The Inventory tab will then show the balance, Minimum Stock, and Adjust button, where you can enter the quantity on hand. See Minimum stock.
Step 5 — Add options for customers to choose from
Section titled “Step 5 — Add options for customers to choose from”After saving the service or product, open it with Edit and go to the Options and Add-ons tab. This is where you set up options customers can see and choose when buying through the Point of Sale or QR Code menu—for example, jewelry for a helix piercing. Click Add, search for the item under Search product or service… (the search checks all your products and services), enter the Qty, the extra Price charged for the option, and its Visibility, then click the item in the list to add it:
- Visible - Not selected: The option appears unchecked. If the customer selects it, its price is added to the item.
- Visible - Selected: The option is checked by default and included in the item price, so it isn’t charged separately. The customer can uncheck it.
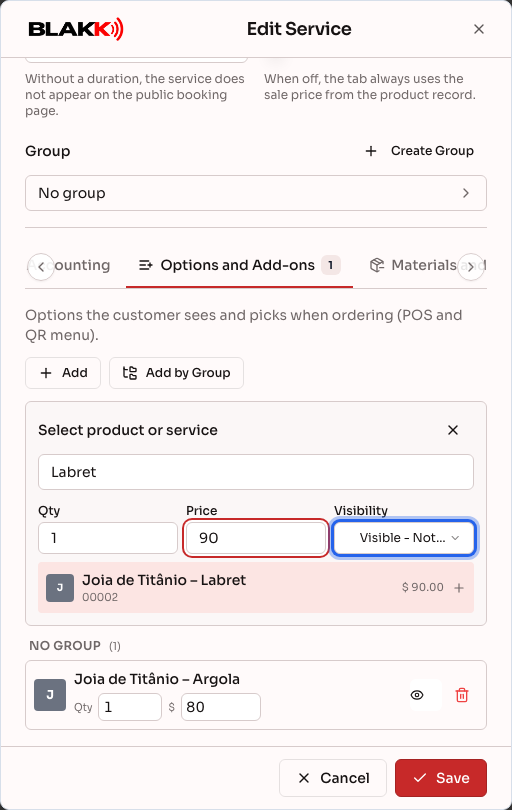
The item is added right away; you don’t need to click Save. To add all items from a group at once, use Add by Group and Add All from Group. In the list, you can change the quantity and price for each option, change its visibility using the icon next to it, or remove it using the trash icon (Delete).
Step 6 — Add materials and supplies
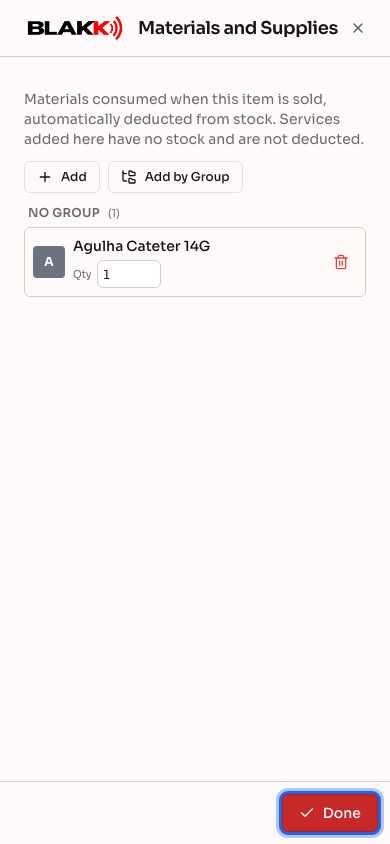
Section titled “Step 6 — Add materials and supplies”The Materials and Supplies tab lists the materials used each time the item is sold, such as the needle and gloves for a helix piercing. Click Add, search for the material, and enter only the Qty used per sale. Supplies don’t have a price or visibility setting because customers don’t see or pay for them. Click the item in the list to add it. In the list, the unit set for the material (such as ml or ea) appears next to the quantity, so you know whether “1” means one unit, one milliliter, or one pair.
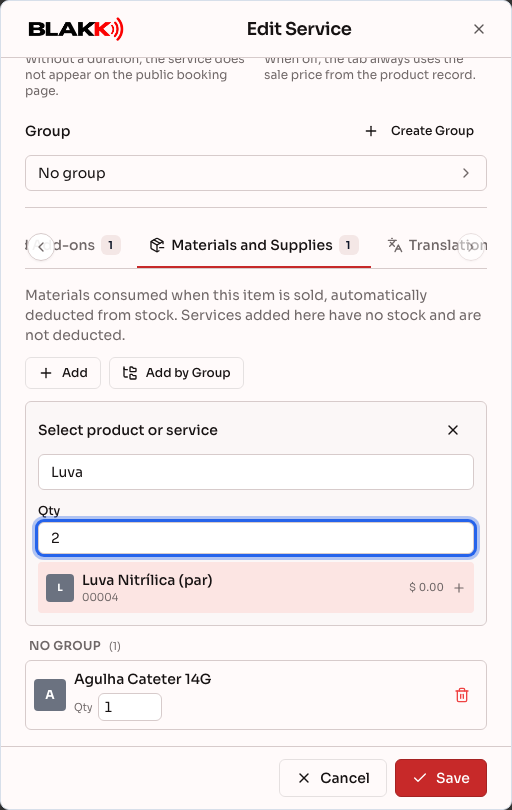
Every sale through the Point of Sale or QR Code menu automatically deducts the specified quantity of these materials from inventory. A service can also be added as a supply, but it won’t be deducted from inventory because services aren’t tracked in inventory.
Step 7 — Sort items in a group
Section titled “Step 7 — Sort items in a group”Click Sort services (or Sort products on the Products screen), choose a group, and drag the items to set the order they appear in within that group. This order is also used on the Tab, Point of Sale, public QR Code menu, and public booking page.
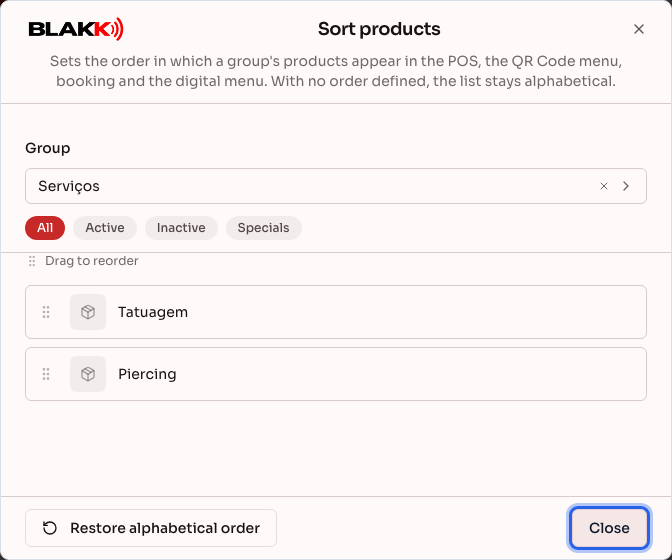
If you don’t sort the items, they appear in alphabetical order by default. Click Restore alphabetical order to restore that order.
Step 8 — Use the tabs on your phone
Section titled “Step 8 — Use the tabs on your phone”On a phone, the setup tabs (Appearance, Availability, Options and Add-ons, Materials and Supplies, and the others) appear as large buttons below the main fields. Tap a button to open that tab full-screen.
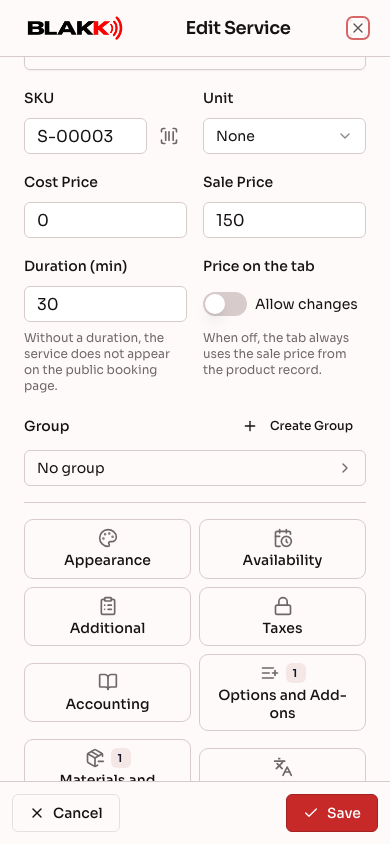
To return to the setup form, tap Done or the X at the top. Going back doesn’t save anything: there’s still just one Save button, at the bottom of the setup form.
What happens next
Section titled “What happens next”- A service with a duration entered is immediately available for booking in the Calendar, Quick Booking, and on the public booking page. No extra setup is needed.
- Products and Services use the same type of record behind the scenes. That’s why “New Product” and “New Service” open nearly identical screens, and why they have separate permissions even though they use the same screen.
- Deleting a service or product doesn’t erase its past sales history. It only removes the item from the setup screens; closed Tabs continue to show it as usual.
- The system won’t let you delete a service or product that’s included in a future appointment or an open Tab—it will tell you which one. Remove the item from the appointment (or cancel the appointment) and from the Tab, then delete it.
- Services can’t have a negative price. To give a discount, apply it at the time of sale.
- Materials and Supplies are deducted from inventory with every sale through the Point of Sale, QR Code menu, or when a Tab is closed. The quantity deducted is the supply quantity multiplied by the quantity of the item sold, unless it was changed on the Tab item. An add-on that’s selected by default but removed by the customer won’t be deducted from inventory.
- Options and Add-ons only appear in the Point of Sale and QR Code menu, where the customer makes their choice. The Tab only adds the service or product itself and doesn’t offer these options.
- You can only delete a group after moving or deleting all its services, products, and subgroups. The system will tell you what’s still in the group.
Common mistakes and questions
Section titled “Common mistakes and questions”Q: I added a service, but it doesn’t show up for booking. Why?
A: Check that you entered the Duration (min). Without a duration, the service won’t appear in the Calendar, Quick Booking, or on the public booking page. You can still add it directly to a Tab without scheduling it.
Q: What’s the difference between Products and Services?
A: They use the same type of record but appear on two different screens. Services have fields that products don’t, such as duration, technical sheet, and anamnesis. Products have an Inventory tab that services don’t. The type is determined by the screen you used to create the item (“New Service” or “New Product”). You can’t convert one type to the other after creating it.
Q: Do I need to enter an SKU?
A: No. If you leave the SKU blank, the system generates a sequential code when you save: products get 5 digits (00001, 00002…) and services get the prefix S- (S-00001, S-00002…). You can enter your own code or scan a barcode instead, and you can change a generated code later when editing the item. The code must be unique within your business.
Q: What’s the difference between Options and Add-ons and Materials and Supplies?
A: Options and Add-ons are visible to customers, who can choose them when they buy. They can have an extra charge (Step 5). Materials and Supplies are what you use to provide the item. Customers don’t see them or pay extra for them, and you only enter the quantity used (Step 6). Both tabs only appear when you edit an item that’s already been saved.
Q: Where do I enter the inventory quantity for a new product?
A: You don’t enter it during setup. Save the product, reopen it with Edit, and use Adjust in the Inventory tab to enter the quantity on hand. See Minimum stock.
Q: On my phone, the setup tabs have turned into buttons. How do I get back to the form?
A: Tapping a button opens that tab full-screen. To return, tap Done or the X at the top. Nothing is saved when you go back. There’s still just one Save button, at the bottom of the setup form.
Q: Are materials and supplies deducted from inventory when I close a Tab?
A: Yes. When you close a Tab, each item deducts its assigned Materials and Supplies from inventory, based on the supply quantity multiplied by the item quantity. A service added as a supply won’t be deducted because services aren’t tracked in inventory. To change the quantity used for an appointment (for example, to use more ink for a larger tattoo), use the Item supplies icon on the Tab item before taking payment. See Tab. If you need to correct the quantity afterward, use Adjust in the product’s Inventory tab.
Q: Do I need to link a technical sheet and anamnesis form to every service?
A: No. Both are optional. Link them only to services that need them. For example, a full sleeve tattoo often needs a technical sheet, while a quick service may not need either one.
Q: What happens if I try to delete a group that still has services in it?
A: The system won’t let you delete it and will tell you that services or subgroups are still linked to it. Move or delete those items first.
Q: Can I change a service price when closing a Tab without changing the setup?
A: Only if Allow changes is enabled under Price on the tab in that service’s setup. If it’s disabled, the Tab always uses the sale price from the setup.
Q: Will deleting a service erase its past sales from reports?
A: No. The sales history remains intact. Deleting a service only removes it from the setup screens for future sales.