Waitlist: Automatically Notify Clients When a Slot Opens
What it is
Section titled “What it is”The Waitlist is for when a client wants an appointment time that isn’t available right now. You enter what they’re looking for — an arm sleeve, their preferred tattoo artist, and the days and times that work for them — and the system keeps an eye on the schedule. As soon as a matching slot opens up (someone cancels or a new time becomes available), the system holds the slot and automatically sends the client a confirmation link by WhatsApp or email, so you don’t have to keep checking the schedule.
When to use it
Section titled “When to use it”- A client wants a helix piercing this week, but the tattoo artist’s schedule is full.
- Someone cancels at the last minute, and you don’t want the opening to go unused — instead of calling a list of people, let the system notify those who are waiting.
- The client doesn’t have a preferred tattoo artist or day — they just want the first available time.
Before you start
Section titled “Before you start”This article covers the Waitlist. If you don’t see this button on the Scheduling screen, ask the studio owner to enable the module for your type of business.
If you can’t view the waitlist or add, edit, or remove someone from it, ask the owner to grant you access to the Waitlist in Access → Roles. With view-only access, you can see the queue but can’t make changes to it.
The slot invitation is sent only if the client has a phone number or email address on file — without either, they’ll stay in the queue but won’t be notified.
Step by step
Section titled “Step by step”Step 1 — Open the Waitlist
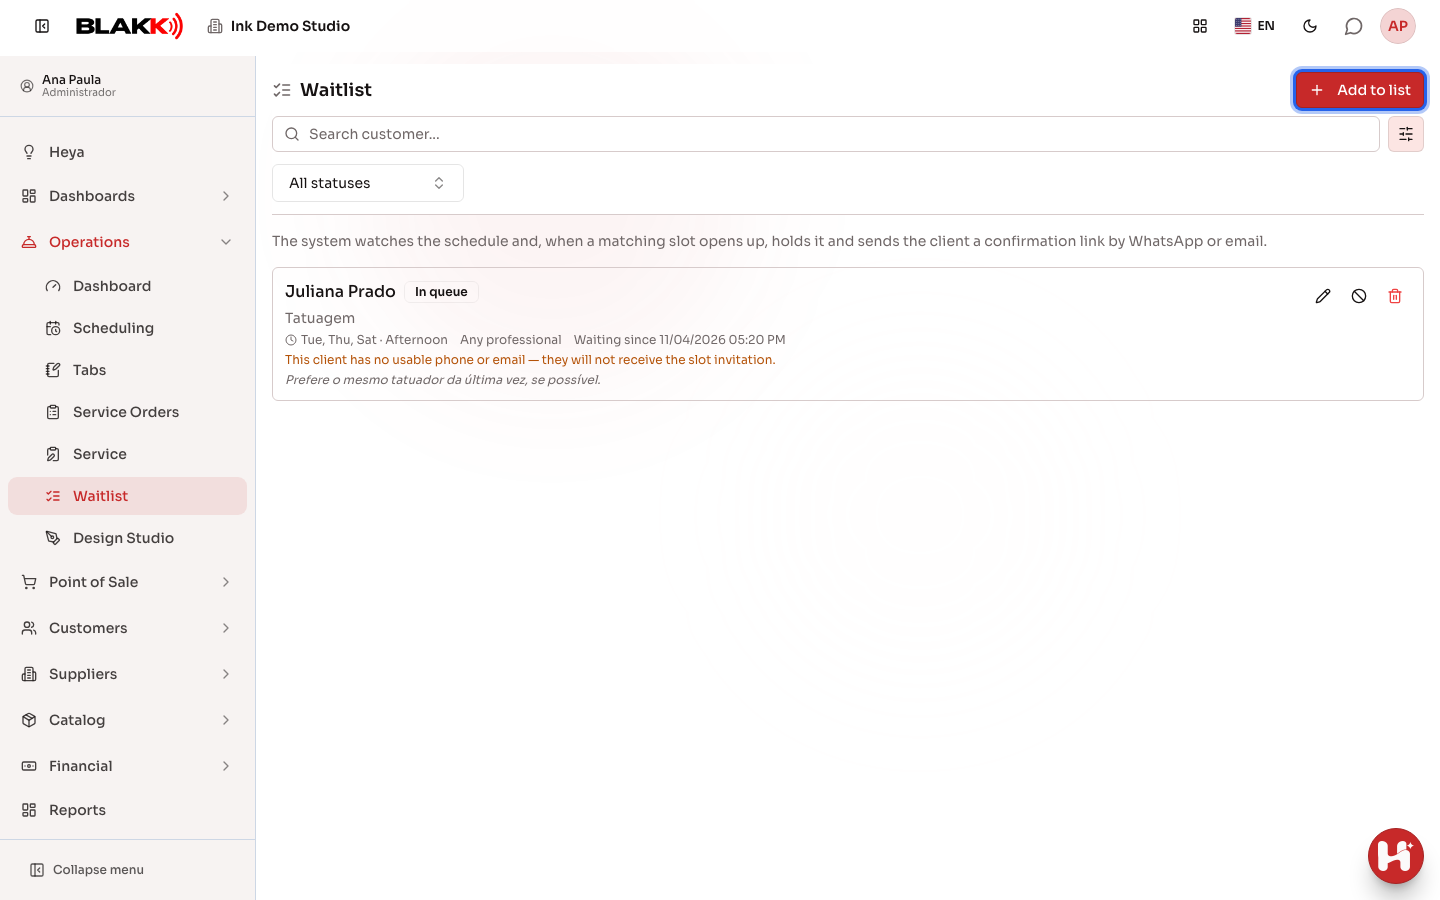
Section titled “Step 1 — Open the Waitlist”On the Scheduling screen, click Waitlist (the number next to the button shows how many people are in the queue), or open the Waitlist menu. The screen shows all entries and their statuses. Use the search to find a client by name, and the status filter (In queue, Awaiting confirmation, Scheduled, or Cancelled) to view just part of the queue.
Step 2 — Choose the client and service
Section titled “Step 2 — Choose the client and service”Click Add to list. Search for an existing client or add a new one right there using the + button next to the field, then choose the arm sleeve under Add service (you can add more than one service). Under Professional, leave Any professional selected or choose the preferred tattoo artist.
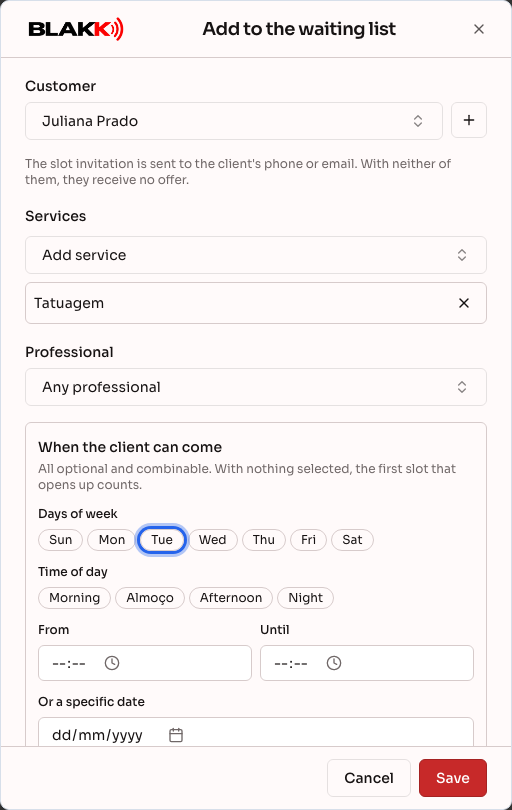
Only services with a duration set up will appear — the same requirement as Quick Fit, for the same reason: the system uses the duration to determine whether a slot will work.
Step 3 — Tell us when the client can come in
Section titled “Step 3 — Tell us when the client can come in”Under When the client can come, all options are optional and can be combined: select the Days of week, one or more Time of day (morning, lunchtime, afternoon, or evening), a time range under From and Until, and/or a date under Or a specific date. Under Notes, add anything else the client requested. If you don’t select anything, the first available slot will work. Click Save to add the client to the queue.
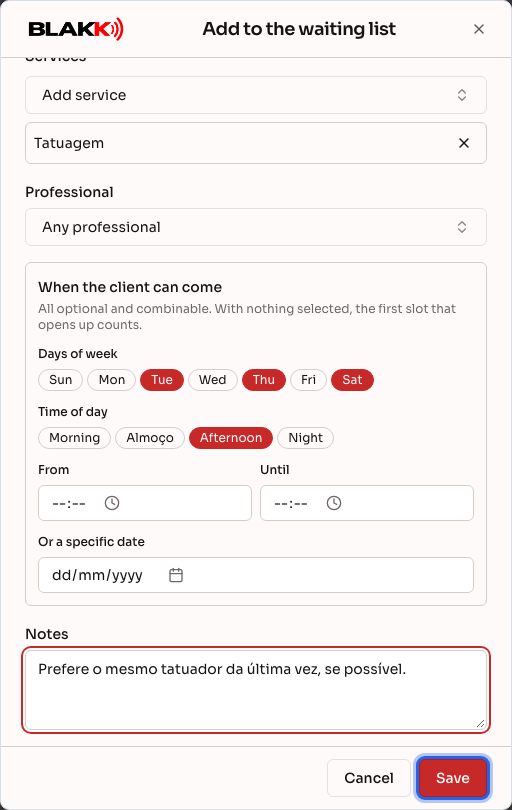
If you select a specific date, any selected days of the week will no longer apply — the screen will let you know when this happens.
Step 4 — View the entry in the queue
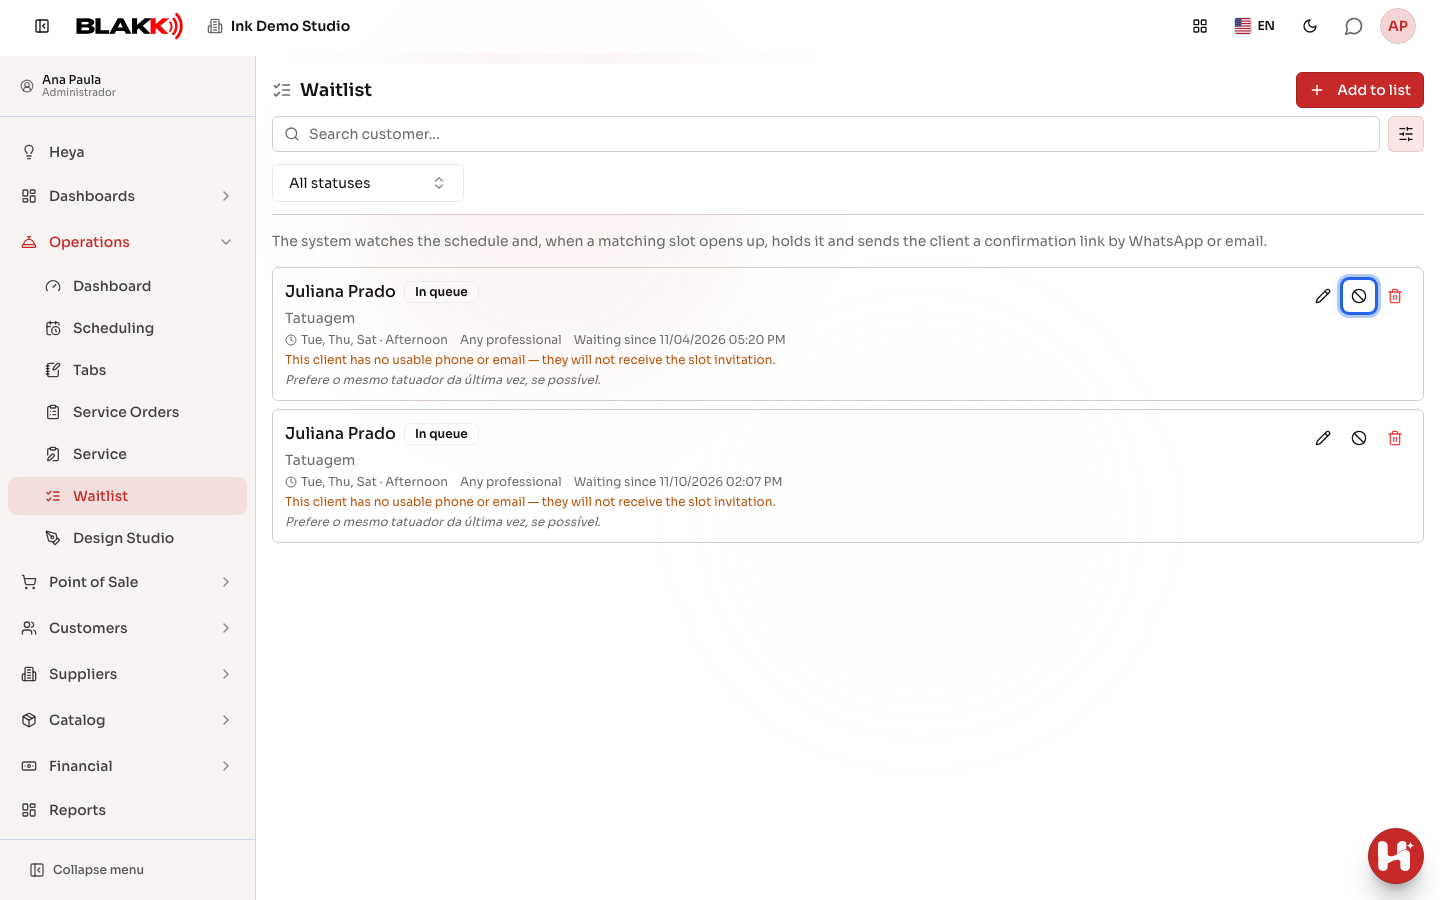
Section titled “Step 4 — View the entry in the queue”After you save, the entry appears in the list with the In queue status, showing the client, service, preferences, and selected tattoo artist (or Any professional).
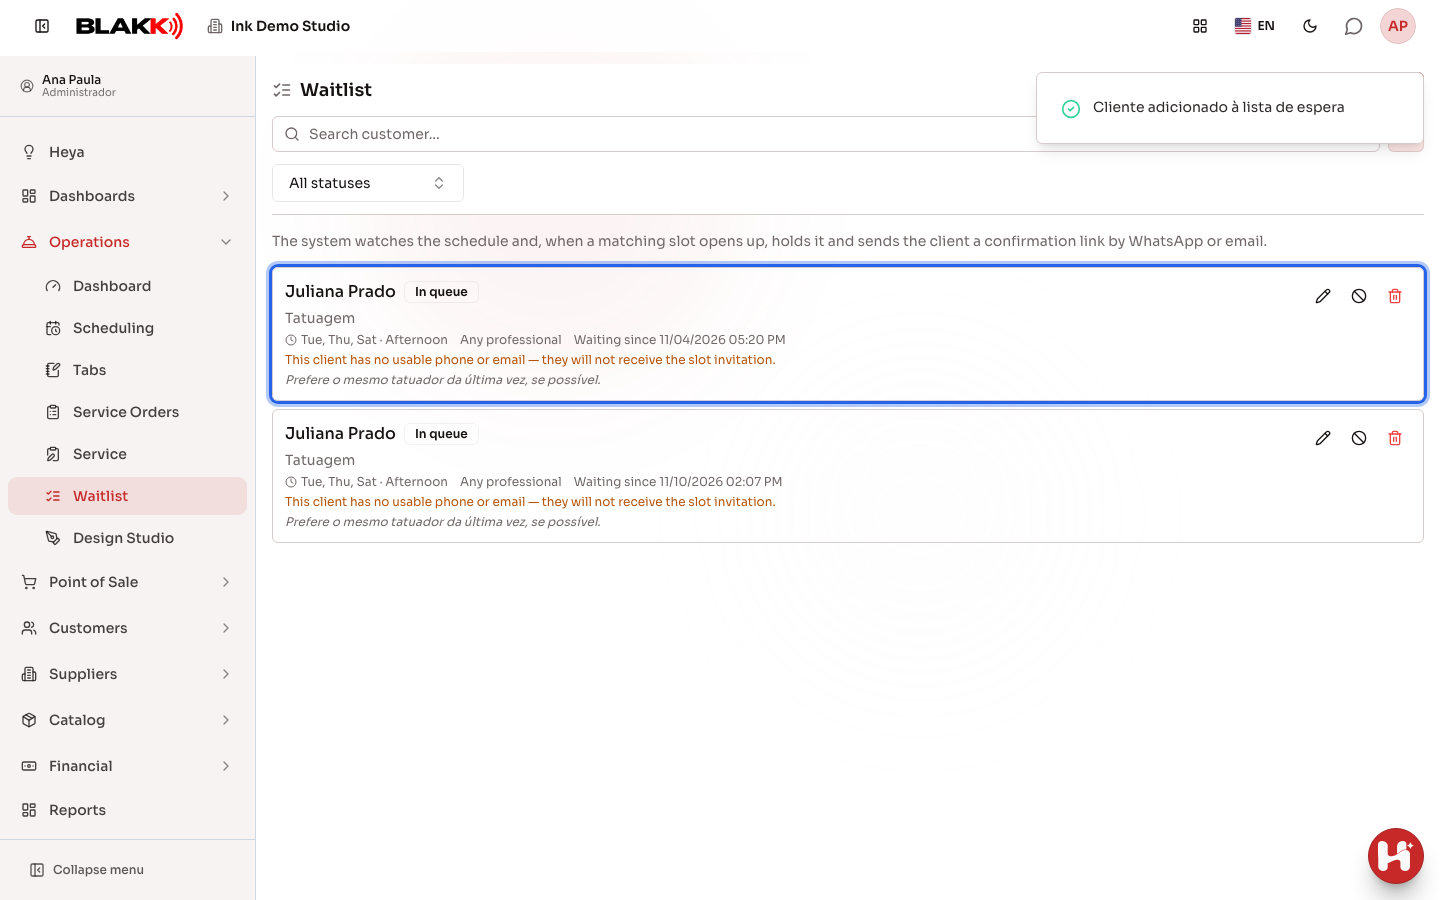
The entry displays a warning if it won’t receive an invitation, but it stays in the queue: the client doesn’t have a usable phone number or email address; one of the entry’s services is no longer available for scheduling (it’s been disabled or deleted, or its duration is missing) — edit the entry and select the service again; or the selected date has passed — edit the date.
When the system holds a slot for the client, the entry shows the Slot on hold and when it expires.
Step 5 — Edit, remove from the queue, or delete
Section titled “Step 5 — Edit, remove from the queue, or delete”Use the icons on the entry: the pencil lets you edit it (changing any preference that’s already been filled in), the prohibited symbol Remove from the queue (the client gave up) cancels it but keeps the history, and the trash can Delete permanently deletes the entry (the system asks you to confirm first). An entry that has already become Scheduled no longer has a pencil icon, and only entries with the In queue or Awaiting confirmation status can be removed from the queue.
Editing an entry — even one that has already been canceled — changes its status back to In queue and starts the search for a slot over from the beginning.
What happens next
Section titled “What happens next”- The system monitors the schedule and, when it finds a time that matches the client’s request, it holds that slot right away — it disappears from the schedule for all other appointments, including Quick Fit and the public booking page — and sends a confirmation link by WhatsApp or email. The entry’s status automatically changes to Awaiting confirmation.
- The client has a limited time to confirm using the link (up to one hour, or until the appointment time, whichever comes first). Once they confirm, the appointment is created and the status changes to Scheduled. If they decline or don’t respond in time, the slot is released back to the schedule, and the entry automatically returns to In queue, ready for another opening.
- An appointment isn’t created automatically — it’s only created when the client confirms using the link. That’s intentional: booking without confirmation could turn any unread message into a no-show.
- A slot held for someone on the waitlist appears on the Schedule grid as a different block (dashed) to let the team know that time is reserved — you can’t edit this block directly from the grid.
Common mistakes and questions
Section titled “Common mistakes and questions”Q: Will the system automatically notify the client when a slot opens, or do I need to call them? A: Automatically — as soon as it finds a matching time, the system sends an invitation by WhatsApp or email. You only need to add the right entry (Steps 2 and 3).
Q: How long does it take the system to find a slot? A: The system checks the schedule every few minutes. It’s not instant, but it doesn’t depend on anyone clicking anything either — it runs automatically all the time, including outside business hours.
Q: Can I book the appointment myself for someone on the waitlist without waiting for the invitation? A: Not directly from here — the client always confirms using the link they receive. If you’d rather book it yourself now, use New appointment or Quick Fit, then remove the entry from the waitlist.
Q: What happens if the client doesn’t respond to the slot invitation? A: After a while with no response, the slot is released back to the schedule — someone else can take it, including someone who didn’t even know it was available — and the entry automatically returns to In queue, where it waits for the next matching opening.
Q: Why does an entry stay in “In queue” without ever receiving an invitation? A: There are three common reasons, and the entry displays a warning for each one: the client doesn’t have a phone number or email address on file; one of the services in the entry is no longer available for scheduling (edit the entry and select the service again); or the selected date has passed (edit the date so the entry can receive offers again).
Q: Can I add more than one client waiting for the same type of opening? A: Yes, with no limit. When a slot opens, the system follows the order in which people joined the queue, among those whose preferences match that time.
Q: Do I need to know the exact service the client will get before adding them to the list? A: Yes, at least one service — the service tells the system how much time a slot needs to have available.