Tab: How to open one, add items, and accept payment
What it is
Section titled “What it is”A tab is where you add everything a customer receives during a visit—an arm sleeve tattoo, a helix piercing, or products such as healing ointment—and accept payment at the end. It connects the services your tattoo artist provides with the money coming into your studio.
When to use it
Section titled “When to use it”- A customer arrives without an appointment and wants a helix piercing right away: open a standalone tab, add the service, and accept payment at the end.
- A customer has an appointment for an arm sleeve tattoo: when it’s time to bring them to the chair, open the tab from the appointment without entering the details again.
- During the visit, the tattoo artist recommends healing ointment for the customer to take home: add the product to the same tab as the service.
Before you start
Section titled “Before you start”This article covers the Tabs screen. If you can’t find this menu, ask the studio owner to enable the Tabs module for your business type.
If you can’t open, edit, or delete a tab, ask the studio owner to grant you access under Access → Roles. The system doesn’t have a fixed “tattoo artist” role—permissions are configured there for each person.
Step by step
Section titled “Step by step”Step 1 — Open a standalone tab (customer without an appointment)
Section titled “Step 1 — Open a standalone tab (customer without an appointment)”On the Tabs screen, click New Tab. Select an existing customer (or quickly add a new one right there) and confirm.
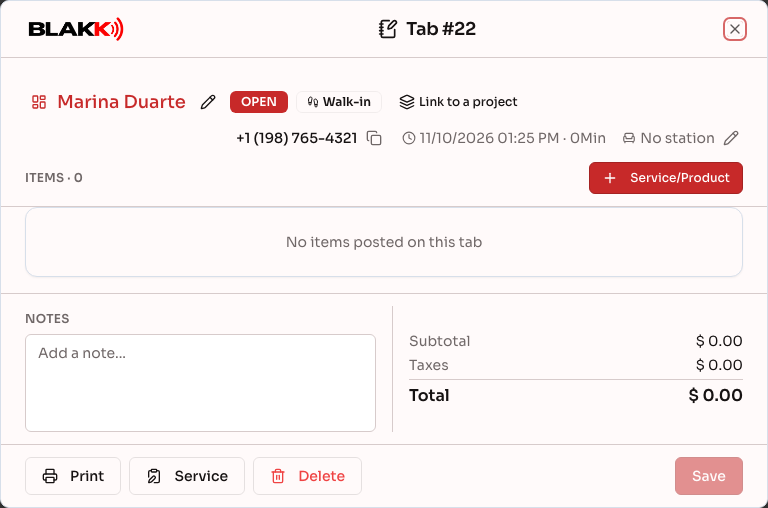
With the tab open, click the panel icon just before the customer’s name at the top (or click the name itself) to view the Customer Summary: how much they’ve spent, what’s still open, upcoming appointments, and recent activity, as well as the Appointments, Services rendered, Anamneses, and purchases tabs and the customer’s forms. The pencil beside the name still lets you change the customer on the tab.
Step 2 — Open a tab from an appointment
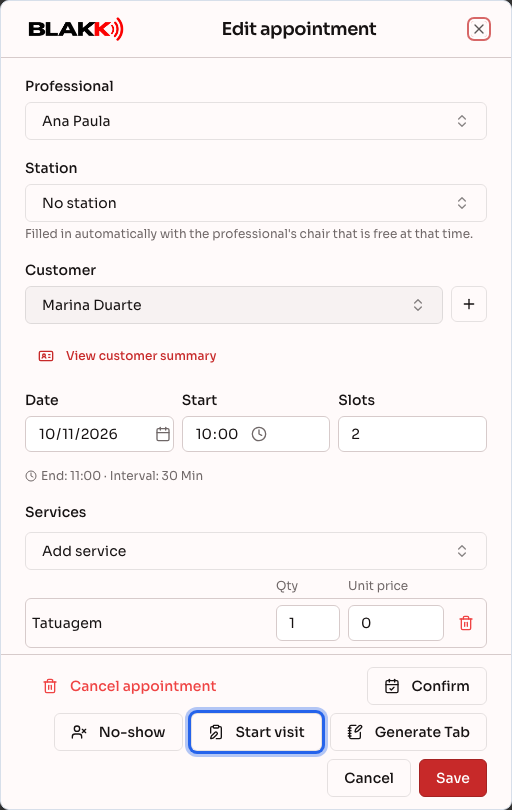
Section titled “Step 2 — Open a tab from an appointment”If the customer already has an appointment, don’t open a standalone tab. Go to the calendar, click their appointment to open it, then click Start visit in the dialog. The services already agreed on in the appointment are added to the tab automatically at the agreed price.
Step 3 — Add a service or product
Section titled “Step 3 — Add a service or product”On the tab, click Service/Product. The screen opens on the Services tab (or All if your studio hasn’t added any services yet), with items grouped by category. Use the All / Services / Products filters or search to find an item, then click it.
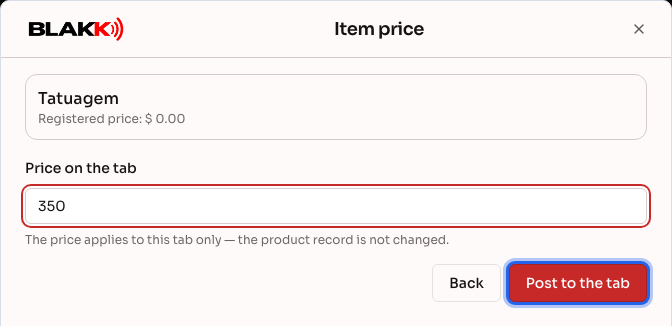
Each product with inventory tracking shows Available stock beside its price, with quantities already added to other open tabs deducted (the amount on those tabs appears in parentheses). The number turns red when inventory is depleted or has reached its minimum. This is just a warning—you can still add the product. Products marked Unavailable in their setup don’t appear in the list. If a service doesn’t have a set price in its setup (for example, an arm sleeve tattoo charged per session), the screen asks for the Price on the tab before you confirm. This price applies only to this tab and doesn’t change the service setup.
Some services require the customer’s anamnesis to be completed before they’re performed. The item displays Anamnesis pending until it’s filled out.
Step 4 — Fill out the service technical sheet
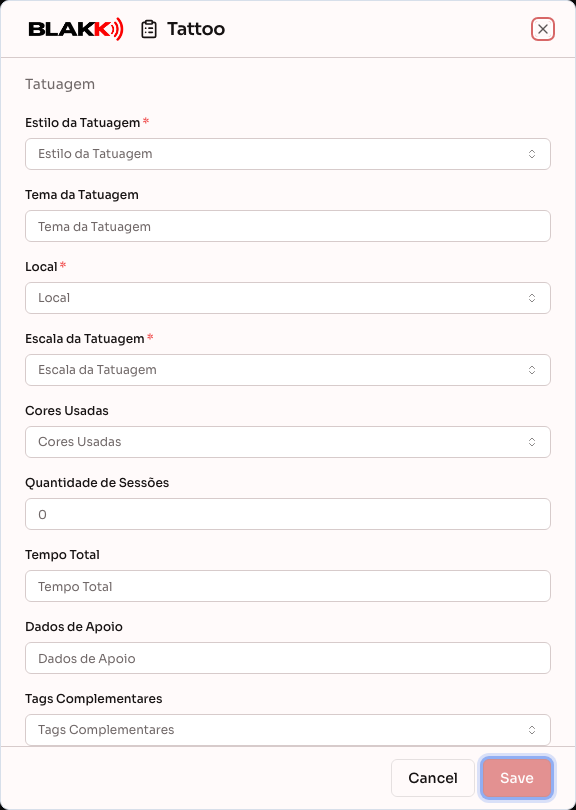
Section titled “Step 4 — Fill out the service technical sheet”Tattoo services (Tattoo, Cover-up, Touch-up) use the Tattoo technical sheet (style, theme, placement, colors, artist), while piercing services (Piercing, Jewelry change) use the Piercing sheet (placement, jewelry, material, artist). On the item you added, click Sheet pending to open and fill out the sheet. If the customer has had something similar done before, click Repeat from last time, then Use to avoid entering everything again.
Fields marked with an asterisk (*) are required. If any are missing when you click Save, the sheet won’t be saved, and the message “Fill out all required fields in the technical sheet.” lists the missing fields. Text fields with a required format (for example, a code with a set number of digits) also prevent saving if the format is incorrect. After the sheet is saved, the item displays Sheet done.
Step 5 — Choose the tattoo artist responsible for each item
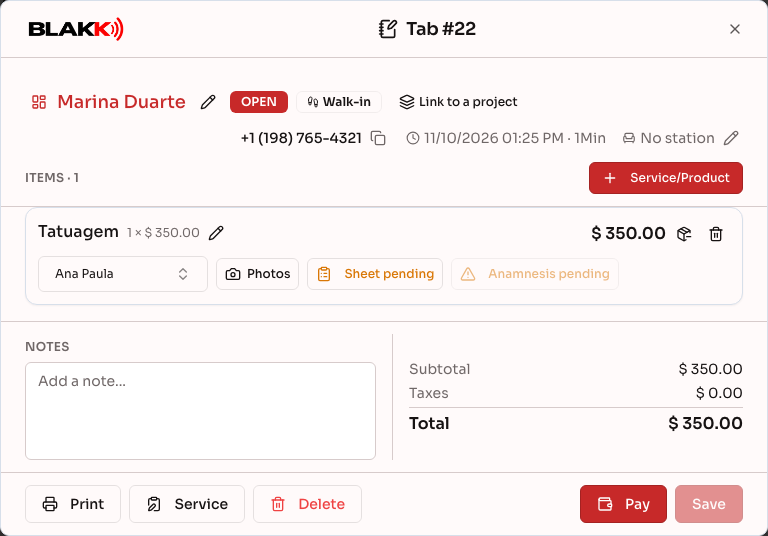
Section titled “Step 5 — Choose the tattoo artist responsible for each item”Each item on the tab has its own tattoo artist selector. Click Select the professional on the item and choose who will perform the service. This helps ensure each tattoo artist’s commission is calculated correctly.
Step 6 — Adjust an item’s supplies
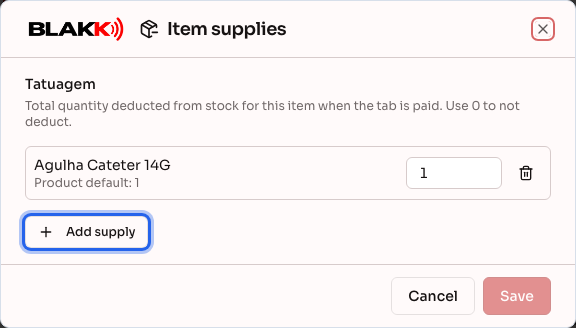
Section titled “Step 6 — Adjust an item’s supplies”If a service or product has materials and supplies in its setup (for example, ink and needles for a tattoo), they’re deducted from inventory when the tab is paid. To specify how much was actually used for this visit, click the Item supplies icon beside the item price.
The dialog shows each supply and the quantity that will be deducted from inventory for this item (the quantity specified in the setup, multiplied by the quantity added to the tab), with Product default shown below the name. Change the quantity, enter 0 to avoid deducting a supply, remove a supply, or click Add supply to add an inventory product that wasn’t included by default. Click Save. If a quantity field is left blank, the row displays the message “Enter a quantity (0 to avoid deducting it),” and the Save button stays disabled until you enter a value.
The icon is highlighted on items with adjusted supplies. To restore the quantities specified in the setup, open the dialog again and click Restore product default. This adjustment applies only to this tab. It doesn’t change the service setup or the price charged.
Step 7 — Add a note
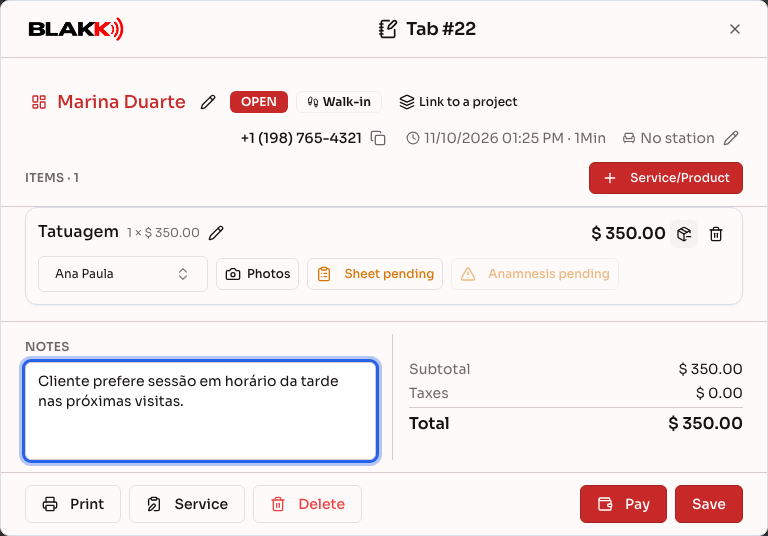
Section titled “Step 7 — Add a note”At the bottom of the tab, use the Notes field (Add a note…) to record any details you need to keep on file—an agreement with the customer or a note for whoever closes the tab later.
Step 8 — Accept a partial payment
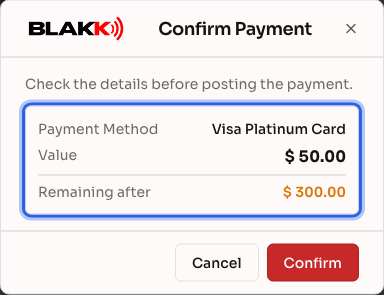
Section titled “Step 8 — Accept a partial payment”Click Pay. Choose the Payment Method, enter the amount, then click Add payment. The Confirm Payment window opens with a summary of what will be recorded: the payment method, amount, installments, and customer (if applicable), the payment method discount, change due, and remaining balance. Review the details and click Confirm. If something is wrong, click Cancel. Nothing will be recorded, and the amount you entered will remain in the field. For card payments through a card terminal, the charge isn’t sent to the terminal until you click Confirm. Clicking a bill denomination also opens the summary.
You can repeat this as many times as needed. Each confirmed payment is saved right away, so even if you close the screen partway through, any payments already recorded won’t be lost.
If a payment method has a Discount % (configured under Payment Methods), its button shows beside the name how much the customer would pay if they paid the remaining balance with that method, after the discount. If you don’t enter an amount, the payment records that amount. The amount you enter is always what’s charged using that method, and the discount is applied proportionally: on a $100.00 tab with a 10% Pix discount, a $45.00 Pix payment covers $50.00 of the tab. Amount due continues to show the tab balance before the discount (the Remaining in line below shows how much remains for each discounted payment method), the bar adds a Discount line underneath showing the discount already applied, and the payment appears in the list with the percentage, such as “Pix (10%).” If the tab already has its own discount, the payment method discount is applied afterward.
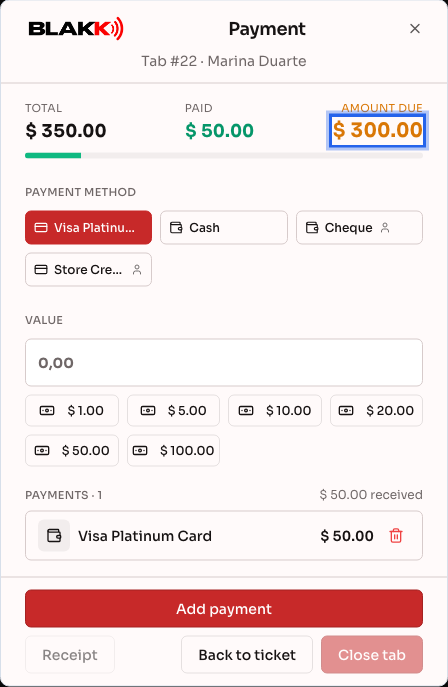
Step 9 — Accept the remaining balance and close the tab automatically
Section titled “Step 9 — Accept the remaining balance and close the tab automatically”Enter the remaining amount, click Add payment again, and confirm in the summary, which tells you that the payment will settle the balance and close the tab. As soon as Amount due reaches zero, the tab closes automatically—the sale is created, inventory for the products used is deducted, and, if the tab came from an appointment, the appointment is marked as complete. There’s nothing else you need to click after recording the final payment.
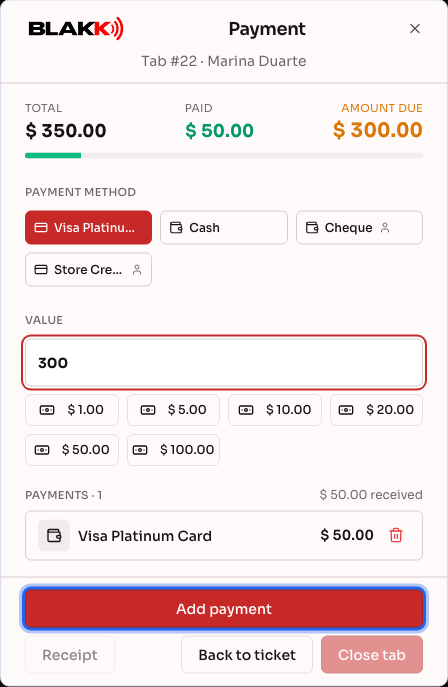
The Close tab button is there as a safeguard: use it to close the tab manually if automatic closing fails after a card has already been charged, or to close a complimentary tab with nothing to collect.
Step 10 — Cancel a tab opened by mistake
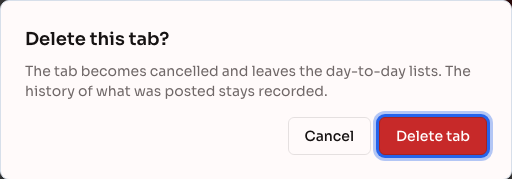
Section titled “Step 10 — Cancel a tab opened by mistake”If no payments have been recorded on the tab, click Delete and confirm with Delete tab. The tab will be marked as canceled. It disappears from the day-to-day lists, but remains in your history.
Step 11 — Issue a service invoice for the tab
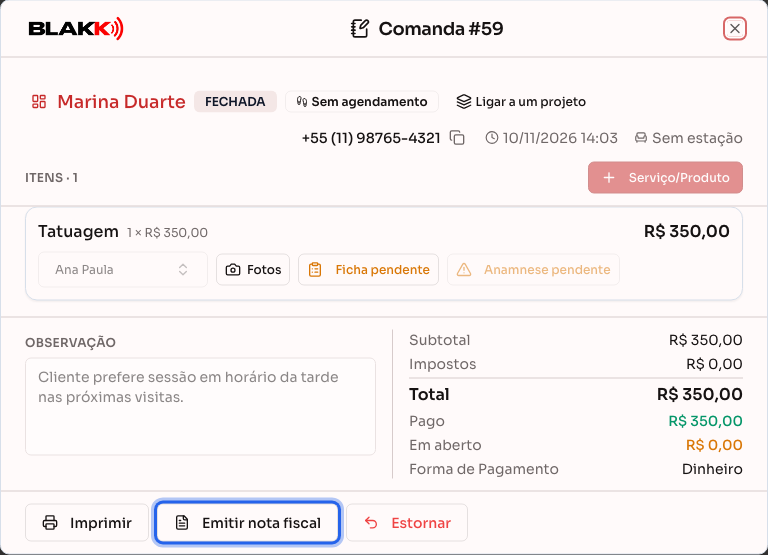
Section titled “Step 11 — Issue a service invoice for the tab”For businesses in Brazil, the tab has an Issue invoice button at the bottom (on mobile, it’s in the ⋮ menu). If the invoice can’t be issued yet, the button is disabled and the tab displays the reason (on a computer, just above the bottom of the screen; on mobile, at the end of the tab): NFS-e issuance hasn’t been set up and enabled under Settings → Business, or the tab hasn’t been closed (paid) yet.
Once the tab is closed, click Issue invoice, review the details, and click Issue NFS-e. The invoice includes services only; products aren’t included. After it’s issued, the button changes to View invoice, where you can download the PDF or send the invoice to the customer. For the complete instructions, see Service invoice (NFS-e).
Step 12 — Reverse a paid tab
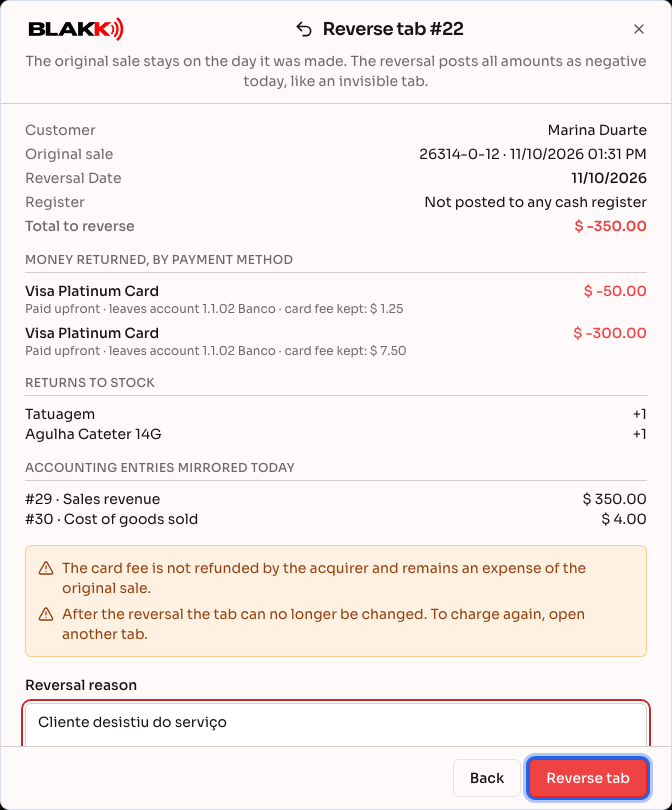
Section titled “Step 12 — Reverse a paid tab”If a customer changes their mind or a paid tab was charged by mistake, open the tab (filter by Closed) and click Reverse at the bottom (on mobile, in the ⋮ menu). Nothing is reversed yet. A screen opens showing exactly what will happen, using today’s date:
- how much will be returned for each payment method and which account the money will come from (the Pix payment deposited in Bank X will come out of Bank X today);
- which cash register will record the reversal (the one currently open, if your studio uses cash registers);
- what will be returned to inventory, the amount of revenue that will be canceled, and the credit returned to the customer;
- commission already paid to the tattoo artist, which will be deducted in the current period;
- warnings, such as card payments (card refunds must be processed through the terminal) and issued invoices.
Enter the Reversal reason and click Reverse tab. The original sale isn’t deleted: it remains on the day it was made, and the reversal is recorded today with all amounts as negatives, like an invisible tab. The tab’s status changes to Reversed, and a banner shows the date, who reversed it, the reason, and what was recorded.
If you can’t reverse a tab, ask the studio owner to grant you access under Access → Roles (this is the same full access that allows you to cancel tabs; if the reversal is recorded in a cash register, you also need permission to close the register).
Step 13 — Print the tab or create a PDF
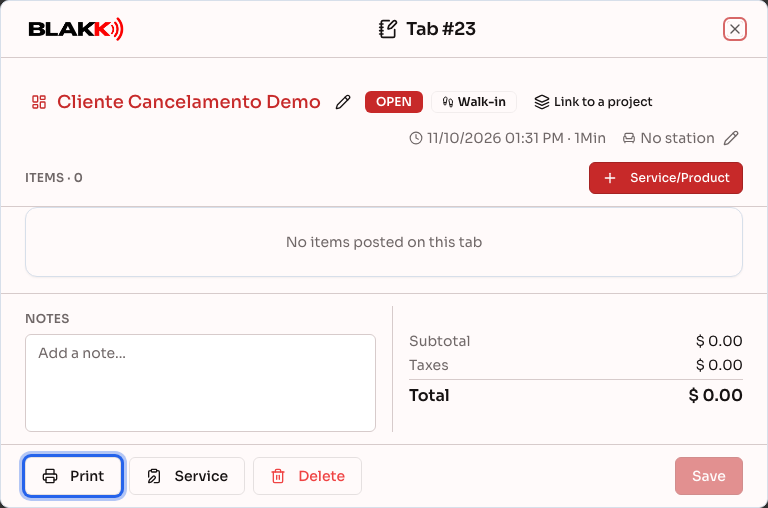
Section titled “Step 13 — Print the tab or create a PDF”Click Print at the bottom of the tab (on mobile, in the ⋮ menu). On a computer, your browser’s print dialog opens, where you can select any installed printer and print on A4 paper. On a phone or tablet, the tab is generated as a PDF that you can share with the customer or print. The printout shows the tab as saved. If the note hasn’t been saved yet, Blakk saves it before printing. If your studio has more than one active tab template, the button displays a list for you to choose from.
The document uses the Tab type template under Settings → Print Templates. If there’s no active template, the screen displays No active Tab template for a regular (A4) printer..
See how to set up a template in Studio printers and print templates.
What happens next
Section titled “What happens next”- Cash register: Closing the tab creates the actual sale. It appears in that day’s cash register closeout, with the payments exactly as they were recorded.
- Inventory: Products such as healing ointment and each item’s supplies are deducted from inventory only when the tab is closed. An open tab doesn’t affect inventory, even if a product has already been added. Supplies are deducted in the quantities from Step 6 if the item was adjusted, or according to the setup if it wasn’t.
- Appointment: If the tab came from an appointment, paying the tab marks that appointment as complete. Payment closes the loop, not “Start visit.”
- Commission: The tattoo artist selected for each item receives the commission for that item, so it’s a good idea to review Step 5 before closing. If payment is made with a discounted payment method, commission is calculated on the item price after the discount.
- Invoice: Once the tab is closed, you can issue a service invoice using the Issue invoice button (Step 11). An invoice is never issued automatically when a tab is closed.
- Reversal (Step 12): Reports show the original sale on the day it was made and the negative reversal on the day it was processed, without counting it as an additional sale. The money comes out of the same account it went into, inventory is returned, the card fee remains an expense (the processor doesn’t refund it), and reversed tips aren’t included in tip distribution. Any unpaid commission is canceled; commission already paid is deducted in the period when the tab was reversed.
Common mistakes and questions
Section titled “Common mistakes and questions”Q: Can I reopen a tab after it’s been closed or canceled? A: No. To protect the information, the system doesn’t allow this. This prevents anyone from changing a tab after it’s been closed and paid. If a tab was paid by mistake, you can reverse it (Step 12): the reversal records negative amounts today. To charge the customer again, open a new tab.
Q: Does reversing a tab refund the money to the customer’s card? A: No. The system records the reversal in your financial records, but card refunds must be processed through the terminal or your payment processor. The confirmation screen warns you when the tab was paid by card.
Q: The reversed tab had an invoice. What happens to it? A: If the invoice hadn’t been sent to the city government yet, it’s removed from the queue when the tab is reversed. If it was already issued, cancel the invoice in the Issued Invoices report. Reversing a tab doesn’t cancel an issued invoice.
Q: I reversed a tab after its commission had already been paid. Does the tattoo artist lose that amount? A: The amount already paid appears as a negative amount in the Commission Report for the period when the tab was reversed, and is deducted from the tattoo artist’s next commission payment.
Q: I saw “Some revenue from this tab has already been received in Customer Payments” when reversing it. A: Part of the tab was paid using a payment method with a later due date, and that payment has since been received. Undo that receipt first, then reverse the tab.
Q: Why doesn’t a product appear in the Service/Product list on the tab? A: The product is marked Unavailable under Manual availability for sale in its setup, or it’s inactive. Open the product under Products, mark it Available, and save. It will appear on the tab again. You can still use products as supplies for an item.
Q: Why is the inventory shown on the tab different from the inventory shown under Products? A: Inventory is deducted only when the tab is completed. That’s why the tab subtracts quantities already added to other open tabs and shows those quantities in parentheses. The Products screen shows the inventory before that deduction.
Q: Why doesn’t the Delete button appear or work? A: You can delete (cancel) a tab only if no payments have been recorded. If you’ve already received a payment, remove it first. Payments made by card or through an online provider that have already been processed can’t be removed this way. Paid tabs can’t be deleted; they must be reversed using the Reverse button (Step 12).
Q: Why can’t I add an item, change the tattoo artist, or change an item’s price anymore? A: You can only make changes while a tab is open. Once it’s closed or canceled, it’s locked. This is the same restriction described in the previous question.
Q: The technical sheet won’t save and shows “Fill out all required fields in the technical sheet.” What should I do? A: One or more fields marked with an asterisk (*) are blank. The message lists the missing fields. Fill them in and click Save again. If the message says “Some fields in the technical sheet have an invalid format,” the listed field wasn’t entered in the expected format.
Q: Why can’t I edit the technical sheet on a tab that’s already closed? A: Once a tab is closed or canceled, the technical sheet is view-only. You can open it, but there’s no Save button. It records how the service was performed and can’t be changed afterward.
Q: Does a micropigmentation item also have a technical sheet? A: Only if the service is linked to a sheet. The studio setup creates Tattoo and Piercing sheets; there isn’t a separate micropigmentation sheet. To record micropigmentation, open the service under Catalog → Services, select the Additional tab, and choose the Tattoo sheet in the Technical Sheet field.
Q: I changed the amount of ink on the tab. Does that also change the service setup? A: No. Adjustments under Item supplies apply only to that item on that tab. The next tab will use the quantities in the service setup.
Q: Why doesn’t a supply from the setup appear in the supplies dialog? A: Only supplies that are deducted from inventory appear: active inventory products. Services and groups used as supplies in the setup aren’t deducted from inventory, so they’re left out. To add another product, click Add supply.
Q: A supply displays the message “Not deducted from inventory.” Why? A: The product used for that supply is no longer an inventory item after the adjustment (for example, it became a service). It remains in the list but isn’t deducted from inventory. Remove it or replace it with another product.
Q: Can I adjust supplies after the tab has been paid? A: No. Inventory is deducted when the tab is paid, and closed tabs are view-only. On items that were adjusted, the icon remains visible so you can check what was used.
Q: What happens if I forget to choose the tattoo artist for an item? A: The item is marked No professional, and the tab still works normally. However, it’s best to choose someone before closing, because that tattoo artist receives the commission for the item.
Q: Why doesn’t a user appear in the tattoo artist list on the tab? A: The list includes only users with service hours entered, using the same criteria as the calendar. Add that person’s hours under the Availability tab in their user profile. If no one at the studio has hours entered, the list shows all active users. Existing tabs and items continue to show the name of the person already selected.
Q: Who can view, edit, or cancel tabs at my studio? A: Anyone the studio owner grants access to under Access → Roles. Access isn’t tied to a fixed job title. It can be configured for each person, with view-only, editing, or full access (including cancellation).
Q: Can I accept part of the payment in cash and part by card on the same tab? A: Yes. Record as many payments as needed using different methods until Amount due reaches zero. If a payment method has a discount, it applies only to the portion paid with that method.
Q: I saw “Remove the discounted payment from this account first” when removing an item or changing a price. A: A payment has already been recorded on the tab using a discounted payment method, based on the items at the time. While that payment remains, you can’t remove an item or change an item’s price. Remove the payment in the payment dialog, make the change, and record the payment again. You can still add items or change the tattoo artist.
Q: I saw “The discount for this payment method has changed. Refresh the screen.” A: Someone changed the Discount % for that payment method while the payment dialog was open. The payment wasn’t recorded. Close and reopen the payment dialog, then record the payment again with the updated discount.
Q: Is the tattoo artist’s commission calculated after the payment method discount? A: Yes. Commission for each item is calculated on the item price after applying the discount for the payment method used.
Q: Can I print the tab or send the customer a receipt? A: Yes. The Print button prints the tab on A4 paper using your browser, or generates a PDF on a phone that you can share (Step 13). Your studio needs an active Tab template under Settings → Print Templates. You can also send a summary through WhatsApp (see the question below).
Q: Why is the Issue invoice button disabled? A: The tab displays the reason. The most common reasons are that NFS-e issuance hasn’t been set up and enabled under Settings → Business, or that the tab hasn’t been closed (paid). Canceled or reversed tabs, and closed tabs without services, can’t generate an invoice either. If the button doesn’t appear at all, ask the studio owner for access to Issued Invoices under Access → Roles.
Q: The tab closed automatically when I accepted payment. How do I issue an invoice now? A: On the Tabs screen, change the status filter to Closed, open the tab, and click Issue invoice.
Q: The tattoo will take several sessions. How do I link the tabs? A: Click Link to a project beside the tab status and create a project (or choose one the customer already has). Each tab becomes a session, and the “Session 2 of 4” badge in the header opens the project. See the step-by-step guide in Projects with multiple sessions.
Q: Does paying with the customer credit payment method deduct from their prepaid balance? A: Yes. When the tab is closed, the amount paid using the customer credit payment method (the one that checks their balance) is deducted from their stored credit, just as it is in the POS. Any remaining balance goes to Accounts Receivable.
Q: Can I send the tab through WhatsApp? A: Yes, if your studio’s WhatsApp is set up in the system. Click the Send tab via WhatsApp icon beside the customer’s phone number, and they’ll receive a summary of the items added.