Email Marketing: Contacts, Campaigns, and Sending
What it is
Section titled “What it is”Email Marketing stores the contacts your business emails with campaigns. Import a spreadsheet (including a list of CNPJs from the Brazilian Federal Revenue Service), organize contacts with tags and lists, and keep track of who unsubscribes. Marketing contacts are kept separate from your Customers records, so importing thousands of CNPJs won’t fill up your customer list.
When to use it
Section titled “When to use it”- You bought or downloaded a list of businesses in your industry (CNAE) from the Brazilian Federal Revenue Service and want to introduce your business to them.
- You want to sort contacts by city, state, or source using tags (for example, “Revenue_2026_11”) so you can send different campaigns to each group.
- Someone asked to unsubscribe or have their data deleted, and you need to make sure they don’t receive anything else.
Before you start
Section titled “Before you start”- Email Marketing must be enabled for your business.
- To import contacts, apply tags, and unsubscribe contacts, your profile needs edit access to Marketing › Email Marketing. To delete a contact’s data, you need delete access.
- Importing data from the Brazilian Federal Revenue Service is only available for businesses in Brazil.
Step by step
Section titled “Step by step”Step 1 — Open Email Marketing
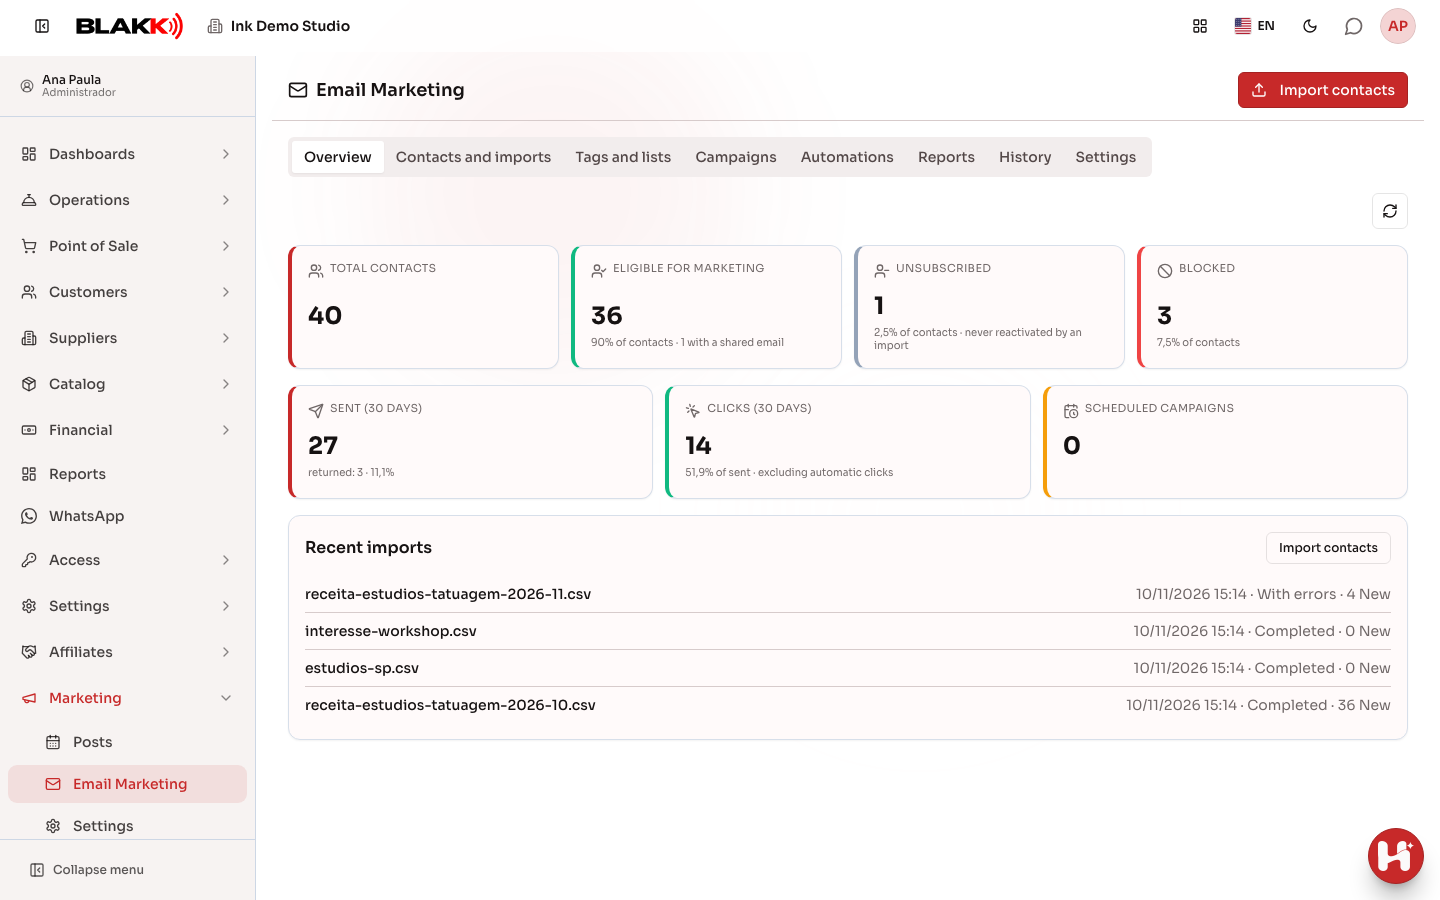
Section titled “Step 1 — Open Email Marketing”From the menu, open Marketing › Email Marketing. Overview shows how many contacts can receive campaigns, how many have unsubscribed, and the most recent imports. Use the refresh button at the top to see the latest numbers. Click any number to open the Contacts and imports tab with a filter applied: Eligible for marketing, Unsubscribed, and Blocked filter by status; Sent (30 days) and Clicks (30 days) show who received or clicked in the last 30 days. The title and tabs stay fixed at the top of the screen while the content below scrolls.
Step 2 — Upload the spreadsheet
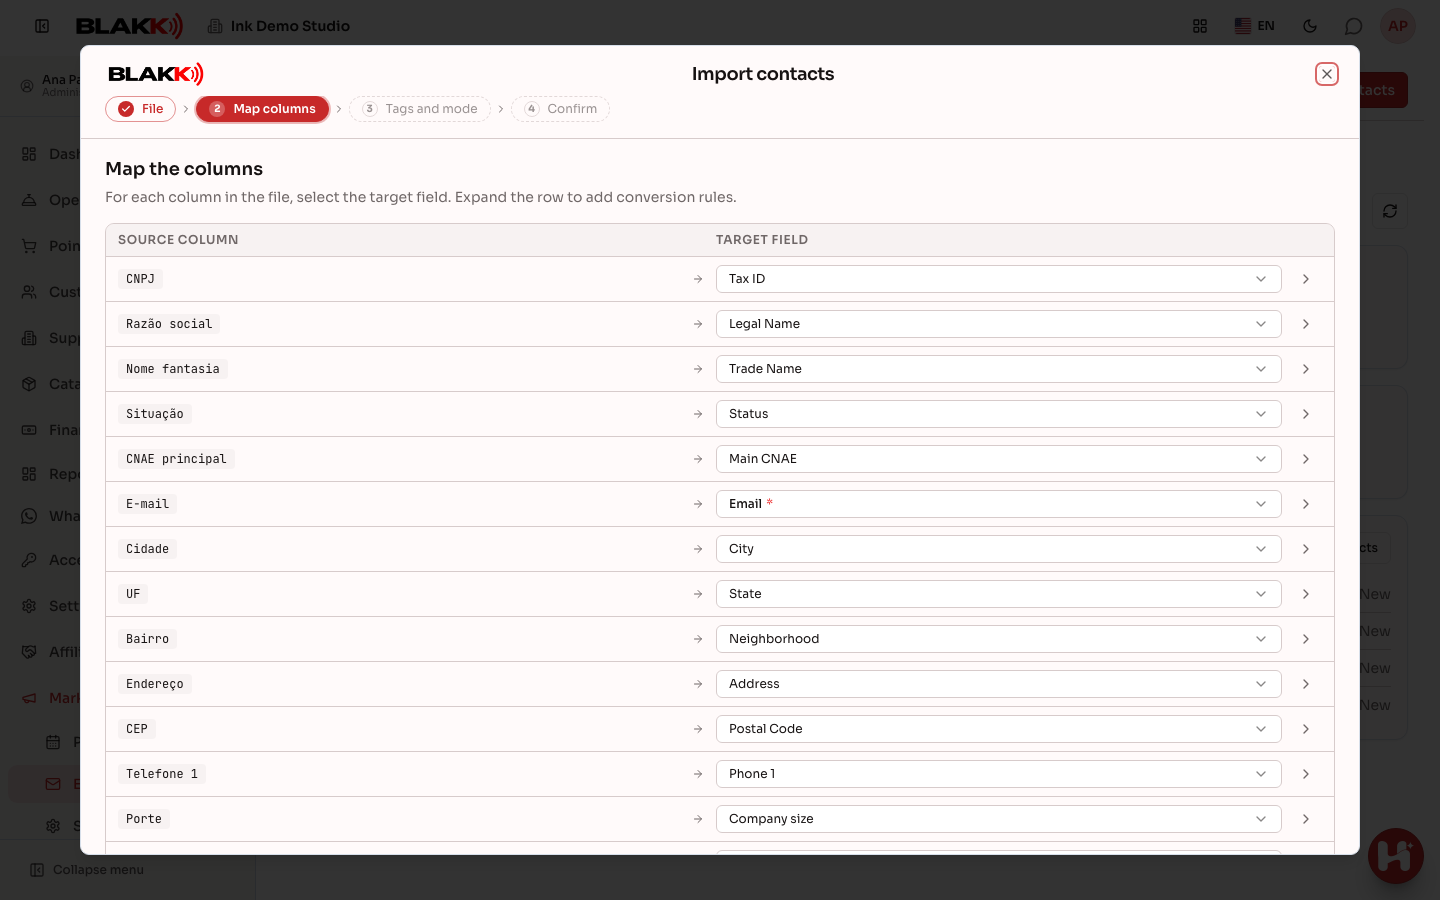
Section titled “Step 2 — Upload the spreadsheet”Click Import contacts. The import opens in a window over the list, with the four steps shown at the top. Drag in a CSV or XLSX file. To leave without importing, close the window using the X; during an import, you can close it only after the import is complete. CNPJ spreadsheets from the Brazilian Federal Revenue Service (CSV files separated by semicolons) are recognized automatically. Check the column mapping in the next step and choose which column contains the email address if needed. Phone numbers, fax numbers, addresses, neighborhoods, ZIP codes, headquarters or branch status, share capital, and CNAE category are also imported and shown in the contact details and export; this information isn’t used to send emails.
Step 3 — Tags, import method, and legal basis
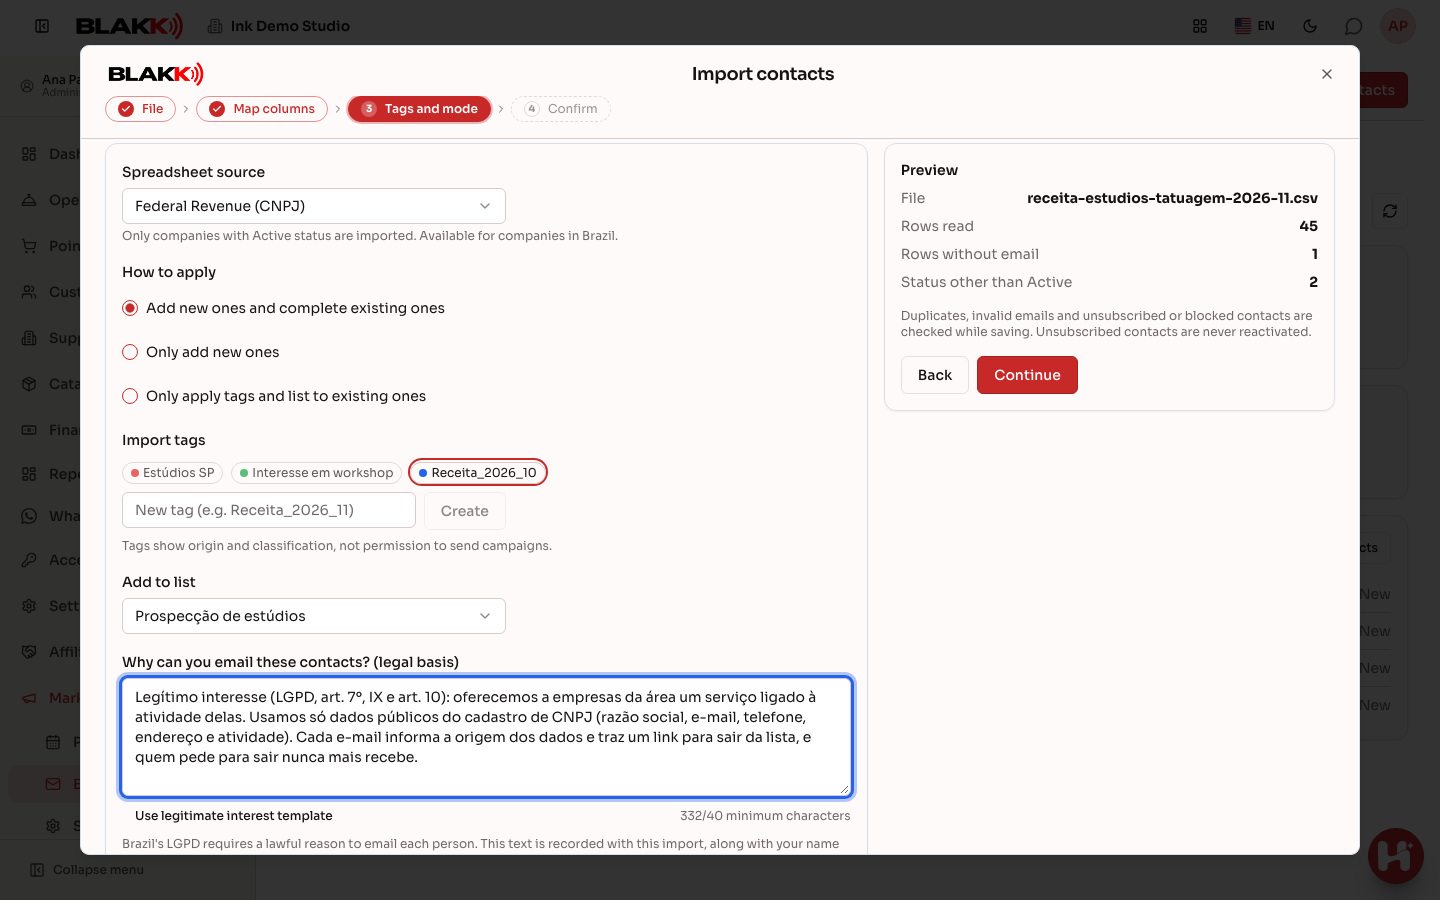
Section titled “Step 3 — Tags, import method, and legal basis”Choose the spreadsheet source, how to apply the data (add new contacts and update existing ones, add new contacts only, or apply tags only), the tags, and the list. Then fill in Why can you email these contacts? (legal basis). The Use legitimate interest template button provides sample text for you to review. The text is saved with the import, along with your name and the date.
Step 4 — Import and review the results
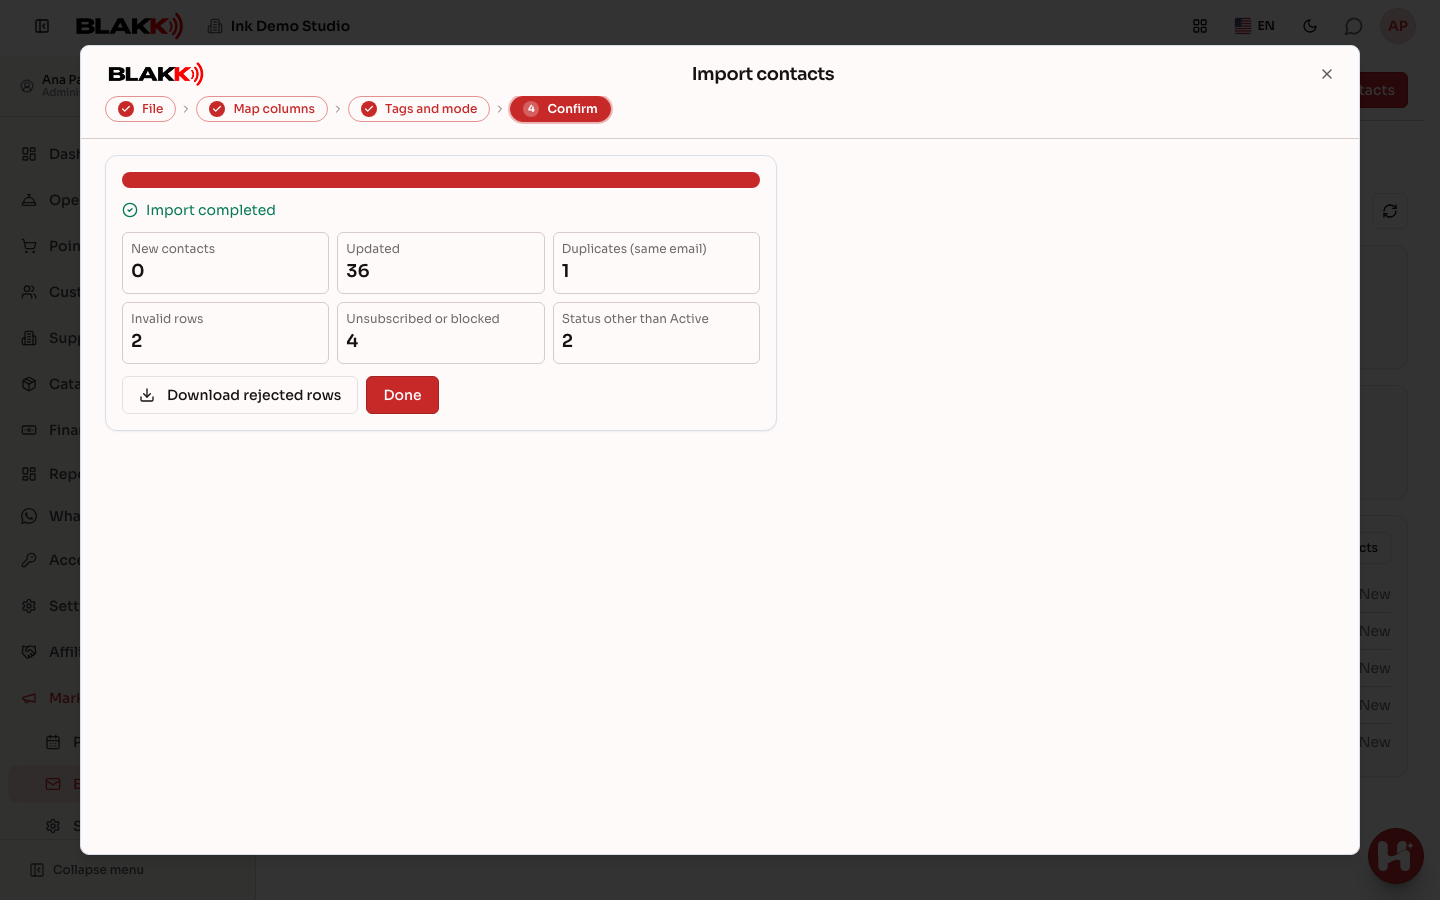
Section titled “Step 4 — Import and review the results”Click Import. When the import is finished, you’ll see how many contacts are new, how many were updated, how many rows were duplicates or invalid, how many businesses had a status other than Active, and how many email addresses were already unsubscribed. Use Download rejected rows to see why each rejected row was excluded.
Step 5 — Organize your contacts
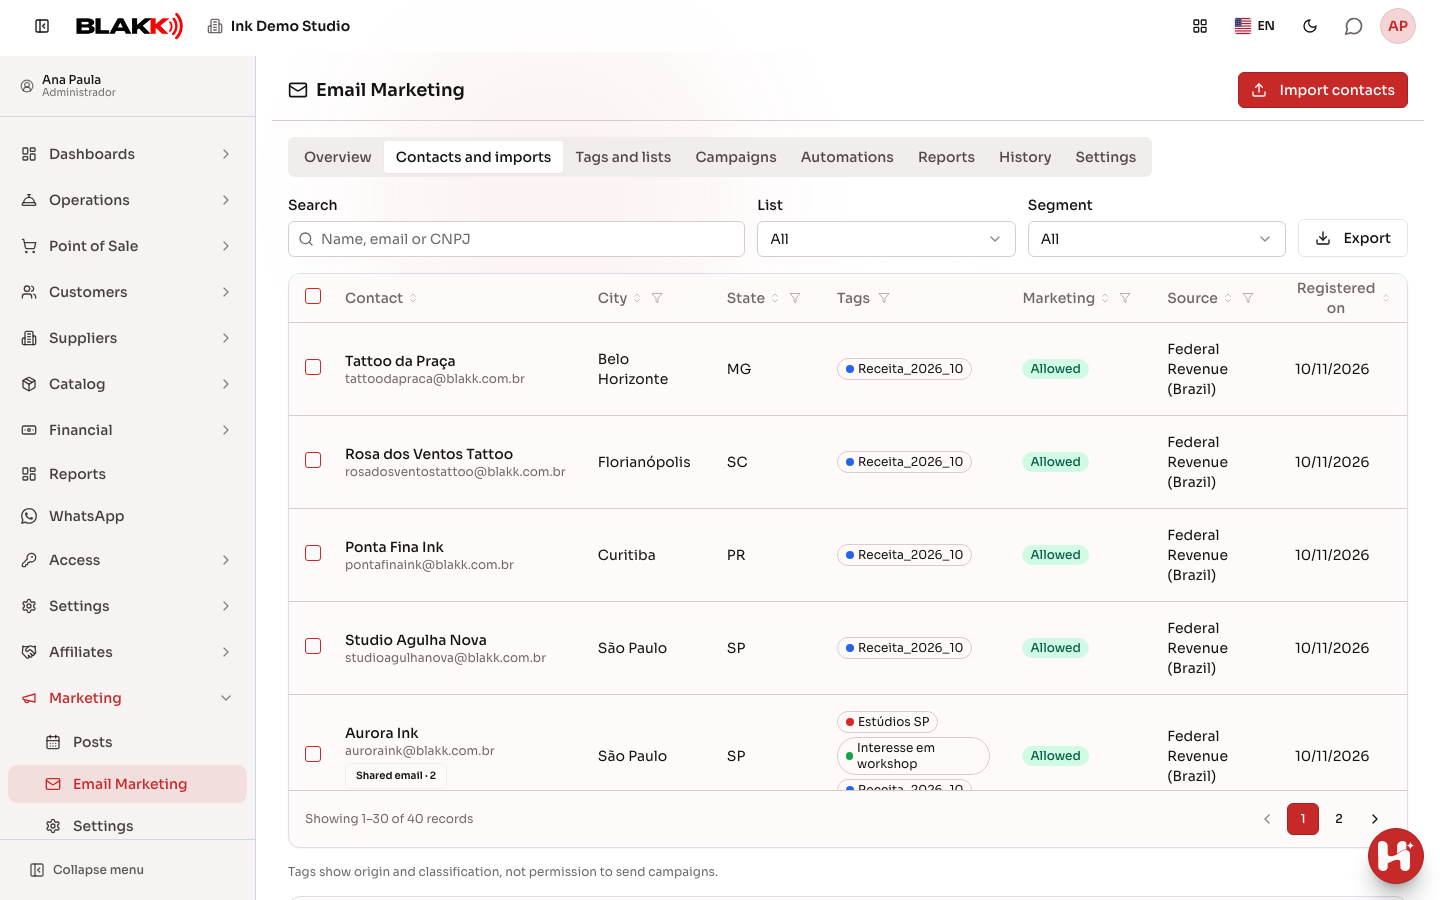
Section titled “Step 5 — Organize your contacts”In the Contacts and imports tab, search for a contact by name, email, CNPJ, city, or state. Enter “SP” to find everyone in São Paulo, “Jundiaí” to find contacts in that city, or enter a city and state together (“Itu SP” or “Itu / SP”). Click a column heading to sort the list; click it again to reverse the order. Use the funnel next to City, State, Tags, Marketing, and Source to choose which values to show, along with the number of contacts for each. A column with an active filter has a red funnel; Clear Filters removes all filters. The list and segment stay at the top, and the export uses the same filters and sort order. To find people who interacted with an email, choose a Campaign and an Interaction: Received the email, Viewed, Not viewed, Clicked, Did not click, Bounced, Unsubscribed, and others. If you don’t choose a campaign, the interaction applies to any campaign (for example, everyone who has ever clicked an email). When you open the list from a report number, the report’s filters appear as labels above the table (for example, the link, device, or bounce reason), while the state, city, or tag becomes a column filter. Remove removes the labels. Select contacts and use Apply tag, Add to list, or Unsubscribe. Click a contact to see the businesses linked to them and the saved legal basis.
Step 6 — Create tags and lists
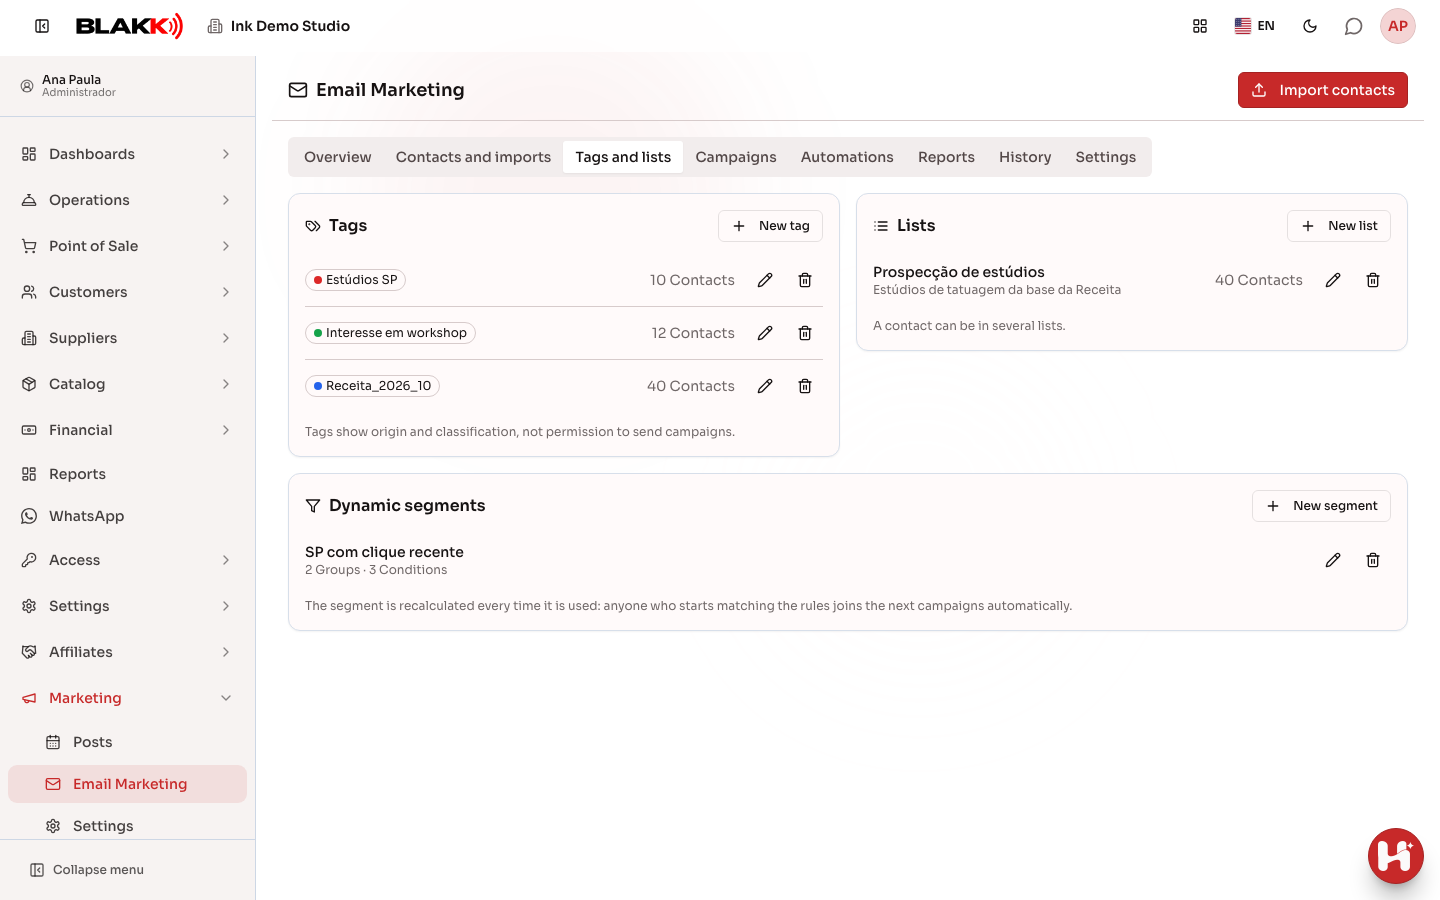
Section titled “Step 6 — Create tags and lists”In the Tags and lists tab, create tags (with colors) and lists to use when choosing who receives each campaign. Click the number of contacts for a tag or list to open the Contacts and imports tab filtered by that tag or list.
Under Dynamic segments, click New segment to set up rules, such as “State is SP and last clicked within the past 90 days.” Conditions within a group must all be met. With Add group (OR) added, only one of the groups needs to match. The dialog shows how many contacts match the rules. The segment recalculates every time you use it, so contacts that match the rules are automatically included in future campaigns.
Step 7 — Create a campaign
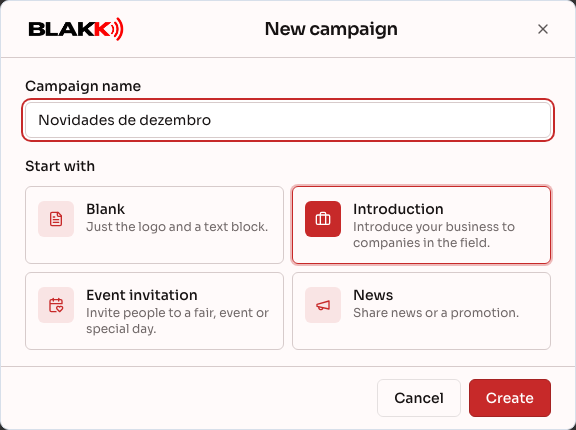
Section titled “Step 7 — Create a campaign”In the Campaigns tab, click New campaign, enter a name, and choose a template to get started (blank, introduction, event invitation, or updates). In the campaign list, click the number of emails sent for a campaign to open the list of recipients.
Step 8 — Build the email and choose your audience
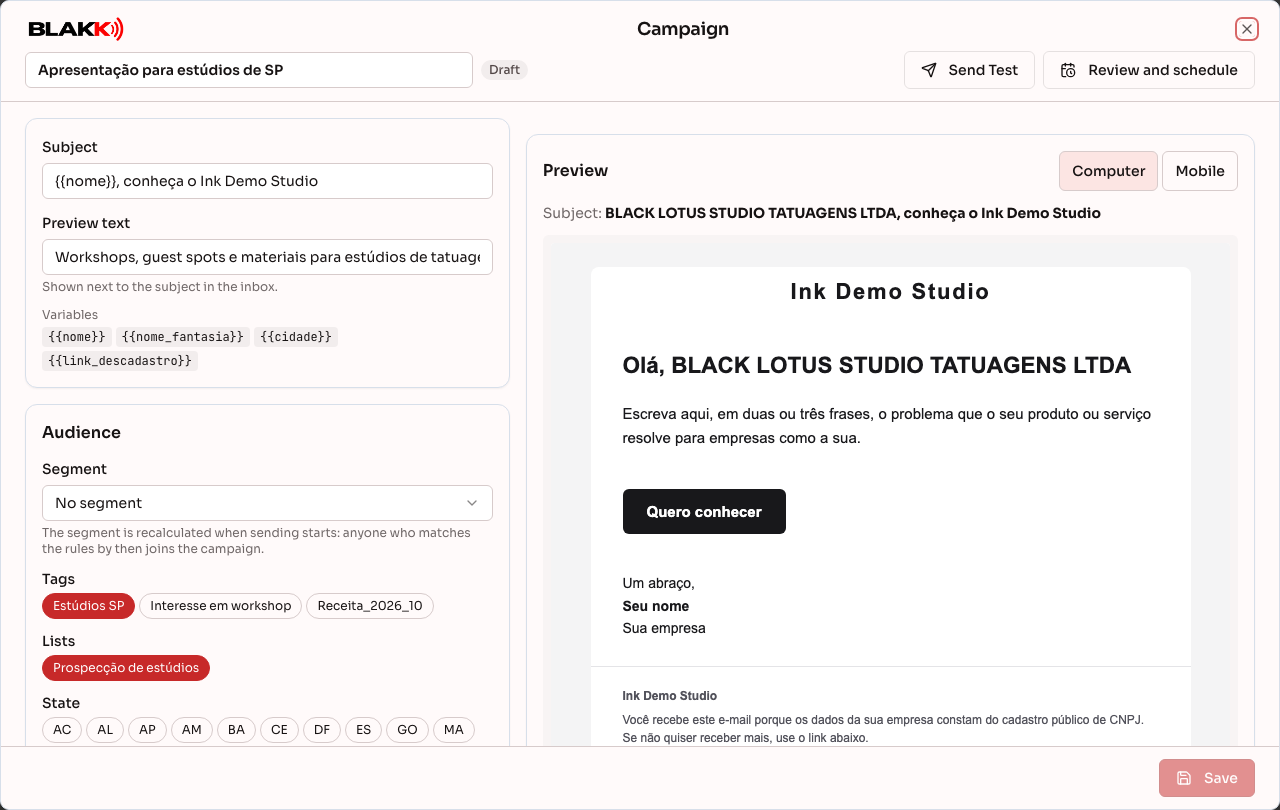
Section titled “Step 8 — Build the email and choose your audience”The editor opens in a pop-up over the campaign list. Click X to close it and return to the list; if there are unsaved changes, the system will ask you to confirm. In the editor, enter the Subject and build your email with text, image, button, logo, and signature blocks. The Image · Gallery block opens the same photo gallery as the website, but only JPG and PNG images are available. Under Audience, choose a Segment, tags, lists, and states, and see how many recipients can receive the email. The preview on the right shows how the email will look on a computer and a phone. Click Save at the bottom of the pop-up to save.
If the email was designed in another program, use the HTML code block and paste in the finished code. The system removes scripts and forms and adds the unsubscribe footer at the end.
Step 9 — Set up the email server
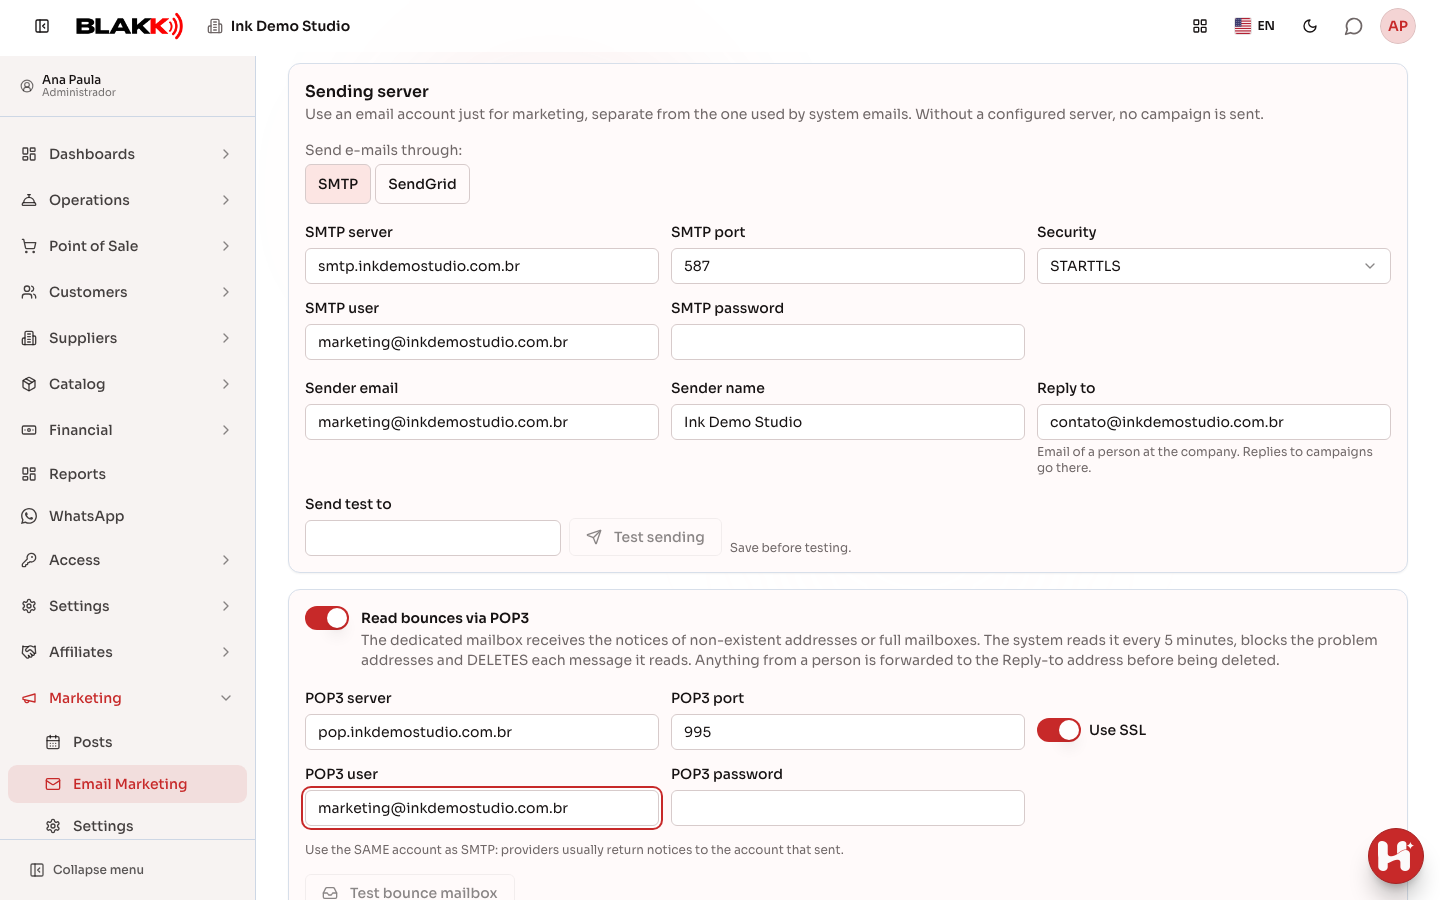
Section titled “Step 9 — Set up the email server”In the Settings tab, under Sending server, choose how your emails will be sent in Send e-mails through::
- SMTP: Enter the server, port, username, and password for an email account used only for marketing. Turn on Read bounces via POP3 using the same account so the system can block bounced email addresses. The POP3 card appears only when SMTP is selected.
- SendGrid: Paste the SendGrid API key (with sending permissions) and click Save. The Webhook URL appears, followed by the How to set up the webhook in SendGrid panel with setup instructions: in SendGrid, go to Settings › Mail Settings › Event Webhook, create a webhook, paste the address into Post URL, and select the Bounced, Dropped, Spam Reports, Unsubscribes, and Group Unsubscribes events (you can leave the others unselected). Turn on Enable Signed Event Webhook, copy the Verification Key into Webhook verification key, and save. To test it, click Test Integration in SendGrid. The Last event received from SendGrid appears on the screen. The webhook reports bounces (including full inboxes and messages blocked by the recipient’s server) and spam reports. POP3 isn’t used with SendGrid: its card disappears, and any saved settings are kept in case you switch back to SMTP.
Enter the sender and Reply to, set the hourly and daily limits, and click Save. Then use Test sending (and, with SMTP, Test bounce mailbox if you turned on POP3).
To warm up a new domain, turn on Spread sends throughout the sending hours (domain warm-up). Instead of sending in batches, the system sends one email at a time at random intervals, spreading the daily limit across business hours. For example, at 50 emails a day from 8 a.m. to 6 p.m., it sends about one email every 12 minutes on average. If sending starts later and some of the daily limit is still available, the interval gets shorter to use the remaining time before the end of the sending hours, without exceeding the hourly limit. For example, with 80 emails remaining and 3 hours left, the system sends one email every 2 minutes or so.
Step 10 — Send a test and schedule the campaign
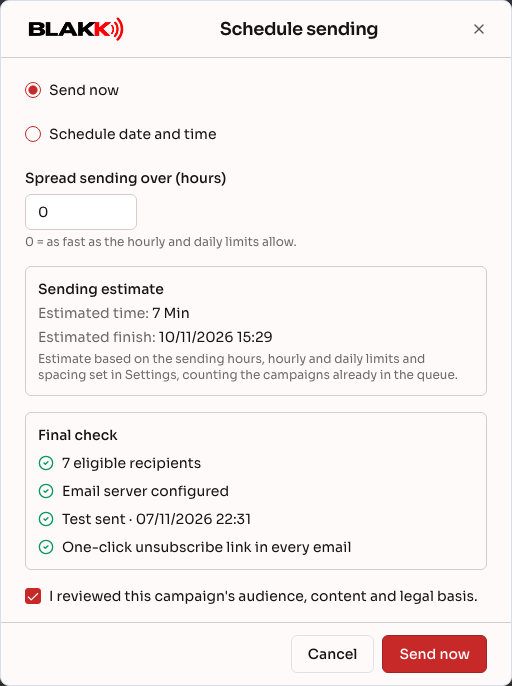
Section titled “Step 10 — Send a test and schedule the campaign”In the editor, click Send Test and check the email in your inbox. Then click Review and schedule, choose to send now or at a specific date and time, review the final list, check the confirmation box, and click Schedule campaign. The Sending estimate panel shows the Estimated time and Estimated finish, calculated using the sending hours, hourly and daily limits, and the spacing set in Settings, and includes campaigns already in the queue. While the campaign is sending, the editor shows progress in three groups: Sending (Recipients, Sent, Skipped, and failed, with the percentage based on recipients), Engagement (estimated views, contacts who clicked, and Unsubscribes), and Delivery issues (returned, Dropped, and Blocked), with the percentages based on emails sent. It also shows the Next send (when spacing is on, this is the scheduled time for the next email) and the Estimated finish (with the time remaining). You can Pause, Resume, or cancel the campaign. The Campaigns list also shows the Next send and Estimated finish for each campaign that’s sending or scheduled.
Step 11 — Review campaign results
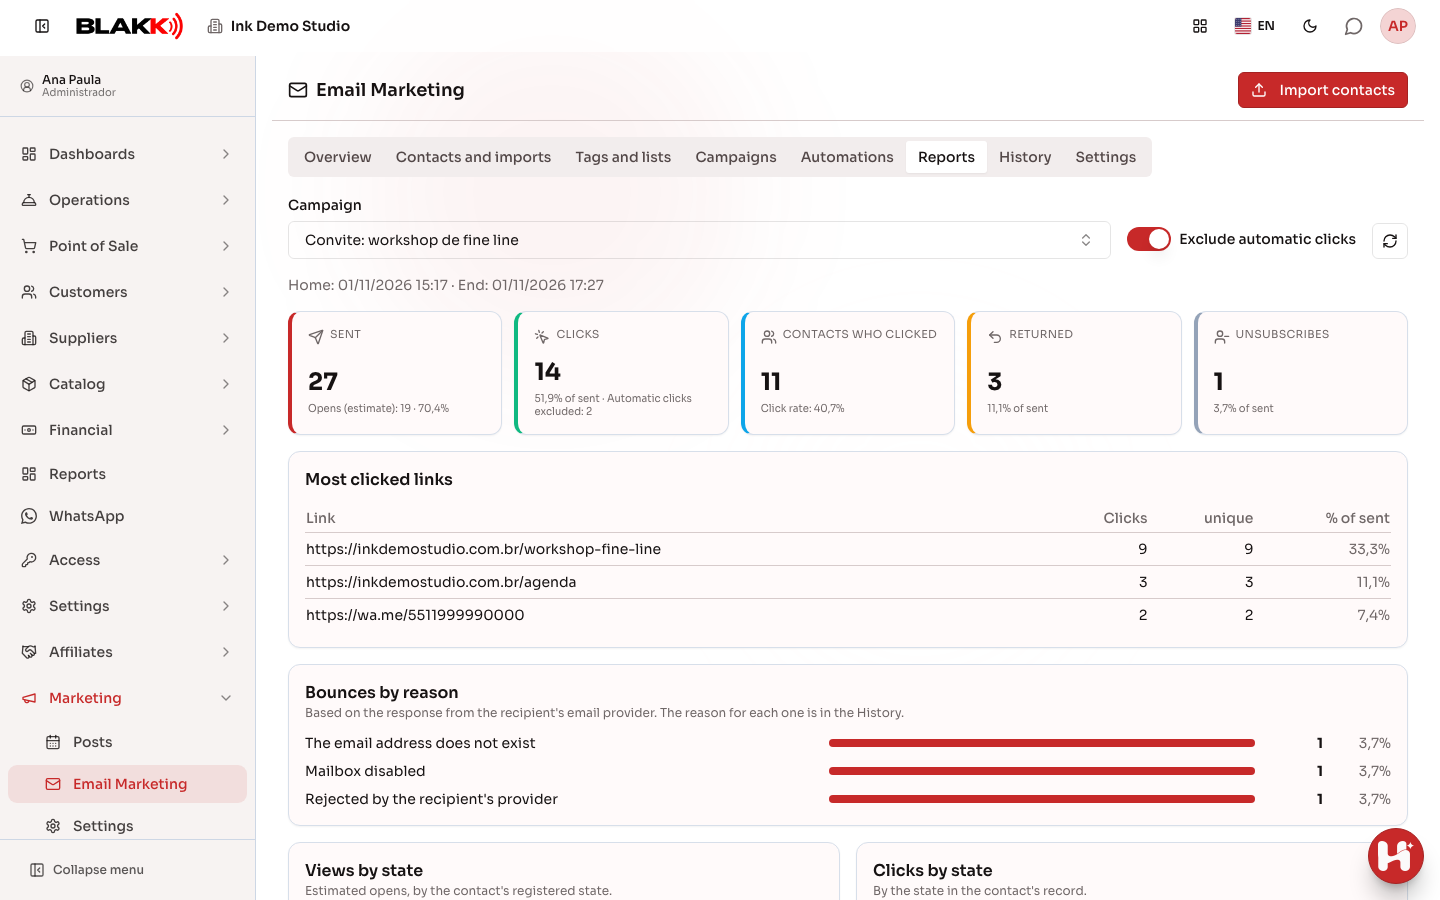
Section titled “Step 11 — Review campaign results”In the Reports tab, select a campaign (enter part of its name to search). You’ll see emails sent, clicks, Contacts who clicked, bounces, and unsubscribes; the Bounces by reason panel (how many emails bounced because the address doesn’t exist, the inbox is full or disabled, the provider refused the email, and so on); Most clicked links; Views by state (estimated opens, only when open tracking is on); and clicks by state, city, device, and tag. The total in parentheses next to each panel title is the sum of its rows. In Clicks by tag, the sum can be higher than the total number of clicks because a contact can have multiple tags. Keep Exclude automatic clicks on to exclude clicks made automatically by antivirus software and security scanners. While the campaign is still sending, use the refresh button next to it to see the latest numbers, or turn on Auto-refresh to refresh the numbers every 30 seconds while the page is open. Until the campaign finishes, the Sent card shows a progress bar with the percentage processed, the percentage remaining, and the number of emails still to be sent. While the campaign is sending, it also shows the Estimated finish, including the date and time, time remaining, and Next send, based on the sending hours and limits in Settings. Paused campaigns don’t show an estimate until they’re resumed. To see WHO interacted with the campaign, click any number: the cards at the top, each row in the panels (bounce reason, Views by state, Clicks by state, city, Click location, Device, and tag), or the unique count for each link in Most clicked links. The View contacts buttons (Received the email, Viewed, Not viewed, Clicked, and Did not click) do the same thing. Each opens the list of those contacts, with the same search by name, email, CNPJ, city, or state. The search and campaign details stay fixed at the top while only the list scrolls, and pagination is always visible. Click a contact to view their profile, including email history and clicked links. In click panels, the number counts clicks, while the list shows each contact only once, so it may have fewer rows. Open in contact list opens the same filtered list in the Contacts and imports tab, where you can export contacts or apply tags and lists in bulk. In the campaign editor, all the numbers in the progress panel (recipients, sent, skipped, failures, views, clicks, unsubscribes, bounces, dropped, and blocked) also open this list. In automations, the Sent and Clicked numbers for each email do the same thing, both in the step and in the flow diagram.
To see WHERE people are, click the map icon (View on map) in the corner of Views by state, Clicks by state, Clicks by city, or Click location. The Campaign map opens with a circle for each location: blue for people who viewed and green for people who clicked. The more contacts in a location, the larger the circle. At the top, turn on Viewed, Clicked, or both. A contact’s position comes from the IP address associated with their click or view, if available; otherwise, it comes from the city in their contact record. Click a circle to see the location, how many people viewed and clicked, how many were located By IP and By the contact’s address, and the contact names. Use the maximize button to expand the map to full screen, the refresh button to reload it, or turn on Auto-refresh to refresh the map every 30 seconds while it’s open. Below the map, you’ll see how many contacts are on it, how many are still waiting for a location (the system is still finding the location for the city in their contact record; they’ll appear on the map in a few minutes), and how many have no location.
Step 12 — Create an automation
Section titled “Step 12 — Create an automation”In the Automations tab, click New automation. Under Trigger, choose when a contact enters the automation: when they receive a tag, are added to a list, start matching a segment, or interact with an existing campaign (“Clicked campaign,” “Didn’t click campaign” after a number of days you choose, or “Opened campaign (estimated)”). Add Steps with emails, waits (in minutes, hours, or days), and conditions, such as “continue only if they clicked the previous email.” Choose whether emails are sent only during your business hours (Send only during the company’s business hours) or at the exact scheduled time. The automation also opens in a pop-up over the list. Click Save, then click Edit email for each email to write the content and send a test. The email opens over the automation; click X to return to it. Finally, click Review and activate.
The Save button is enabled only when the steps are set up correctly: a condition needs an email before it and a wait between them. The orange message below the steps explains what’s missing.
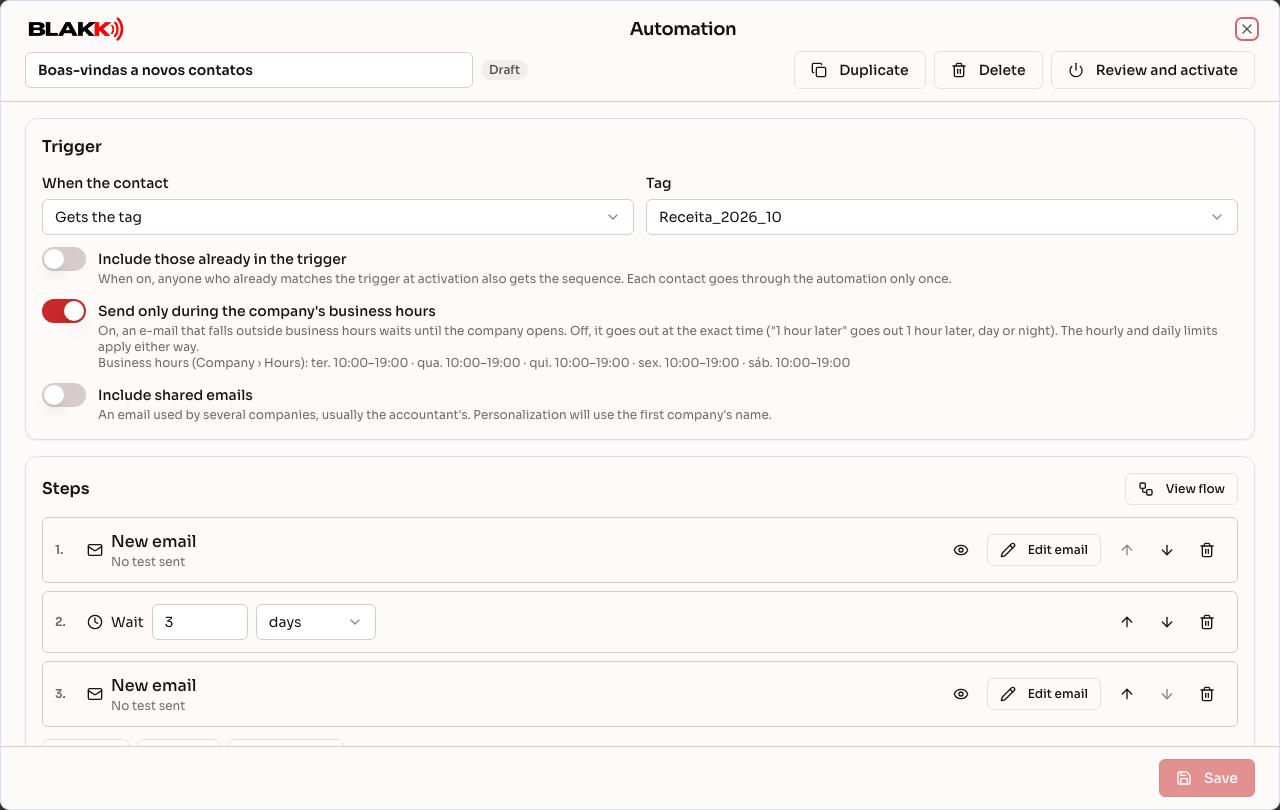
Each contact goes through the automation only once. Once it’s activated, you can’t edit it. To change the text or steps, use Duplicate and activate the copy. Click Close to stop the automation permanently and cancel emails that haven’t been sent yet.
Step 13 — Review sending history
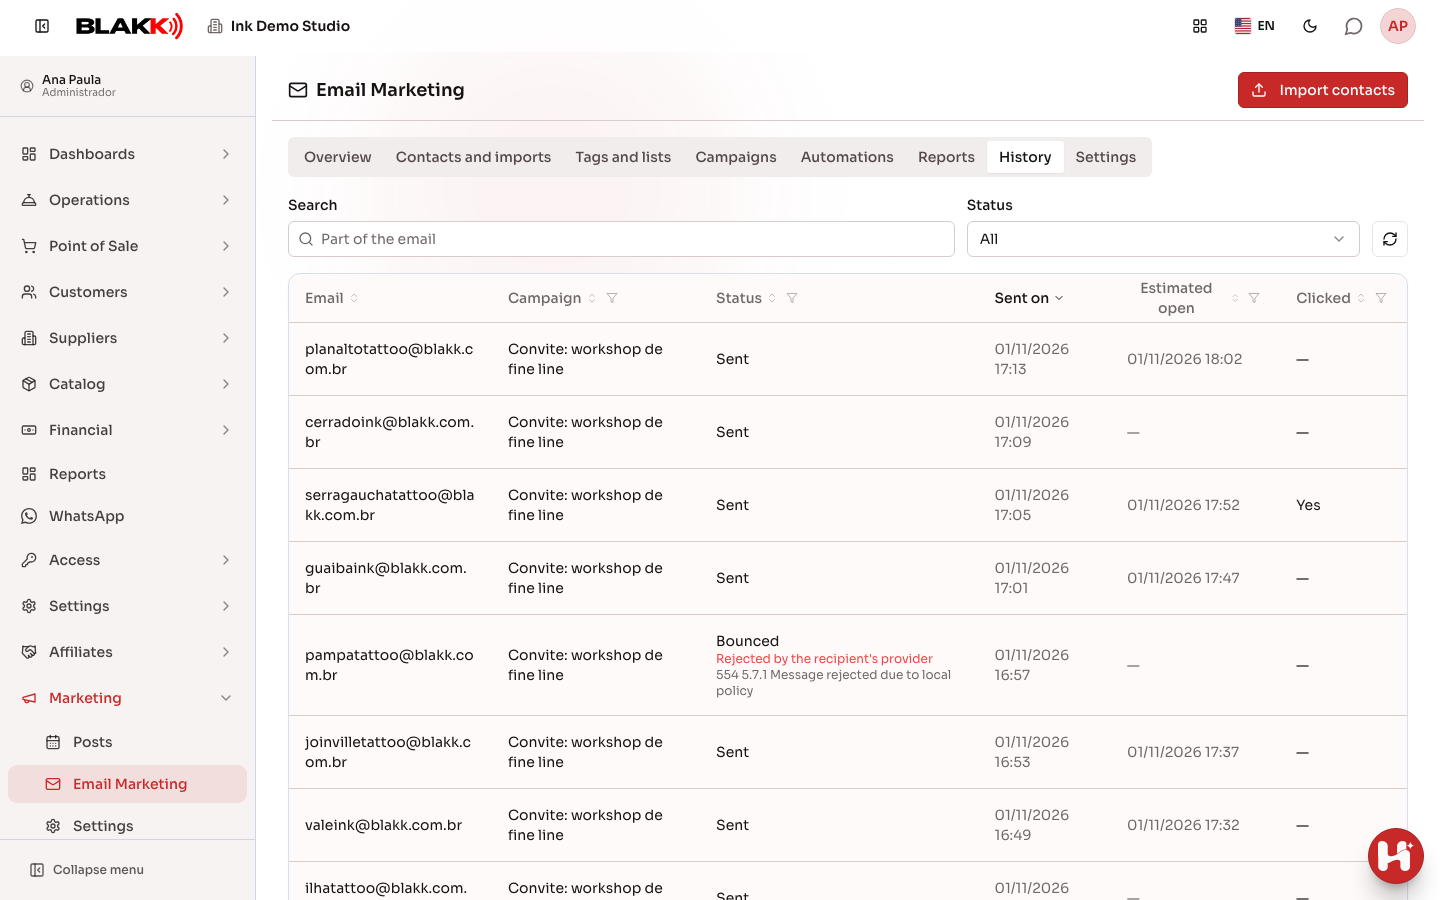
Section titled “Step 13 — Review sending history”In the History tab, see every email sent from campaigns and automations, including the recipient, status, send date, estimated open, and whether the person clicked. The most recent emails always appear at the top. Filter by status, search by part of the email address or by the contact’s city or state (for example, “SP” or “Itu SP”), and use the refresh button to see the latest sends. As in Contacts and imports, click a column heading to sort, and use the funnel in the Campaign, Status, Estimated open, and Clicked columns to choose which values to show. An email that was sent but not delivered shows the warning Not delivered: inbox full or Not delivered: temporary bounce below its status (with SendGrid, this depends on the webhook). A Bounced email shows the reason below its status, such as “the email address doesn’t exist,” followed by the recipient provider’s original response. When you click a contact in Contacts and imports, their details show all saved information (address, phone numbers, CNAE, business size, and share capital), followed by their Email history: how many emails they received, estimated opens, clicked emails, and, for each email, the links they clicked, with the date, device, and location. Reading time isn’t measured because email clients don’t report how long a message stayed open.
What happens next
Section titled “What happens next”Imported contacts are ready to receive email campaigns sent through your business’s own email server. You can edit a campaign only while it’s a draft. Sending follows the hourly and daily limits and business hours, and the system checks before each email to make sure the contact can still receive it. Every email includes an unsubscribe link and the one-click unsubscribe feature for Gmail and Yahoo. A bounced email (an address that doesn’t exist) blocks the contact, and the campaign pauses automatically if bounces exceed the configured limit. Unsubscribed contacts are added to a permanent suppression list: future imports won’t re-enable their email addresses. Contacts with shared email addresses are excluded from campaigns by default.
Common mistakes and questions
Section titled “Common mistakes and questions”Q: How do I see who opened or clicked my email? A: In Reports, select the campaign and click the number you want to view (or use the View contacts buttons). Or, in Contacts and imports, filter by Campaign and Interaction. Views are estimates (they’re only available when open tracking is on, and iPhones and Macs open emails automatically); clicks are exact, excluding automatic clicks made by antivirus software.
Q: Why does Click location show “No location”? A: The location comes from the IP address at the time of the click. If the report says the IP location database hasn’t been loaded, the server hasn’t downloaded the database yet (it’s updated automatically every month). If you don’t see that message, the server is most likely behind a proxy that hasn’t been configured as trusted. All clicks then show the proxy’s internal IP address. Ask your technical support team to check the proxy settings. Clicks already recorded without a location will stay that way because IP addresses aren’t stored.
Q: Why were some rows in my spreadsheet rejected? A: A row may have been missing an email address; the address may have been invalid or a placeholder (such as “[email protected]”); the email domain may not exist or accept emails; the business may have had a status other than Active with the Brazilian Federal Revenue Service; or the email address may already have been unsubscribed or blocked. Download the rejected rows to see why each one was excluded.
Q: Does the system fix mistyped email addresses? A: Yes, when the typo is in the domain of a known provider: “hotamil.com” becomes “hotmail.com,” “gmai.com” becomes “gmail.com,” and “gmail.com.br” becomes “gmail.com.” The system corrects the domain during import (the summary shows how many email domains were corrected) and again when sending, so this also applies to campaigns already in the queue. Before each email is sent, the system also checks whether the domain accepts emails and skips addresses that don’t, without using a send or generating a bounce. The system can’t detect a typo in the username (the part before the @) before sending.
Q: What is a shared email address? A: It’s an email address used by multiple businesses, usually an accountant’s address. It becomes a single contact linked to all those businesses and is excluded from campaigns by default because the name in the email would be incorrect.
Q: What is the legal basis, and why is it required? A: Brazil’s LGPD requires a legal reason for emailing each person. For businesses listed with the Brazilian Federal Revenue Service, the reason is usually legitimate interest. Your business is responsible for choosing and standing behind the text; the system only requires and records it.
Q: Will people who already had the tag receive emails when I activate the automation? A: Only if you turn on Include those already in the trigger before activating it. If it’s off, only people who receive the tag (or are added to the list or start matching the segment) after activation will enter the automation.
Q: When does an automation’s wait period start? A: It starts when the previous email is actually sent, not when it enters the queue. If the hourly or daily limits or business hours hold the email, the wait starts afterward. The system checks automations every 30 seconds, so a wait of a few minutes may be delayed by up to about a minute. The Maximum frequency (days) setting applies only to campaigns. Automation emails don’t count toward it, so an automation follow-up won’t prevent someone from receiving the next campaign.
Q: What’s the difference between a campaign and an automation? A: A campaign is a one-time email sent to a list, segment, or tag. An automation is a sequence (email, wait, condition, email) that each contact goes through on their own schedule and that remains active until you stop it. To follow up on a campaign (for example, Christmas, Black Friday, and New Year’s, each with its own flow), send the campaigns as usual and create an automation for each one, using the “Clicked campaign,” “Didn’t click campaign,” or “Opened campaign (estimated)” trigger for that campaign. Each automation tracks only its own campaign, so someone who clicked the Black Friday campaign and ignored the Christmas campaign follows the right flow for each one.
Q: When does a campaign-based automation start? A: It starts as soon as the selected campaign is sent and the contact interacts with it: when they click (or when an estimated open is recorded), or when the selected number of days passes without a click for the “Didn’t click campaign” trigger. Clicks from bots and antivirus software don’t count, and people who didn’t receive the campaign (because their email bounced) don’t enter the “didn’t click” automation. If the selected campaign is still a draft, the screen will let you know: the automation starts only after that campaign is sent.
Q: Are automation emails sent overnight? A: It depends on the Send only during the company’s business hours setting for each automation. When it’s on, an email scheduled outside the business hours set under Company › Hours waits until the business opens (if no hours are set, the default is 8 a.m. to 8 p.m.). When it’s off, the email is sent at the exact scheduled time, day or night. The business hours under Settings apply only to campaigns.
Q: What if a contact unsubscribes while going through an automation? A: They exit the automation and won’t receive any more emails. The same applies to contacts blocked because of a bounce.
Q: How do I see who opened an email? A: In Settings, turn on Measure opens (estimate). Future sends will show estimated opens in reports and sending history. It’s only an estimate: iPhones and Macs open emails automatically, and many email clients block images. Use clicks to see who was interested.
Q: How do I use my own domain for email links? A: In Settings, enter your Link domain (for example, links.yourbusiness.com.br), create the CNAME record shown on the screen in your DNS settings, save, and click Verify domain. Tracked links use your domain only after verification. The address must load over HTTPS. If verification fails soon after you create the CNAME, wait for DNS propagation and try again. If it still fails, contact support about the domain certificate. The domain can’t be the system’s domain or one already used by another business. The unsubscribe link will also use your domain. Don’t remove the CNAME or change the domain while sent emails are still in inboxes. Their unsubscribe and click-tracking links will stop working.
Q: Why doesn’t the unsubscribe link in a test email unsubscribe me? A: A test email isn’t a real send and isn’t linked to a contact. The link opens a page explaining that it’s a test. In real sends, the same link unsubscribes the person who received the email.
Q: How long are clicks stored? A: For 24 months by default. Change this under Keep clicks for (months), in Settings. Campaign numbers remain available after older click data is deleted.
Q: What’s the difference between a list and a segment? A: A list is fixed: only people you add are included. A segment is a rule that recalculates when the email is sent, so a contact imported yesterday who matches the rules is included in today’s campaign.
Q: Why can’t I delete a tag or segment? A: You can’t delete a tag or list that’s used in a segment’s rules. Remove it from the rules first. A segment selected as the audience for a draft or scheduled campaign is also locked until you change the campaign audience.
Q: I imported the same spreadsheet twice. Were the contacts duplicated? A: No. Contacts are identified by email address, so the second import only fills in information that was blank.
Q: I unsubscribed a contact by mistake. How can I reactivate them? A: You can’t reactivate them. Unsubscribing is permanent to protect people who asked to stop receiving emails. If they want to receive emails again, they need to request it.
Q: Do imported contacts appear in Customers? A: No. Marketing contacts are stored only in Email Marketing.
Q: Can I remove the unsubscribe link or business name from an email? A: No. The sender information and unsubscribe link are always added to the end of the email. You can change the footer text, the link text, and Sender in the footer, which is filled in with your business name and address. For example, you can use your brand name and city. This field can’t be blank because the email must identify who sent it.
Q: Why don’t some gallery images appear in emails? A: Only JPG and PNG images can be used in emails. Videos don’t work in email, and the desktop version of Outlook doesn’t display WebP images.
Q: Why did the campaign pause automatically? A: The email server (or SendGrid) rejected the login or sender, went offline, or the number of bounces exceeded the configured limit. The reason appears in the campaign editor. Fix the issue and click Resume.
Q: Can I send campaigns through SendGrid instead of SMTP? A: Yes. In Settings, select SendGrid under Send e-mails through: and paste your account’s API key. The sender email address must be verified in SendGrid (as a single sender or an authenticated domain); otherwise, SendGrid will reject it and pause the campaign with an explanation. Use a SendGrid account (or subuser) dedicated to your business because the webhook is configured per account. SMTP settings are saved, so you don’t have to enter them again if you switch back to SMTP.
Q: Do I need POP3 with SendGrid? A: No. With SendGrid, bounces (including emails blocked by the recipient’s server), dropped emails, spam reports, and unsubscribes are reported through the webhook. Emails are sent with a return address managed by SendGrid, so bounces don’t go through your inbox. That’s why the POP3 card appears only with SMTP, and the system doesn’t read your inbox when you use SendGrid. Gmail’s unsubscribe button still works through the one-click link.
Q: When will the campaign finish sending? A: Estimated finish appears in the scheduling dialog, campaign editor, and campaign list. It’s an estimate based on the sending hours, hourly and daily limits, and spacing in Settings, and includes campaigns already in the queue. Active automations, pauses, and bounces can delay the finish. If you see No estimate, check the sending hours and limits. If they’re set to zero or the sending hours aren’t possible, the campaign won’t finish.
Q: What’s the difference between bounced, dropped, and blocked in campaign progress? A: returned are emails that were sent but bounced because the recipient’s provider rejected them. Dropped are emails SendGrid rejected without trying to deliver (for example, an address it already knows is invalid); these also count toward failed. Blocked are contacts in this campaign who are currently blocked because of a permanent bounce, three temporary bounces in 30 days, or a spam report. They won’t receive any more campaigns.
Q: What happens to an email that bounced because the inbox was full? A: It’s counted as a temporary bounce. The email appears in History with the warning Not delivered: inbox full, and the contact remains eligible because the inbox may be cleared. After three temporary bounces in 30 days, the contact is blocked. With SendGrid, the warning is reported only if the webhook is configured and the Bounced event is selected.
Q: Why do I need to configure the SendGrid webhook? A: SendGrid accepts every email right away and only reports later if it bounced, was dropped, or was reported as spam. Without the webhook, these notifications don’t come through, so problem addresses won’t be blocked and automatic pausing for bounces won’t work. With SendGrid, bounces are reported a few minutes after sending, not immediately as they are with SMTP. If the screen says “rejected events,” the verification key you entered doesn’t match your account. Copy the Verification Key again.
Q: How do I warm up a new domain? A: Start with a low daily limit (for example, 50) and turn on Spread sends throughout the sending hours (domain warm-up). Emails are sent one at a time at random intervals throughout business hours (or all day if the setting is off), for both campaigns and automations. The screen shows the average interval. Since intervals are randomized and the system checks the queue every 30 seconds, the total sent in a day may be slightly below the limit. Gradually increase the daily limit over several weeks.
Q: Do bounced emails pile up in the inbox? A: No. The system checks the bounce inbox every 5 minutes, blocks problem addresses, and deletes each message after reading it. Messages from people are forwarded to the email address under Reply to before they’re deleted.
Q: What are automatic clicks? A: Antivirus software and security scanners used by businesses automatically open email links seconds after delivery. These clicks are flagged, and when Exclude automatic clicks is on, they’re excluded from the totals.
Q: How do I see on a map where the contacts who viewed or clicked are located? A: In Reports, select a campaign and click the map icon in one of the location panels. At the top of the map, choose Viewed, Clicked, or both. A contact’s location is based on the IP address associated with their click or open (starting with this version, the system stores the city and approximate coordinates for an open, but never the IP address). If there’s no IP location, it uses the city in the contact record. People using the iPhone or Mac Mail app appear at the location of the Apple server that opened the email, usually in the same region. The first time a city appears, it takes a few minutes to locate.
Q: Why do clicks by state use contact records instead of location data? A: IP-based locations are approximate and often inaccurate on mobile devices (the mobile carrier may show up in a different city). Views and clicks by state, and clicks by city, use the location in the contact record. Click location shows the IP-based estimate, but IP addresses aren’t stored.
Q: How do I handle a request to delete a contact’s data? A: Open the contact and click Delete data. The contact, businesses, tags, and lists are deleted. Only a code derived from the email address is kept to prevent it from being added again in a future import.