Design Studio: Create Tattoo Designs with AI
What it is
Section titled “What it is”Design Studio is where clients and the studio work together to create a tattoo design by chatting with an AI agent. The client describes their idea in text, sends reference photos, or records an audio message, and the agent returns 3 or 4 design variations. Once the client approves a design, it’s locked and added to the work order, which serves as the quote at the studio.
When to use it
Section titled “When to use it”- A client reaches out on WhatsApp with an idea (“a moon with lavender on the forearm, 12 cm”), and you want them to work out the design before coming to the studio: send them the Design Studio link.
- A client is in the chair, and you want to try out styles together: open the design from the work order and chat with the agent there.
- You need to know, months later, what the client asked for and approved: the history keeps the entire conversation, audio messages, images, and approval.
Before you start
Section titled “Before you start”Design Studio must be enabled for your business, and the platform must configure the AI. If the screen shows “Design Studio is not set up yet. Contact support, contact support.
You need edit permissions for the Design Studio menu (or Work Orders) to create designs and chat. Each generated image uses some of your plan’s AI quota.
Step by step
Section titled “Step by step”Step 1 — Open Design Studio
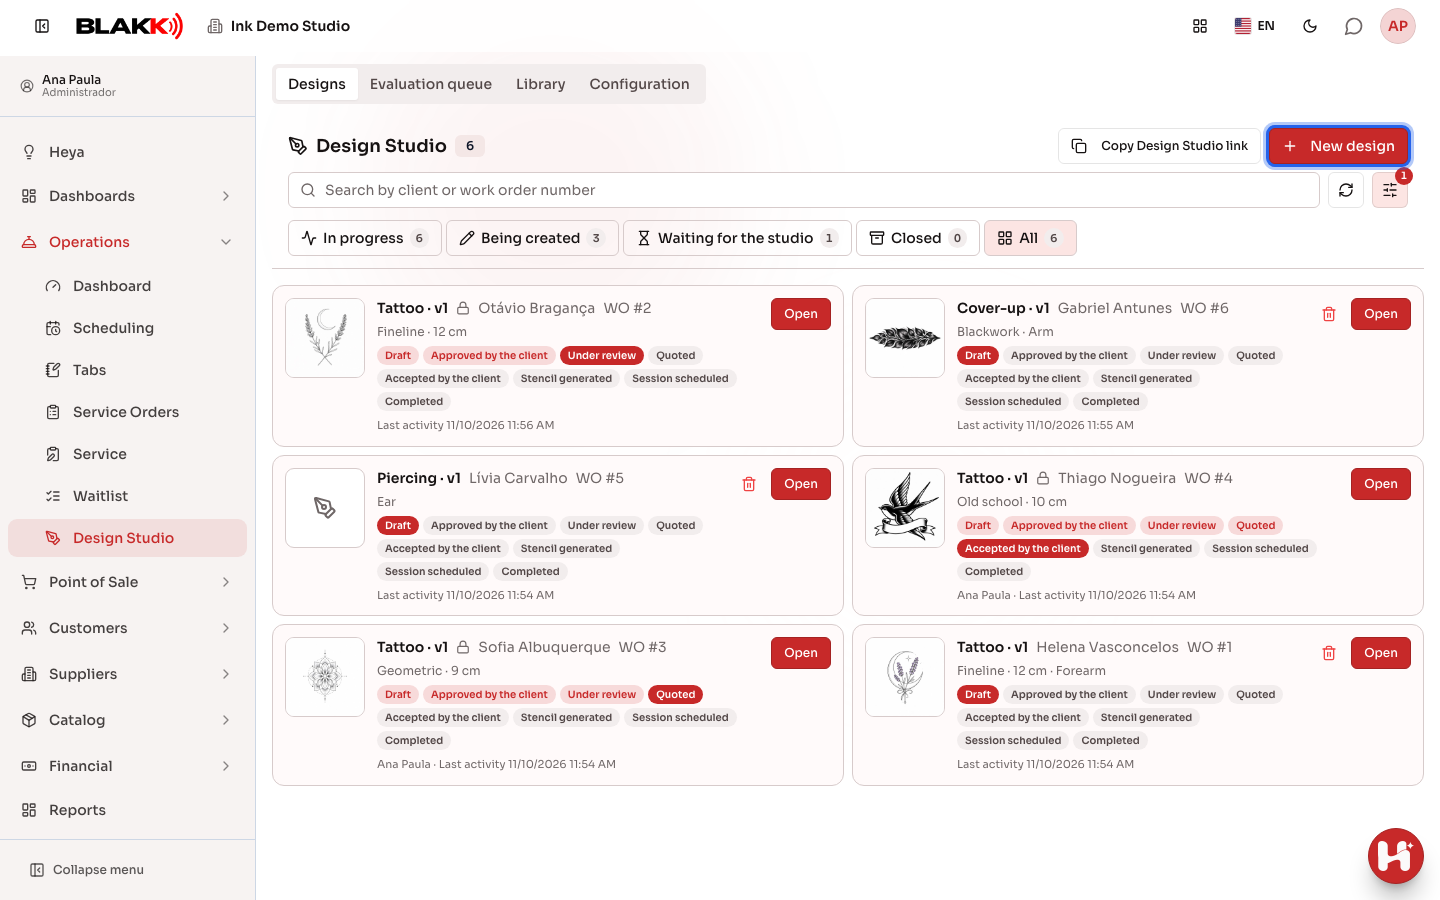
Section titled “Step 1 — Open Design Studio”From the Operations menu, open Design Studio. The list shows designs in progress and their status; tap a card to open a design. To get started at the studio, tap New design, choose a client, and tap Create and open. You can also start from a work order, under the Design tab, by tapping Tattoo design.
Step 2 — Send the link to the client
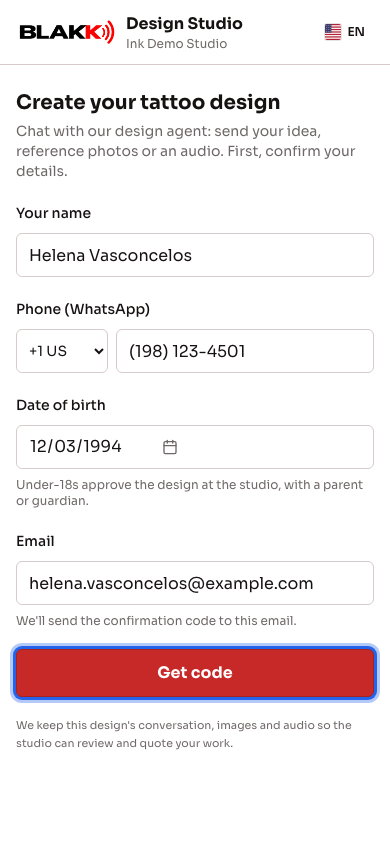
Section titled “Step 2 — Send the link to the client”Tap Copy Design Studio link (on a phone, tap the copy icon next to the create button) and send the link to the client. When they open it, they enter their name, phone number, and date of birth, tap Get code, enter the code sent to them on WhatsApp (or by email if the studio’s WhatsApp isn’t connected—in that case, the page also asks for their email), and tap Confirm and start. Nothing is created until they confirm the code.
Step 3 — Chat with the agent
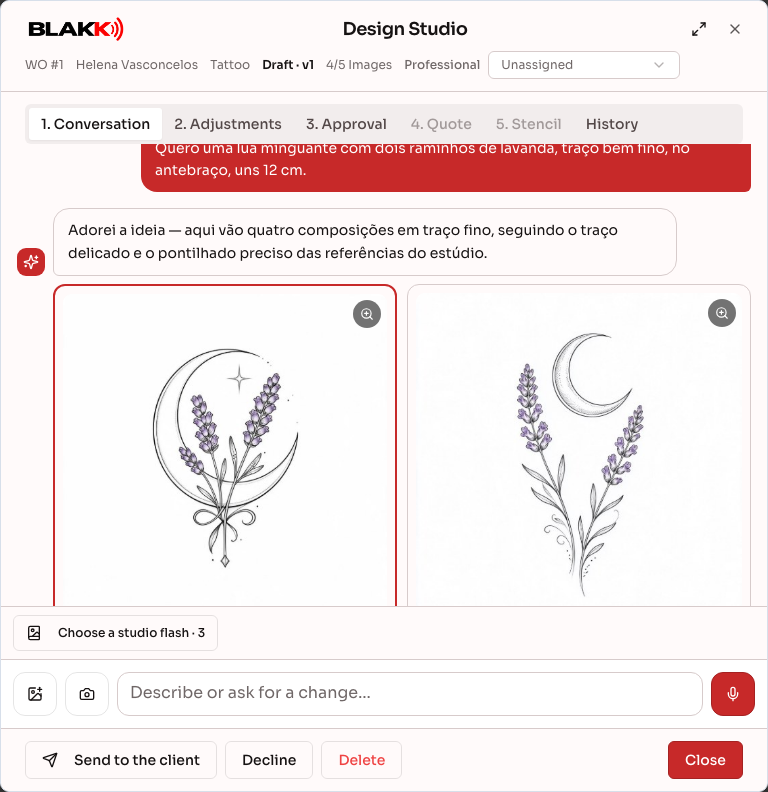
Section titled “Step 3 — Chat with the agent”The client (or you) describes the idea, sends reference photos from their gallery or camera, and can record an audio message by holding the microphone, just like on WhatsApp: release to send, drag up to lock the recording, or drag sideways to cancel. The agent replies and generates variations. Tap an image to enlarge it: pinch with two fingers to zoom, and swipe to move to the next image. Tap Choose below a variation to open the adjustments.
Step 4 — Adjust the selected variation
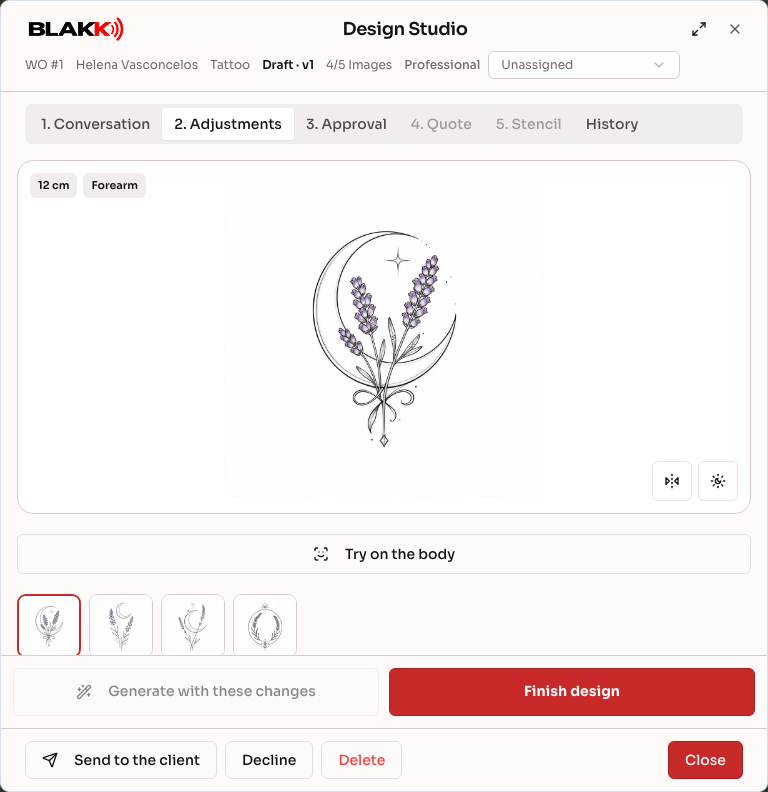
Section titled “Step 4 — Adjust the selected variation”On the adjustments screen, change the style, color (Black only or Color), actual size in centimeters, and body placement, or type a request. Watercolor designs are always in color. Tap Generate with these changes to have the agent create a new version. The mirror and flip buttons create a version instantly without using any AI quota. On a computer, the Maximize button at the top of Design Studio enlarges the window and displays the image and adjustments side by side.
Step 4.1 — Preview the design on the body
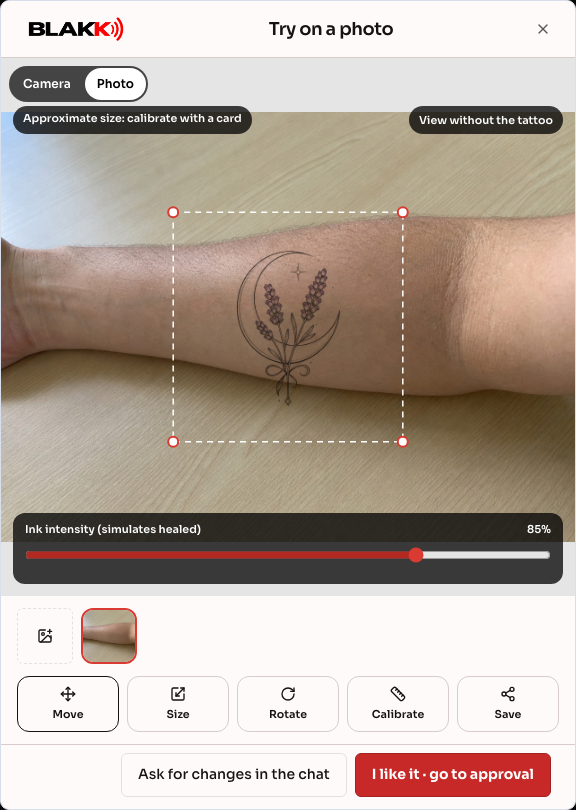
Section titled “Step 4.1 — Preview the design on the body”Before approving, the client (or you at the studio) can tap Try on the body to see the design on skin. In Camera, the phone tracks the body part (forearm, upper arm, calf, or thigh) and displays the tattoo at the actual size entered in the adjustments. You can drag, resize with two fingers, and rotate it. The Ink intensity (simulates healed) control lightens the ink to show how it will look after healing. In Photo, the tattoo is placed over a photo of the body part. The on-screen size is the actual size: it’s based on the measurement of the arm (or leg) and adjusts as you move closer to or farther from the camera. A chip in the corner shows where the measurement came from: Estimated from the average (±10%), Estimated from your height (enter your height under Your height (cm, optional) in Adjustments), or Calibrated with a card. To calibrate, tap Calibrate, hold a bank card against the body inside the frame, and keep it still. The system detects the edges and measures over 30 frames, then asks you to confirm (or use Adjust by hand). Calibration applies to the same client’s future previews for 12 months. Minors need to calibrate again each time.
In Adjustments, the Size control and pinch gesture change the size in centimeters. Until a quote is created, the selected size is saved to the design details when the client taps liked; after that, it’s only used for the preview. Switch arm moves the tattoo to the same spot on the other arm. The preview doesn’t track arm rotation (inner or outer side).
In camera mode, tap the round button to take a photo, which appears right away. From there, you can tap Retake, share the photo, or, if you like the result, tap I like it · save the photo and go to approval. The photo is saved to the design, and the screen moves on to approval.
The live camera image and photo stay on the device. Only the final photo with the tattoo is saved to the design, and only after the person taps save. Saved previews appear during approval and can be deleted.
Step 4.2 — Choose a piercing placement and jewelry
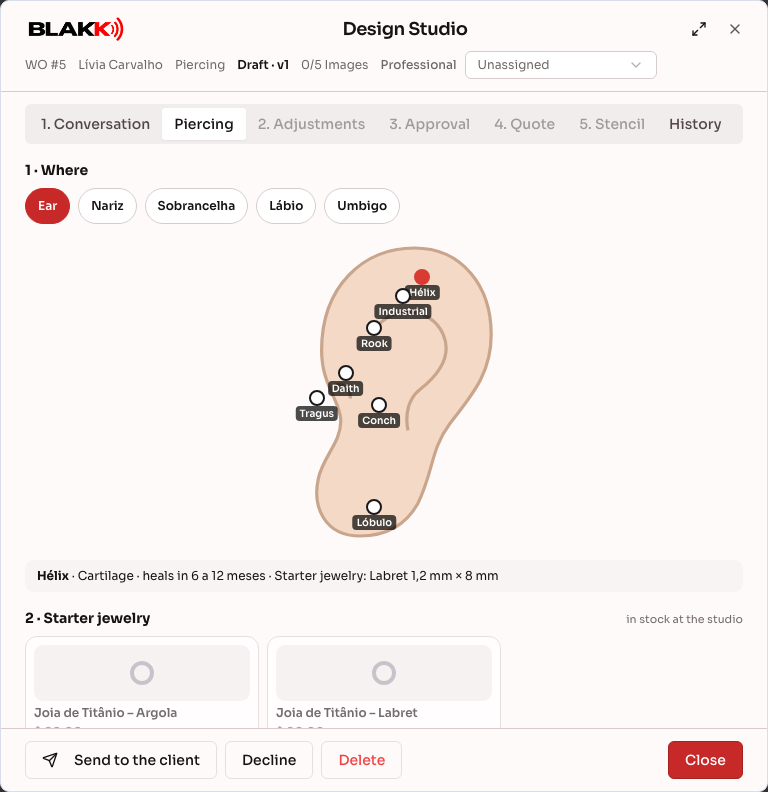
Section titled “Step 4.2 — Choose a piercing placement and jewelry”For a piercing design, the Piercing tab shows the Ear map and other areas (nose, eyebrow, lip, and navel). Tap a placement to see the healing time, initial jewelry, and jewelry options that fit there, along with each item’s price and stock status. Jewelry that’s out of stock can’t be selected. Choose a piece of jewelry and tap Try on with the camera to preview it on the face using the front-facing camera. The photo appears first; then you can save it, share it, or take another. The total includes the piercing service and the jewelry.
At the studio, tap Add to work order to add the piercing service and jewelry to the work order, including each item’s price and taxes. The jewelry is deducted from inventory when the work order is completed.
Step 4.3 — Cover up an old tattoo
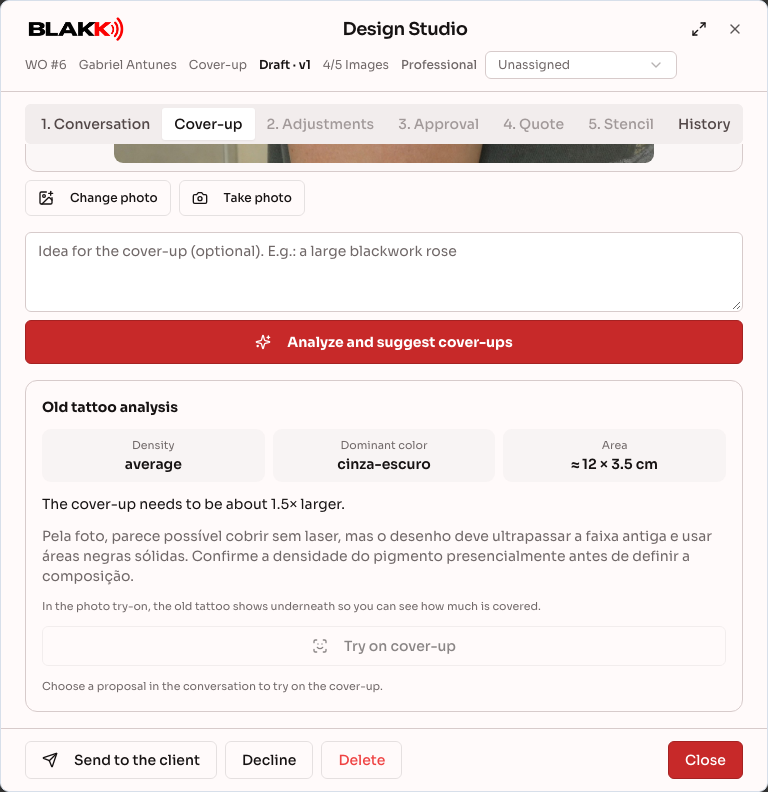
Section titled “Step 4.3 — Cover up an old tattoo”Create a design with the type “Cover-up.” It opens in the Cover-up tab. Upload a photo of the old tattoo (taken straight on in good lighting), drag over the photo to mark the tattoo’s area, and add an idea if you like. Tap Analyze and suggest cover-ups.
The agent analyzes the old tattoo’s density, dominant color, approximate size, and how much larger the cover-up needs to be. It also lets you know if laser lightening may be needed beforehand and suggests dense, dark designs to hide the old tattoo. The suggestions appear in the conversation like other variations, and the analysis is saved in the Cover-up tab. Tap Try on cover-up to open a photo preview with the old tattoo underneath the design, so you can see how much it covers.
Step 5 — The client approves the design
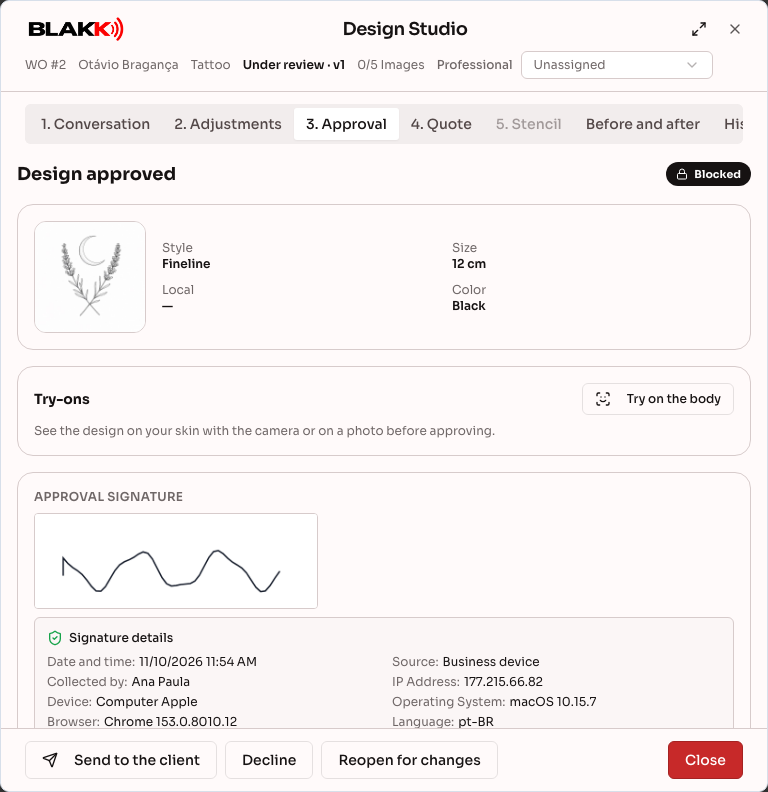
Section titled “Step 5 — The client approves the design”When the design is ready, the client taps Finish design, confirms they understand they can’t make further changes, signs on the screen, and taps Approve design and send to the studio. The signature is saved with the same verification details as the medical intake form (date, IP address, device, and browser), and the studio can see it in the Approval tab. The design is locked, and the work order status changes to “Awaiting review.”
If the client is at the studio, they can approve the design on a studio device without receiving a link. In the design’s Approval tab (where the screen goes after they tap I like it · save the photo and go to approval for the body preview), tap Client is here · approve on the tablet and hand them the device, which can be the professional’s phone. The client confirms they understand, signs, and taps Approve design. For clients under 18 or clients without a date of birth on file, enter the Legal guardian. This button is available while the design is being created and a variation has been selected.
Step 6 — View the history
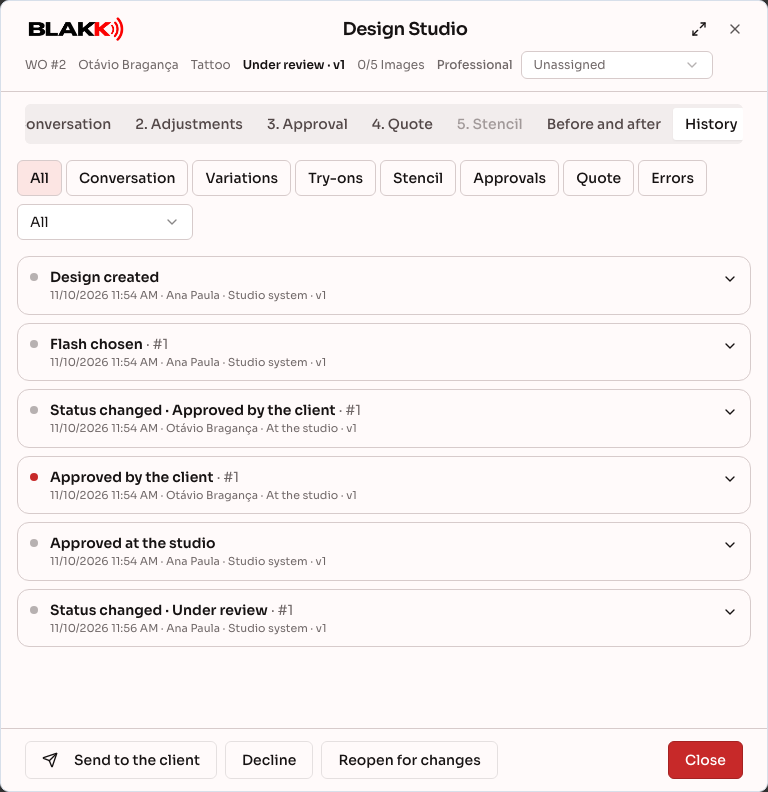
Section titled “Step 6 — View the history”In the studio’s Design Studio, the History tab shows every step: messages, audio with transcripts, reference images, all generated variations (including those the client didn’t choose), and approval details, including when and how it happened. Tap a step to see more details.
Step 7 — View the review queue
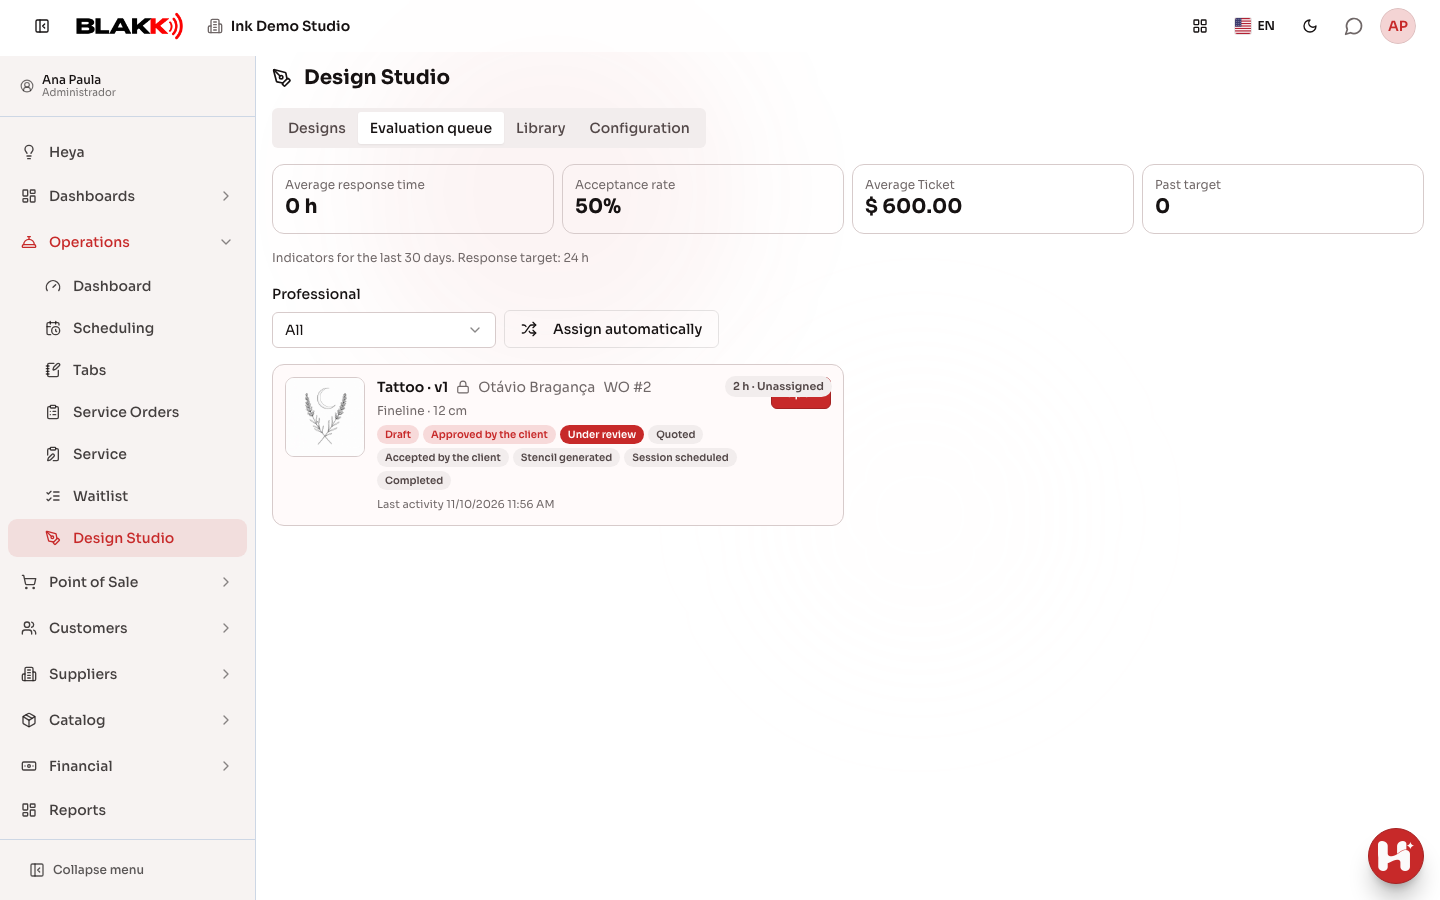
Section titled “Step 7 — View the review queue”Designs approved by clients wait for a quote in the Design Studio’s Evaluation queue tab. The tab shows how long each design has been waiting (in red if it exceeds the response-time target) and metrics for the last 30 days: average response time, acceptance rate, and average order value. Tap Assign automatically to assign designs without a professional to someone who can create a quote.
Step 8 — Create a quote for the design
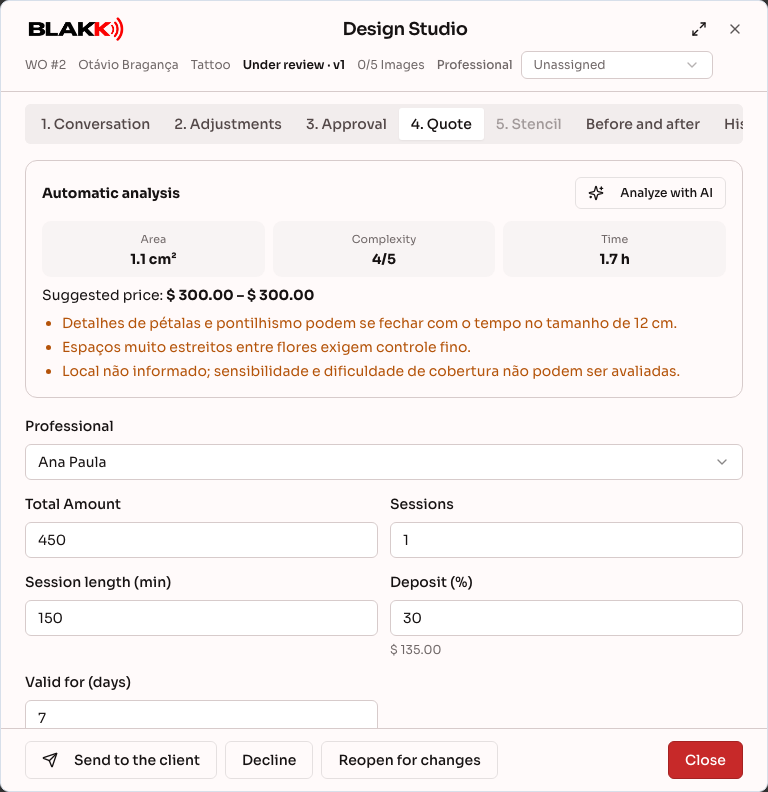
Section titled “Step 8 — Create a quote for the design”Open the design and go to the Quote tab. Tap Analyze with AI. AI estimates the area in cm², complexity, time, and technical alerts, and the system suggests a price range based on the studio’s pricing table. Choose a professional, enter the price, number of sessions, session length, deposit percentage, and expiration date, then tap Quote and send. The quote is sent to the client via WhatsApp. If the design needs changes, tap Ask the client for changes.
Anyone creating quotes needs the “Design Studio — create quotes” permission. If you can’t create a quote, ask the studio owner to give you access under Access → Profiles.
Step 9 — Send the design to the client
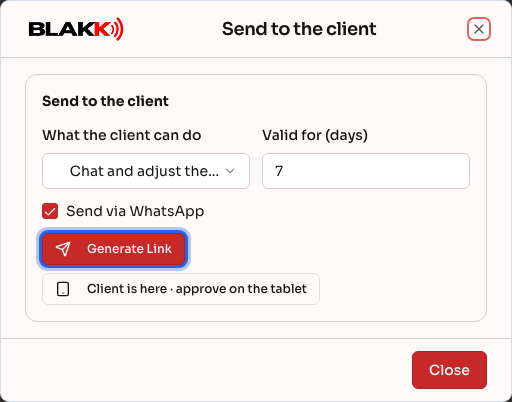
Section titled “Step 9 — Send the design to the client”To send a design to the client at any time, tap Send to the client, choose what they can do (View and approve only or Chat and adjust the design), set an expiration date, and tap Generate Link. The link is sent via WhatsApp and can also be copied. You can revoke a link after sending it. If the client is at the studio, tap Client is here · approve on the tablet to open the approval screen on the device.
Step 10 — The client accepts and pays the deposit
Section titled “Step 10 — The client accepts and pays the deposit”Using the link, the client enters the last 4 digits of their phone number to view the design. The client’s name and work order number appear at the top of the design screen, so you’ll know who sent a screenshot. With only the last 4 digits, the client can only view the design: the conversation and variations appear without Choose, the message field, or adjustments, and Get code appears instead. To chat with the agent, choose a variation, make adjustments, approve, accept, and pay, the client must verify their phone number with a code sent on WhatsApp. In the quote, they review the terms, sign on the screen, and tap Accept and sign. The signature is saved with the same verification details as the medical intake form: date, IP address, device, and browser.
After the client accepts, the deposit is reserved in a project in the work order:
- With an active Digital Account: The client pays using a Pix generated on the spot, and the payment is automatically added to the project. If the Pix expires, the client taps Generate Pix to generate a new one.
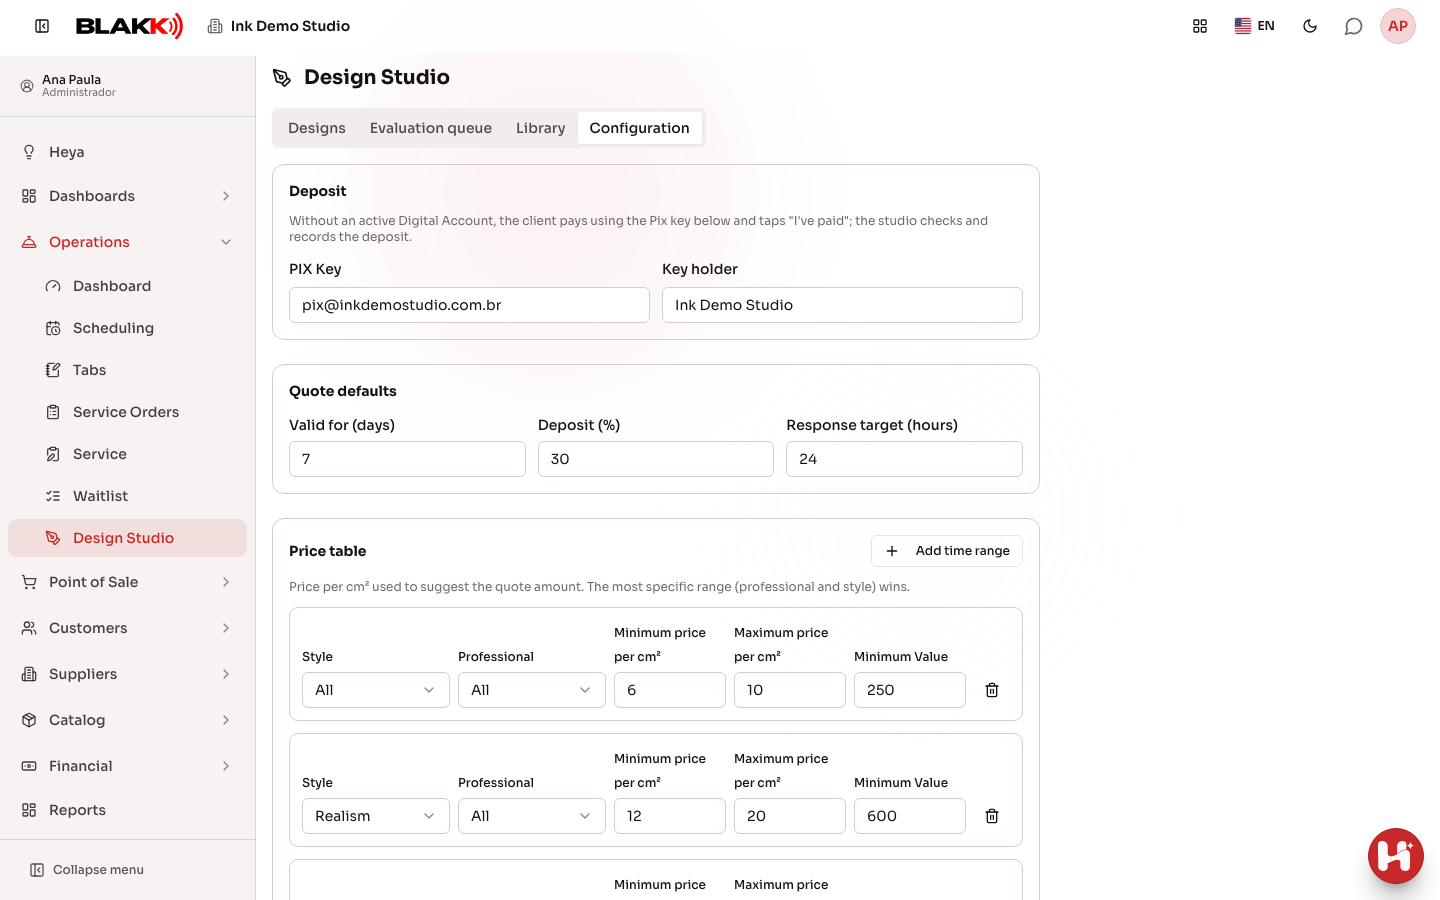
- Without a Digital Account: The client pays using the studio’s Pix key and taps I’ve paid. At the studio, tap Record deposit in the Quote tab.
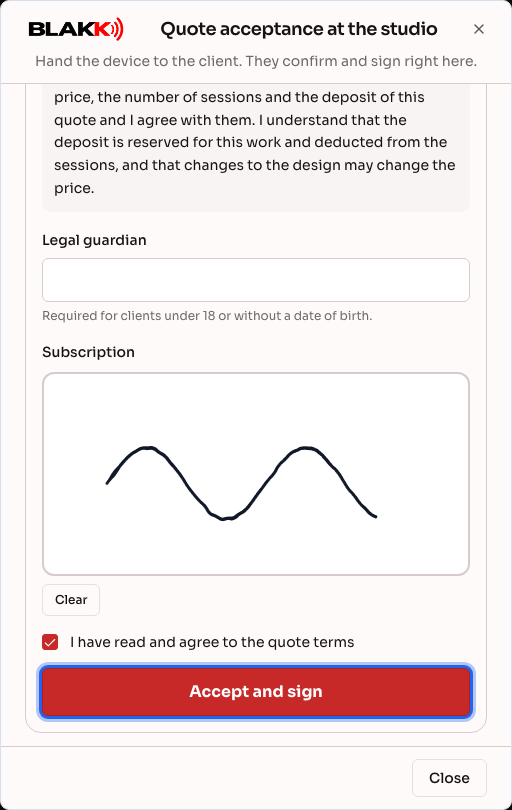
If the client is at the studio, tap Client is here · accept on the tablet in the Quote tab. The same acceptance screen opens on the studio device with the terms and signature. Clients under 18 always accept this way, with their legal guardian’s name.
Step 10.1 — Print the stencil
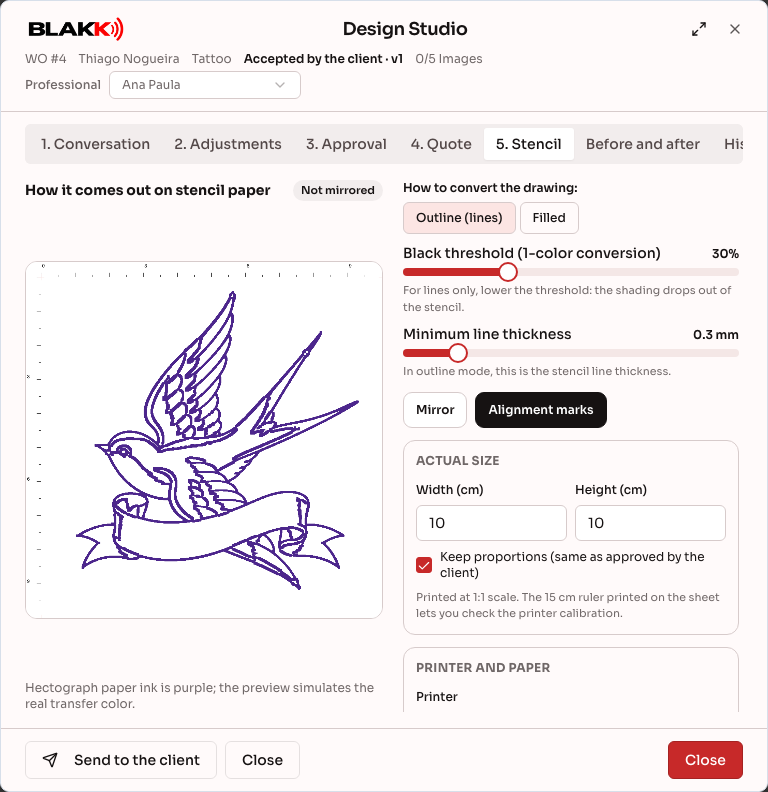
Section titled “Step 10.1 — Print the stencil”Once the quote is accepted, open the Stencil tab. The preview shows how the design will look on the paper in the purple transfer color, and the entire design fits on the screen.
Under How to convert the drawing:, choose Outline (lines) to print just the design’s lines, without filling in the black areas. Choose Filled to print the black areas as solid fills, as in a blackwork design. For outlines, Minimum line thickness controls the line thickness.
Black threshold (1-color conversion) ranges from 0% to 100%. The lower the setting, the less shading is included. To keep only the lines in a black-and-gray design, set it between 20% and 30%. Then check the actual size (the size approved by the client is filled in), choose the printer and paper, and tap Print stencil or Download PDF.
Print at actual size (100%), without fitting the design to the page. Use the 15 cm ruler printed on the sheet to check the size. Designs larger than the sheet are printed in sections, with a 1 cm overlap and alignment marks. Each print is recorded in the work order.
Step 10.2 — Build the style library
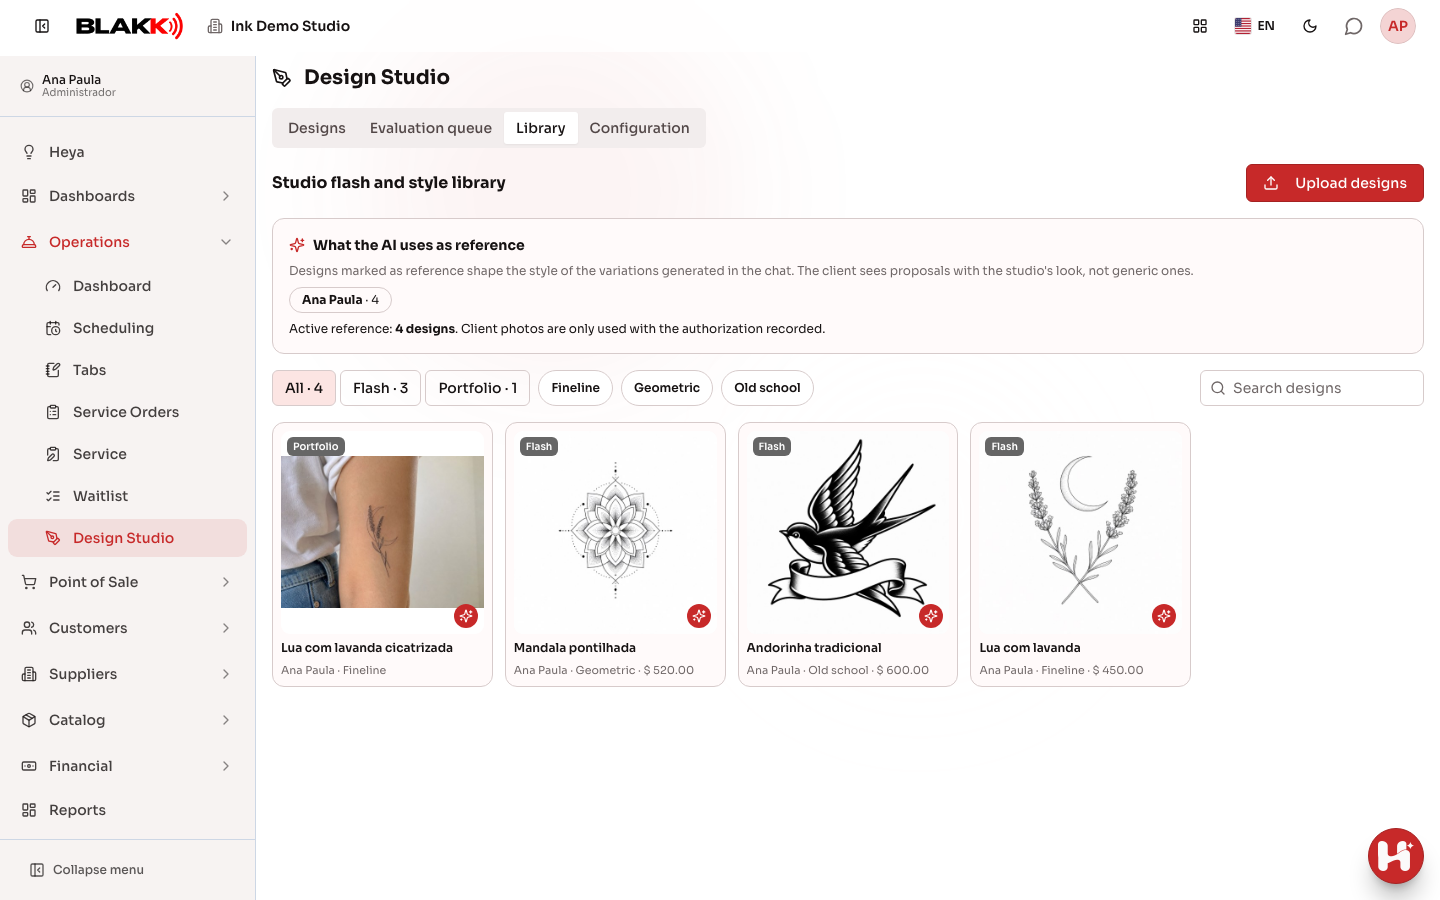
Section titled “Step 10.2 — Build the style library”In Design Studio’s Library tab, tap Upload designs and choose up to 10 images at a time. Specify whether each image is Flash (a ready-made design) or Portfolio (a photo of completed work), and select the professional. Tap a design to edit its name, style, price, and size, and to mark it as Exclusive (sold only once).
Designs marked Use as AI style reference are sent to the agent as examples of the studio’s style, so chat variations reflect the studio’s look. The agent uses designs from the professional assigned to the design first, followed by designs from the studio. Flash designs are automatically used as references. A portfolio photo is only used after you select I have the client’s authorization to use this photo.
In the conversation, Choose a studio flash displays the available flash designs. When a client chooses one, it becomes a design variation right away, without generating an image or using any AI quota. An exclusive flash is removed from the list when a client approves a design created with it.
Step 10.3 — Post before-and-after photos
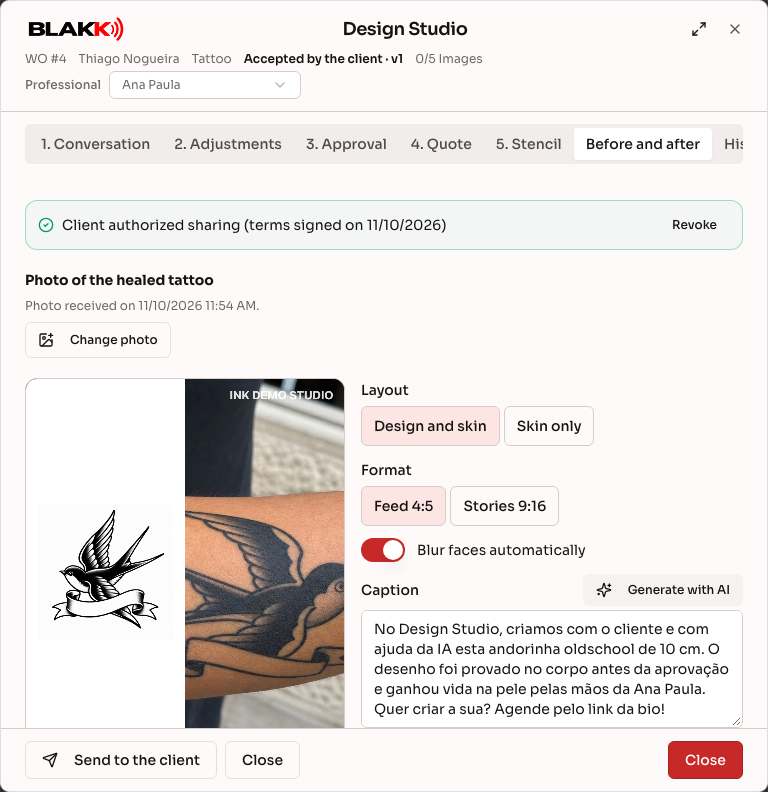
Section titled “Step 10.3 — Post before-and-after photos”After approval, the Before and after tab combines the approved design and a photo of the healed tattoo in a layout ready to post on social media. Nothing is posted without the client’s authorization. They can authorize sharing through the design link in the Sharing tab, or on the studio tablet by tapping Client signs on the tablet and signing the release on the screen. Minors can only authorize sharing at the studio with a legal guardian. Authorization can be revoked at any time: scheduled posts are canceled, and the before-and-after is removed from the portfolio. The studio must remove any posts that have already been published directly from the social media platform.
Thirty days after the last session, the client receives a WhatsApp message asking for a healed photo (and authorization, if they haven’t provided it yet). The photo appears in the tab; the studio can also upload one using Upload healed photo.
Choose the layout (Design and skin or Skin only) and format (Feed 4:5 or Stories 9:16). When Blur faces automatically is on, faces in the photo are blurred on the device, and the studio’s branding appears in the corner. If the device can’t detect any faces, or if blur is turned off, you must confirm that you’ve reviewed the photo before it can be posted. Tap Generate with AI to have the agent write a caption and hashtags, then review them. Select the Instagram accounts and, if you like, Studio portfolio (Library). Choose Now or Choose date and time (Best time is based on Marketing), then tap Schedule post. The post is added to the Marketing queue, which you can view by tapping See post queue.
You need Marketing post permissions and active social media accounts for your business to post on social media.
Step 10.4 — Close, complete, or resume a design
Section titled “Step 10.4 — Close, complete, or resume a design”After the client accepts the quote, the Close button appears at the bottom of Design Studio (on a phone, in the ⋮ menu). You can use it at any stage after acceptance: after the quote is accepted, a stencil is generated, or a session is scheduled. Before the client accepts, use Decline to close the design.
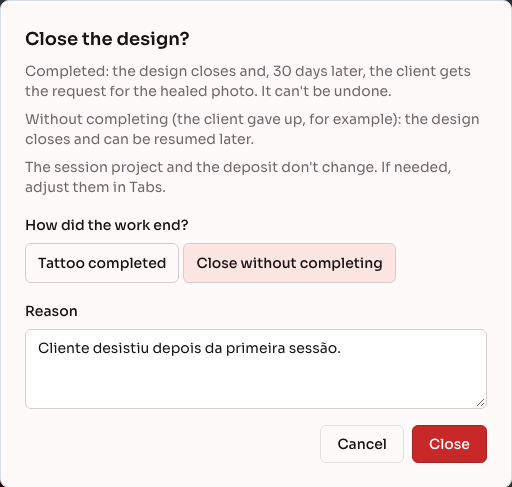
Under How did the work end?, choose:
- Tattoo completed: The design is marked as complete, and the client receives a request for a healed photo 30 days later. This can’t be undone.
- Close without completing: Use this if the client changes their mind midway through the process, such as after the first of three sessions. Add a reason if you like. The design moves to Closed and shows how far the work got. The client sees that the design is closed when they open the link and can no longer pay the deposit there.
Closing the design doesn’t affect the session project or deposit: any payments already made stay in the project. If you need to cancel the project or refund the deposit, do it in Work Orders. An exclusive flash design returns to the available designs.
To continue a closed design, open it and tap Resume. It returns to the stage where it stopped, without creating a new version. If the session project was canceled or completed in Work Orders, reopen the project there first. If another client bought the design’s exclusive flash in the meantime, you can’t resume the design.
Step 11 — Set up quotes
Section titled “Step 11 — Set up quotes”In Design Studio’s Configuration tab, add Stencil printers (each with its own paper and mirror setting), the Pix key used without a Digital Account, the quote expiration period and default deposit, the review queue’s response-time target, and the price-per-cm² table (by style and professional). The most specific price range takes precedence.
For piercings, add Piercing placements (each with the piercing service, tissue, healing time, and initial jewelry) and Piercing jewelry, each linked to an inventory item. Jewelry marked Only after healing can’t be selected for the piercing.
Under Flash for sale, Publish flash on the studio site displays the flash on the studio website at a fixed price and gives the client a shortcut to choose it in the conversation. Let the client ask for variations of a flash determines whether clients can request changes to a flash they’ve selected or must use it as is.
What happens next
Section titled “What happens next”The approved design is saved to the client’s work order, and the work order status follows the design’s status: “Design in progress,” “Awaiting review,” quote sent, accepted, and so on. When the client accepts, a session project is created with the price, number of sessions, and deposit. From then on, sessions and payments are managed through the work order. You can’t manually change this status from the Work Orders screen. While the client is still creating the design, the work order appears only in Design Studio, not in the Work Orders list.
If you need to change something after approval, tap Reopen for changes. A new draft version is created, while the approved version stays in the history. To close a design before acceptance, use Decline. After acceptance, use Close (Step 10.4).
Common mistakes and questions
Section titled “Common mistakes and questions”Q: Can a client change the design after approving it? A: No. Approval locks the design. Only the studio can reopen it, which creates a new version for the client to adjust and approve again.
Q: Why can’t a minor approve a design? A: Clients under 18, and clients who haven’t provided their date of birth, must approve designs at the studio with a legal guardian. They can still use the link to chat and view variations.
Q: The AI stopped generating images. What happened? A: Each design has an image limit, and each business has a daily limit. Images also use your plan’s AI quota. The conversation tells you which limit was reached.
Q: A variation showed an error. Did I lose a credit? A: No. Failed images don’t count toward the limit. Tap Try again on the variation.
Q: The client opened the link but can’t chat or choose a variation. A: With only the last 4 digits of their phone number, the client can only view the design. To chat and choose a variation, they tap Get code and confirm the code sent to them on WhatsApp. If they’re taken back to the identification screen, their session has expired. They just need to confirm a new code.
Q: The client didn’t receive the code on WhatsApp. A: Check that the phone number includes the country code. If the business’s WhatsApp isn’t available, the page offers to send the code by email.
Q: Does the tattoo appear at actual size on camera? A: It’s approximate. The size is based on an average measurement of the body part and varies a little from person to person. For an exact size, tap Calibrate and use a bank card as a ruler. For the hand, foot, face, and torso, the tattoo doesn’t track the body, so position it with your fingers.
Q: Does the client need to allow camera access? A: Yes, but only for the live preview. If they’d rather not, they can tap I’d rather use a photo. The camera image never leaves the phone.
Q: Do I need to mirror the stencil? A: It depends on the equipment. Stencil thermal printers print normally, so mirroring is off by default. Turn on Mirror by default only for a printer that needs an inverted design, such as when using regular paper and a thermal copier.
Q: The stencil printed smaller or larger than expected. A: Measure the 15 cm ruler printed on the sheet. If it’s off, the print was scaled to fit the page. Print at actual size (100%). To adjust the position on the sheet, use the printer’s X and Y correction settings in Configuration.
Q: Can deposits be paid without a Digital Account? A: Yes. Without an active Digital Account, the client sees the studio’s Pix key and lets you know they’ve paid. The studio verifies the payment and records the deposit in the project.
Q: The quote expired before the client accepted it. What now? A: The design is marked as expired. Reopen it and create a new quote.
Q: The client canceled after paying the deposit. Is the money automatically refunded? A: No. The deposit stays as a credit in the project. Close the design by tapping Close → Close without completing (Step 10.4). If a refund is due, the studio must issue it outside the system.
Q: The client changed their mind midway through the sessions. How do I close the design? A: Tap Close and choose Close without completing. The design moves from “In progress” to Closed. If the client comes back, tap Resume.
Q: Can I delete a design? A: Only if it’s never been approved or quoted (draft, declined, or expired). Tap the trash icon on the card or tap Delete in Design Studio. The conversation, images, previews, and history are permanently removed, along with the work order for the quote if it’s empty. Approved or quoted designs keep the approval record, so they can only be declined—or closed if the quote has already been accepted. You need delete permissions. If you can’t delete a design, ask the studio owner to give you access under Access → Profiles.
Q: Can I delete a design’s work order? A: Not from the Work Orders screen. A design’s work order keeps the conversation and approval history. To close the design, decline it (or tap Close if the quote has already been accepted). If it’s never been approved or quoted, delete the design.